Skyrim:Nightcaller Temple
|
|||
|---|---|---|---|
| # of Zones | 1 | ||
| Clearable | No | ||
| Dungeon | Yes | ||
| Respawn Time | Never (storage is safe) | ||
| Level | Min: 18 | ||
| Occupants | |||
| Orcish Invaders, Vaermina Devotees | |||
| Important Treasure | |||
| Skull of Corruption Mannimarco, King of Worms |
|||
| Console Location Code(s) | |||
| NightcallerTempleExterior01, NightcallerTemple01 | |||
| Region | |||
| The Pale | |||
| Location | |||
| East of Dawnstar | |||
| Special Features | |||
| # of Alchemy Labs | 3 | ||
| # of Arcane Enchanters | 1 | ||

Nightcaller Temple is a small fort on the clifftop overlooking Dawnstar. It contains only one zone, Nightcaller Temple.
Also known as the Tower of Dawn by some locals, the temple is a ruin within a ruin. Originally a military fort that was later abandoned, it was subsequently occupied by worshippers of Vaermina. At some point after these Daedric devotees occupied the tower, an Orc war party attacked, intending to destroy the Skull of Corruption which had inflicted them with terrible nightmares. Unable to fend off the Orcs, and in a last-ditch effort to protect the artifact, the worshippers released the Miasma, a gas that put everyone inside to sleep, and the temple fell into ruin once more.
Speaking to Erandur, a follower of Mara, in the Windpeak Inn in Dawnstar will begin the quest Waking Nightmare to end the locals' nightmares, which focuses on this location and its questionable past. Depending on your choices during the quest, Erandur may relocate to the ruin after its conclusion.
Related Quests[edit]
- Waking Nightmare: Relieve the people of Dawnstar from Vaermina's curse.
Walkthrough[edit]
Exterior[edit]

The entrance is guarded by three leveled creatures. There are several snowberry bushes around the building. It is possible to climb the ruined wall to the right of the entrance, then jump on top of the ruined structure and proceed to the north side, where you will find an unlocked wooden chest. Against the outer western wall of the building is a moonstone ore vein.
Nightcaller Temple[edit]
Shrine Chamber[edit]

The entrance leads directly into the entry hall, where Erandur has established a makeshift shrine of Mara on the left-hand wall. A copy of Trials of St. Alessia is on the table under the shrine. Prior to the start of the related quest, there are two skeevers in this room. A lectern at the back of the room holds three common books, with a novice-locked chest against the wall behind it. You are unable to explore past this first room until you start the related quest.
Inner Sanctum[edit]
There is a strange, almost mechanical noise coming from the back of the entrance hall, near the large central wall carving. After Erandur unlocks the carving during the related quest, it will become a shadowy curtain leading into the tower. In the middle of the tower lies the Skull of Corruption, a powerful Daedric artifact which feeds on the dreams of its victims. The ruins haven't been entered in a long time, judging from the dust and cobwebs. There are many crates and barrels found within the ruins, as well as many Orcish invaders and Vaermina devotees. The number of invaders and devotees that revive depends on your level; any that do will be immediately hostile to both you and Erandur.
When you first enter with Erandur, he will lead you to the right until you can look through some grating down upon the Skull of Corruption. You can also see the magical barrier blocking access to the artifact and most of the ruins. Opposite the grating is a locked wooden door that requires a key to open. Descend the stairs as they curve around until you reach the barrier. There are two invaders at the bottom of the stairs, and a raised wooden grate blocking a passage to the northwest.
Library[edit]
After a brief conversation with Erandur, he will lead you back upstairs to the locked wooden door, which he will now unlock. Through the door is a short passage leading to the library, where you will find an invader and a devotee upstairs, and two more devotees and another invader downstairs. After any of these opponents that revive have been dealt with, Erandur will instruct you to find The Dreamstride, a book that contains the information needed to pass the magical barrier. Most of the books in the library have been burnt and are worthless; however, in addition to the book you are looking for, the following can also be found: 16 Accords of Madness, v. VI, Biography of Barenziah, v2, Feyfolken II, On Oblivion, The Book of Daedra, The Firmament, and Varieties of Daedra. Downstairs, against the northeast wall, is a wooden door with an expert-locked chest behind it. Once you return to Erandur with the book, he will lead you along a passage to the northwest toward a laboratory, where he hopes to find a potion known as Vaermina's Torpor. This concoction will enable you to enter the Dreamstride state and pass the magical barrier.
Laboratory[edit]
The passage leads into a storeroom that contains an invader and a devotee, as well as numerous unusable barrels, sacks of foodstuffs, and two sets of shelves holding a total of six bottles of Nord mead, two bottles of alto wine, nine bottles of wine, and three empty wine bottles. Against the northeast wall is a small shelving unit holding a nightshade flower, a chaurus egg, and a bulb of garlic. Beside this unit is a barrel containing ingredients. On the floor are two large pieces of charcoal, a piece of leather, and a leather strip. In the western corner is a passage into the laboratory. Here you will find two devotees and an invader on the left, and a further devotee and invader on a lower level. Once they are taken care of, Erandur will explain what the Torpor potion looks like.
In this room are a total of three alchemy labs, with three counters, two broken tables, one small round table, and many sets of shelves all the way around the lower part of the room. The items found in the room are:
1 Blue Butterfly Wing, 4 Butterfly Wing, 1 Canis Root, 1 Chaurus Eggs, 2 Daedra Heart, 1 Dragon's Tongue, 5 Elves Ear (three hanging dried and two loose samples), 2 Falmer Ear, 3 Fire Salts, 2 Frost Mirriam (both hanging dried), 1 Garlic (hanging braid), 2 Giant's Toe, 1 Glow Dust, 3 Hagraven Feathers, 3 Ice Wraith Teeth, 1 Jazbay Grapes, 4 Luna Moth Wing, 2 Nightshade, 4 Nordic Barnacle, 1 Rock Warbler Egg, 1 Salt Pile, 4 Scaly Pholiota, 4 Skeever Tail, 2 Slaughterfish Scales, 2 Taproot, 2 Troll Fat, 4 Tundra Cotton, 2 Vampire Dust, 1 Void Salts.
1 Random Potion of Healing, 2 Potion of Minor Healing, 2 Potion of Minor Magicka, 3 Potion of Minor Stamina, 1 Potion of Resist Fire, 4 Potion of Resist Shock, 1 Vaermina's Torpor.
7 Alto Wine, 1 Carrot, 1 Dog Meat, 1 Horker Meat, 2 Nord Mead, 6 Wine.
2 Apothecary's Satchel, a copy of the Alchemy skill book Mannimarco, King of Worms, a copy of The Book of Daedra.
To the southeast from the lower level is a wide passage. On your immediate right, on the ground is a large coin purse. The passage leads to the wooden grate that was blocking access to/from the main passage next to the magical barrier. On the left is a handle that lowers it. Once you return to Erandur with the Torpor potion, he will instruct you to drink it.
Inner Sanctum Revisited[edit]

Drinking the potion will cause you to enter the Dreamstride state, in which you will have to navigate the temple to re-enact the scene when the Miasma was originally released and the magical barrier was created. Once you have done this, you will be able to take the random soul gem that is maintaining the barrier, thus removing the barrier and allowing access to the rest of the ruin. You will then need to battle alongside Erandur back through the rooms and passages you traveled in the Dreamstride state in order to reach the Skull of Corruption. The path is completely linear, with more encounters with devotees and invaders as you proceed.
Passage to Sleeping Quarters[edit]
You will pass a raised alcove on your right that contains a wooden table, with an arcane enchanter built into it. On the table is a leveled potion of healing, a leveled potion of magicka, a random potion, and two random soul gems. Against the south wall is an unlocked chest. Shortly past this area, an alcove on the left has a tall wardrobe containing clothes. Next is a set of shelves on the right holding two bottles of wine and two empty wine bottles. The passage then turns north, and ends with a wooden door on your right.
Sleeping Quarters[edit]

Through this door is a dormitory with four single unowned beds and two dressers, one of which has a set of Vaermina robes on top. Against the east wall is an unlocked chest. On the left, a flight of stairs leads down to nine more unowned single beds. Also in this area are two dressers containing a mix of common and fine clothes, a cupboard containing clutter, another set of Vaermina robes and a pair of boots on the floor, and piles of food sacks in the corners. Beside the stairs is an adept-locked chest, with a long wooden table next to it holding a leveled potion of healing, a leveled potion of magicka, an iron dagger, a small coin purse, and three loose septims.
To the west near the chest and table is a narrow passage leading to a dining room, which features five long wooden tables and benches holding a total of six bottles of alto wine. Around the room are several sets of shelves and sideboards holding another seven bottles of alto wine, six bottles of wine, a random helmet, two random potions of healing, and one random potion of stamina. From here the passage continues to the north then west, passing on the left a small shelving unit holding two soul gem fragments, two bottles of alto wine, and a bottle of Nord mead.
Inner Sanctum Finale[edit]

At the end, a wooden door opens into a room with a flight of stairs at the far end leading up to the Skull of Corruption. When you first enter, a cutscene will play where Erandur is greeted as "Brother Casimir" by two Vaermina devotees, Veren Duleri and Thorek (the two devotees who were conversing at the start of your Dreamstride), revealing Erandur to be the person who initially released the Miasma and whose memory you used to travel past the magical barrier. Apart from the Skull of Corruption, the room contains an unlocked chest to the right of the platform where the staff is held, as well as two small shelving units holding two bottles of Nord mead among several empty wine bottles.
Notes[edit]
- You cannot take a follower into the fort with you. If you are traveling with one, they will stand by the entrance and wait for your return.
- Many internal markers refer to this place as Syncope Sanctuary, indicating an early name.
- An unused key called Syncope Sanctuary can also be found in the game files, though it's unobtainable by normal means and doesn't open anything.
- Unused location data for a location known as Tower of Dawn can also be found in the game files. This name is otherwise only ever used in a Dawnstar-specific loading screen which states: "The Tower of Dawn sits on a mountain overlooking Dawnstar. It is rumored to be cursed." It is assumed the Tower of Dawn was either another early name for Nightcaller Temple, or they are one and the same.
Maps[edit]
-
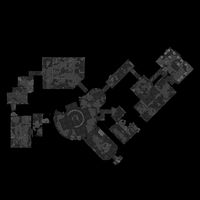
Nightcaller Temple
