Skyrim:Soul Cairn
|
||
|---|---|---|
| Added by | Dawnguard | |
| # of Zones | 2 | |
| Respawn Time | 10 days | |
| Level | Min: 13 | |
| Occupants | ||
| Bonemen, Durnehviir, Keepers, Mistmen, Reaper, Wrathmen | ||
| Important Treasure | ||
| Elder Scroll (Blood) Locket of Saint Jiub Saint Jiub's Opus Spell Tome: Conjure Boneman Spell Tome: Conjure Mistman Spell Tome: Conjure Wrathman |
||
| Console Location Code(s) | ||
| DLC01SoulCairnOrigin
More Location Codes
DLC01SoulCairnBoneyardEntrance, DLC01SoulCairnCemetaryKeeper, DLC01SoulCairnCemetaryKeeper01, DLC01SoulCairnCemetaryKeeperStart, DLC01SoulCairnCraterKeeper, DLC01SoulCairnCraterKeeperStart, DLC01SoulCairnDragonLair, DLC01SoulCairnForestKeeper, SoulCairnHorseQuest, SoulCairnHorseQuest02, SoulCairnHuskMerchant, SoulCairnOffShoot, SoulCairnPOI01, SoulCairnPOI03, SoulCairnPOI04, SoulCairnPOI05, SoulCairnPOI06, SoulCairnPOI08, SoulCairnPOI09, SoulCairnPOIJiub, SoulCairnPOIMaze, SoulCairnPOIRJ02, SoulCairnPOIRJ05, SoulCairnPOIRJ06, SoulCairnPOIRJ07, SoulCairnPOIRJ08, SoulCairnPOIRJ09, SoulCairnPOIRJ10, SoulCairnStartAmbush, SoulCairnTest, SoulCairnTest2, SoulCairnTome01, SoulCairnTome02, SoulCairnTome03, SoulCairnWall01, SoulCairnWallPOI01
|
||
| Special Features | ||
| # of Alchemy Labs | 1 | |

The Soul Cairn is a plane of Oblivion haunted by lost souls.
Your first visit to the Soul Cairn will be with Serana during the Dawnguard main quest. When Serana adds her blood to the other ingredients in the portal vessel in Valerica's study, the stone circles on the lower level split open, rising up and spinning around to form a curved staircase leading down from the balcony to the portal. If you are not a vampire or vampire lord, you will need to have part of your soul trapped by Serana. If you choose to have Serana soul trap you, Valerica will tell you to find the soul essence gem. After you do, your soul trapped state will be undone, and all your stats will return to normal. Finding it before meeting her will also work.
The Soul Cairn is primarily inhabited by souls, wandering non-hostile spirits that were sent here because they were soul trapped before being killed. Interacting with these spirits, they will usually comment on how lost or confused they are or how desolate or horrible the Soul Cairn is. When a black soul gem is used, the soul it contained goes here.
For more information on the Soul Cairn, see the lore article.
Residents[edit]
|
† She will relocate to her study once she is advised of Lord Harkon's death.
Related Quests[edit]
- Chasing Echoes: Explore Castle Volkihar.
- Beyond Death: Search for Valerica in the Soul Cairn.
- Durnehviir: Learn a dragon shout from Durnehviir.
- Impatience of a Saint: Collect the ten missing pages of Saint Jiub's Opus.
- Soul Cairn Horse Quest: Find Arvak's skull.
Areas of Interest[edit]
- Boneyard — An enclosed graveyard in the Soul Cairn.
- Reaper's Lair — An enclosed ruin in the Soul Cairn.
Characteristics of the Soul Cairn[edit]

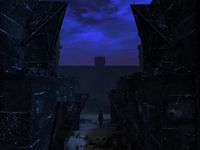
The Soul Cairn is roughly shaped like a figure 8 when viewed from the entrance stairs. It is oriented with the stairs toward the southwest and the Boneyard entrance to the northeast. There are two massive walls in the Soul Cairn. One wall divides the figure 8 closer to the side with the entrance stairs, with one gap roughly in the center. The second wall surrounds the Boneyard, separating it from the Soul Cairn.
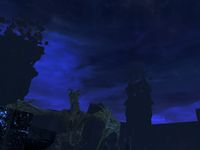
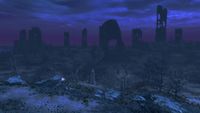
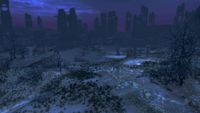
Once you arrive, you can see the stairs from the portal ascending to a hole in the sky surrounded by darkness. The sky within the Soul Cairn ranges in color from blue to black and purple. There are many black structures throughout this plane of Oblivion, including many seen beyond the boundary of the area, which is clearly defined as a shimmering blue magical barrier (see bugs).
The landscape is completely alien. Scattered throughout the Soul Cairn are black skeletal trees and bushes (with soul husks being the only plant in the plane that can be harvested), upright black stones similar to very large gravestones, and the bones and skulls of dragons. If you look straight up at the sky, you will see what appears to be a giant black hole.
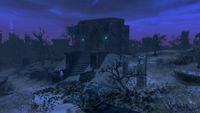
There are many structures scattered throughout the Soul Cairn. Some of these are buildings containing a chest, typically guarded by hostile creatures. The entrances to some of these structures are blocked by bars. Pairs of standing stones with glowing bluish-green balls near the top are located near these buildings. Hitting the orbs with ranged spells or bow shots will lower the bars, granting access to the interior.

You will also find well-like structures dotting the landscape. Most of these emit a purplish-white glow from the top, similar to the focus points in and around the College of Winterhold. Standing in these causes your health to regenerate. There are smaller wells that do not glow; jumping into these will teleport you to a nearby, previously inaccessible area.
Yet another type of structure you'll come across is the lightning attractor, which is activated by placing a grand or greater soul gem into a holder, which will then cause lightning to strike the rod, turning the soul gem into an empty black soul gem. Using these lightning rods will summon several hostile creatures.
Flora and Fauna[edit]
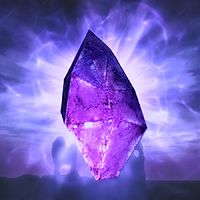
The flora here is unlike anything you've encountered in Tamriel. Soul husks are the strange clusters of sand-colored and sand-textured cones sticking up from the ground. They can be used to counter the effects of Ideal Master Crystals, the giant floating health-draining gems that may be found at the top of the various structures within the Soul Cairn. Soul husks are also the only currency used when trading with the spectral merchant, Morven Stroud, for various enchanted items and spell tomes.
Soul fissures are another common feature of the Soul Cairn; they are cracks in the ground with air rising visibly out of them, which causes them to emit a hissing noise. When you activate a soul fissure, it will fill the largest soul gem in your inventory, filling black soul gems first.
While traversing the Soul Cairn, you will be attacked by bonemen, wrathmen, and mistmen. There are also a few unique creatures to be found here: the cursed dragon Durnehviir, three keepers who maintain a barrier around the Boneyard, and the Reaper.
- Bonemen
- Bonemen look like blue-black skeletons. Once defeated, they collapse like normal skeletons, but then their remains become soul embers, which are translucent black puddles similar in shape to a defeated ice wraith's remains. They typically carry ancient Nord weapons, which can be looted along with soul gems, various alchemical ingredients, gems, jewelry, and soul husks. They are the most common of the creatures found within the Soul Cairn.
- Wrathmen
- Wrathmen appear similar to ghostly draugr, and typically carry random two-handed melee weapons. Their remains also turn to soul embers after dying. Their weapons, but not their armor, can be looted along with similar minor loot to bonemen.
- Mistmen
- Mistmen appear similar to the corrupted shades found in Kilkreath Ruins, and seem to favor magic as their main form of attack, although they will pick up dropped weapons. Their remains also turn to soul embers after dying, and they carry similar minor loot to bonemen.
- Keepers
- The keepers are tall, armored foes with black, smoky heads, armed with dragonbone weapons and carrying black soul gems. Their weapons, but not their armor, can be looted if your level is 45 or higher. When defeated, their bodies dissolve into ghostly remains, the same as the various guardian spirits faced during Kyne's Sacred Trials.
Walkthrough[edit]
Objective: Beyond Death:[edit]
The portal takes you to the southwestern edge of the Soul Cairn. There is a path heading north away from you. You can either choose to locate Valerica immediately, by following the path in front of you to the entrance to the Boneyard, or explore the Soul Cairn first and locate Valerica once you have defeated the three keepers. The keepers are found by the tallest, most ornate towers in the Soul Cairn, and are siphoning power from lost souls to maintain the barrier surrounding the Boneyard. Once they have been defeated, the barrier surrounding the Boneyard will fall, enabling you to enter the Boneyard and obtain the Elder Scroll located there.
Southwest Corner of the Map: Near the Portal[edit]
There are several soul husks around the bottom of the stairs from the portal. By following the path north for a short distance, you will see a square black building on the right. There are stairs leading up to a doorway blocked by bars. To the left, on the ground, are a hunting bow and a quiver of iron arrows. On either side of the doorway, you'll see standing stones with glowing orbs near the top. Shooting both of these with arrows or ranged spells will lower the bars, allowing you to access the interior. Inside is a chest containing a soul gem or two, while a random enchanted steel dagger, page 8 of Jiub's Opus, and a random soul gem lie on the ground in front of it. A second soul gem is in a stand on the right.
Continuing along the road to the north, you will see another building a short way off to the right of the path. As you approach, you will be attacked by several bonemen, with some outside and others inside the building. There are open doorways to the interior on each side of the building, and several healing wells around the outside. Stepping into the small well just outside the building's northern entrance will teleport you to the roof of the building, where you will find a chest, with a copy of The Book of Life and Service and a random soul gem in front of it. You may safely return to the ground by carefully jumping onto the lower roof of the structure from the southern corner of the roof. Inside the building, there is a chest in the western corner, with a medium coin purse, a random soul gem, and page 6 of Jiub's Opus on the ground in front of it.
Continuing along the path, the path passes through a gap in a tall black stone wall, with a flight of stairs leading up to the gap.‡ A healing well lies to the left, and beyond that to the west is a stone courtyard, with a building built into the wall. Inside the building is a chest containing quality loot. There is a wide exit on the far side of the room to the northwest. Upon exiting through that doorway, four bonemen will rise from the ground: two immediately in front of you, and two on another smaller structure ahead. Once they are dealt with, you can climb the stairs on the side of the structure ahead to find a chest filled with quality loot, with page 3 of Jiub's Opus and a copper and sapphire circlet on the ground in front of it. However, take care not to linger, as an Ideal Master Crystal hangs in the sky above the chest.
This structure is bisected by the barrier surrounding the Soul Cairn. There are two large healing wells beside the structure, but nothing else of interest is in the immediate area. Passing back through the building built into the wall, you have the choice of exploring the rest of this side of the great wall before passing through the gap, or heading straight for Valerica.

Continuing your exploration, there is a path heading west. Following it will enable you to explore the left-hand side of the original path. There are several soul fissures for you to collect, as well as healing wells. When you arrive back at the stairs to the portal, you can cross and start exploring the other side, which is far larger.
There is a building east-southeast of the portal steps, with two random soul gems inside on the ground level on a stack of squared-off stones. A teleport well lies a few paces outside the building to the northeast. The well will transport you to the roof of the building, where you will be attacked by boneman and wrathman guarding a chest. You may safely return to ground level by jumping from the western corner of the roof.
Northwest of the teleport well, you'll see the spine of a dragon sticking out of the ground, with a human skull on top of it. In front of this gruesome totem stands a soul gem pedestal holding a black soul gem. Approaching will cause three bonemen to emerge from the ground and attack. A few steps south of the teleport well lie the skeletal remains of another dragon, with a human skeleton in its ribcage. There are ancient Nord gauntlets and a steel sword of shocks inside the dragon's remains.
Near the southeastern corner of the Soul Cairn, a distance due east of the previous teleport well building, is a large structure with an interior courtyard where two soul husks grow. There is only one narrow doorway in or out, with several flights of stairs leading up from the courtyard to the top of the structure opposite a tower. If you are facing the tower, there are stairs on your left which descend to a lower roof. You can either use the Whirlwind Sprint dragon shout or descend the stairs, follow the roof along, and then climb another flight at the far end to reach the tower. At the top of the tower is an Ideal Master Crystal floating above another chest of quality loot.
A discernible path heading north from the doorway to the courtyard leads to a paved section with a lightning attractor beside a chest. Some skeletal remains and a soul gem are on the ground in front of the chest. Using the lightning attractor causes some bonemen and wrathmen to rise from bone piles around it.
Middle of the Map: Between the Boneyard and the Portal[edit]

Head toward the gap in the great wall. A short distance before reaching it, there are stairs off to the east leading up to the rear of the wall, with a window that looks through to the other side. The window is flanked by flagpoles, and there is a soul standing beside it. Additionally, the stones at the base of the flagpoles hold page 1 of Jiub's Opus, a random poison, a copy of The Book of Life and Service, and a random filled soul gem. You can see a chest (which contains minor loot) through the window on the other side of the wall. To reach the chest, you need to pass through the gap in the wall and immediately turn east, then follow the wall until you reach a short flight of stairs leading up to the alcove containing the chest.
North of this chest, you will find Morven Stroud, a merchant from High Rock who wound up here after he double-crossed some necromancers. He arrived with his horse and cart, and is the only merchant within the Soul Cairn. He is willing to trade 25 soul husks for any single random item. You can choose between a sword, a battleaxe, a piece of light armor, a piece of heavy armor, or a spell tome. He has an unlimited supply of each option, so if you're after a specific enchantment, save and reload before speaking to him.
Morven can be found standing or sitting near his wagon; his skeleton is lying sprawled across the wagon seat, and can be freely looted for a few coins. Some unusable barrels are at the wagon's rear, with page 10 of Jiub's Opus sitting atop one of them.
A large building with a doorway blocked by bars lies immediately behind Morven. The orbs you need to shoot are on either side of you when facing the blocked doorway. The orb on the left is on top of the building. Inside the building, you'll find a chest containing minor loot. A few paces to the southwest of Morven Stroud is a flight of stairs leading up to a teleport well, which takes you to the pinnacle of the same building. Dropping from the northern corner leads to a flat section of roof, where you'll find another chest containing minor loot (you will only suffer minor damage from the fall).
Southeast Corner of the Map: Near the Reaper's Lair[edit]
The First Keeper and Conjure Wrathman Spell Tome[edit]
Following the main wall and barrier to the east leads to several structures. The first is a small many-arched structure containing nothing of interest. The second structure just beyond the first is a tall, ornate tower, with broken masonry spinning around its top, and what seems to be many souls congregating around a tall, armored figure at its base. This is one of the keepers. As you approach, up to four wrathmen will rise and attack. Once they are defeated, you will face the keeper, who carries a dragonbone battleaxe. During the fight, the souls that the keeper was draining will vanish.

A few paces farther east lies another structure, with four pillars supporting it. Beneath the structure, you'll find a typical shrine base holding the Spell Tome: Conjure Wrathman. Upon approaching the spell tome, some wrathmen will attack. There is a path to the east of this structure; follow it to find the Reaper's Lair. On the east side of this building, you will find a skeleton leaning against a large rock, with a random enchanted greatsword and an ancient Nord helmet lying beside it. There is also a note next to the skeleton, which suggests this was an accomplished adventurer who willingly entered the portal against someone's advice. More wrathmen will rise as you approach the skeleton.
Reaper's Lair and a Reaper Gem Fragment[edit]
The Reaper's Lair is the only building with a door within the Soul Cairn. To correctly call forth the reaper and its minions, you will normally need to collect three reaper gem fragments, although it is also possible to do this using fire runes (see notes). Full details for the lair are found on the relevant page.
Heading north from the Reaper's Lair, you'll come to a large paved area with several structures and flights of stairs that lead up to a lightning attractor. Using it will cause some bonemen, wrathmen, and mistmen to attack. Head northwest, passing the spiked roof of a building, to another paved area with a well in the middle. As you approach, bonemen will attack you. Beside the well is a skull, a random shield, a random enchanted dagger, page 5 of Jiub's Opus, a random poison, and three empty random soul gems.
Objective: Impatience of a Saint:[edit]
North of the well, you will encounter Jiub sitting beside or walking around an extinguished campfire while muttering to himself. He was a Dunmer adventurer from Morrowind, and was killed by Dremora in Kvatch during the Oblivion Crisis. You can speak to him to learn more about him, and offer your services to help him find ten pages of his notes so he may write the second volume of his autobiography. This will initiate the quest Impatience of a Saint. Once you've collected all ten pages of his book, you will be able to see the details in Jiub's form far more clearly. He will be overjoyed, and will reward you with a unique book, Saint Jiub's Opus, as well as the locket of Saint Jiub.
To the west is a large structure, with a path leading around behind a wall. As you approach, several bonemen, wrathmen, and mistmen will all attack. A well is in the northern corner of the structure. Nearby, along the northeast wall, a random enchanted steel war axe is on the same raised section of paved ground as the well.

The entrance to yet another structure is nearby to the southwest.† Enter the structure and look to your right for a teleport well that takes you to the roof. There is an Ideal Master Crystal hanging above a chest, which contains one of the reaper gem fragments in addition to quality loot. There is a second, lower level to the southwest, featuring at the far southwest end another chest of minor loot with a sack of soul husks beside it.
Northeast Corner of the Map[edit]
Conjure Mistman Spell Tome[edit]
From the location of Arvak's skull, continue northeast to find another tower with a teleport well inside. As you approach, some bonemen, wrathmen, and mistmen will attack you from the roof as well as from the ground. You can teleport directly to the roof and then fight your way back down. Two flights of stairs down from the top, on the first covered section, is a copy of The Book of Life and Service. On the next level down, you can see part of a long bow; casting any magic at it will cause another boneman to rise.

Back on ground level, another dragon carcass with an enchanted battleaxe and a few orcish arrows lies a couple feet north of the stairs. A few paces farther to the east lies a staircase leading up to a paved section, where you'll find a plinth holding the Spell Tome: Conjure Mistman. There is a medium coin purse, an empty random soul gem, and page 7 of Jiub's Opus on the ground at the base of the shrine. You will summon several angry mistmen upon approaching the spell tome.
The Second Keeper and a Reaper Gem Fragment[edit]
North-northwest of the shrine is a teleport well with three pillars around it and two healing wells beside it, all underneath a floating island. Entering the teleport well transports you to a structure on top of the island. Following the path around the structure counter-clockwise as you climb, you will pass several souls before reaching a keeper armed with a dragonbone bow. Behind the keeper is another teleport well, which returns you to the ground beside the first well. Head west, and you will soon see another large building with an Ideal Master Crystal floating above it. Inside, a staircase leads all the way to the roof, where a chest containing quality loot (including one of the reaper gem fragments) and a copy of The Book of Life and Service are sitting directly under the crystal.
Heading southwest, up the hill toward the Boneyard, you will see a building situated against the eastern wall, with several flights of stairs leading up to it. At the top of the first flight of stairs, you will see a short, covered passage on your right. There is a chest at the end of the passage, with page 4 of Jiub's Opus and two pieces of silver ore sitting on the ground beside it. As you approach the chest, a mistman will rise from the nearby pile of bones.
A path heading south from this building leads to a healing well surrounded by upright stones. Turning and heading southwest leads past a soul acting as a farmer. The soul is tilling the land where fourteen soul husks are planted, as two cow souls wander freely nearby.
Northwest Corner of the Map[edit]
Conjure Boneman Spell Tome[edit]
Head west from the large complex west of Jiub's camp to find a large raised paved area with stairs leading up to a lightning attractor. Using the attractor will cause some bonemen, wrathmen, and mistmen to rise and attack. From here, head west-northwest through a fairly barren area, and you'll eventually reach a large structure, with two tall pillars of black stonework that mark the beginning of an underpass. The path begins on the southern side of the structure, with several bonemen patrolling the underpass. Inside the building, stairs lead up and counter-clockwise until you reach an Ideal Master Crystal hanging inside the building above a chest containing quality loot.
To the southwest is a paved area where a soul is standing over a lootable skeleton with a large coin purse beside it. There is a building nearby, with stairs leading up to a barred area and an Ideal Master Crystal hanging in the sky above. As you reach the top, several bonemen will rise. One of the orbs that you need to hit to lower the bars is above them; the other is under the pitched roof farthest from the bars, somewhat hidden behind some stacked stone slabs. A chest containing quality loot with a soul sitting beside it lies beyond the barred gate.
To the west, you'll find a plinth sitting on some stonework surrounded by several soul husks. Beside the plinth lies the Spell Tome: Conjure Boneman, two random soul gems, and a sack of soul husks. As you approach, a horde of at least five bonemen will assault you.
The Third Keeper and a Reaper Gem Fragment[edit]
Farther to the west is another large building. As you near it, you will pass under a small arch and ascend a short flight of stairs. On the far side are several bonemen, wrathmen, and mistmen. A keeper is leaning against the wall in front of you, armed with a dragonbone mace.
To the left lies another short flight of stairs leading up to an area blocked by a gate. One of the control orbs is on your right at eye level, and the other is high above the blocked doorway. Shoot these to access an area with another Ideal Master Crystal floating over a chest containing one of the reaper gem fragments and some quality loot. As you approach the chest, some bonemen will attack. Take care, as you may be within range of the Ideal Master Crystal during the fight.
There is a teleport well to the right of the keeper, which takes you to the top of an L-shaped roof section above the well. There is a quality chest at the other end of the roof, and a lightning attractor where the roof turns. Using this will cause some bonemen and wrathmen to rise from the piles of bones on either side of the attractor.
West of the main structure, you'll find a teleport well in a small paved area with many upright stones around it. The well takes you to a raised platform, where a mistman attacks you near a dead traveler's camp. Here, a skeleton lies near an extinguished campfire. Near the campfire, you will find three random potions of healing, magicka, or stamina, a random potion or poison, a scroll of storm thrall, a dragon priest dagger, a random staff, a large coin purse, three soul husks, and a knapsack. Take care when dropping back down to the ground, or use the Become Ethereal shout to avoid damage.

East-northeast of the building containing the keeper is a large, complex structure. The main entrance is on the southern side, which leads into a maze of short dead-end passages where an occasional boneman, wrathman, or mistman guard two chests. There is a sack of soul husks in the corridor near one of the chests, which also has a copy of The Book of Life and Service beside it on the ground. There are two loose soul husks and a daedra heart on a platform to your left near the passage with horizontal bars at either end.
The Soul Essence Gem[edit]
The passages eventually lead to a teleport well with grating above it, which takes you directly above. Stairs lead up to a chest under an Ideal Master Crystal. The chest will be empty if you're a vampire, but will contain the soul essence gem if you had Serana trap part of your soul. Around the far side of the chest is page 9 of Jiub's Opus and a random empty soul gem.
On the west side of the entrance to the Boneyard is a large structure with an inner courtyard accessed by a narrow passage. Inside you will find what looks like a word wall, in front of which lies a typical boss chest, page 2 of Jiub's Opus, a ruby, and a small coin purse. Return to Jiub to complete his quest, then head to the entrance of the Boneyard.
Approaching the entrance to the Boneyard, you will find Valerica, who rushes to her daughter. She has set up an alchemy lab to the left of the Boneyard's entrance, and several books can be found nearby: Immortal Blood, Physicalities of Werewolves, and The Book of Daedra. Three rolls of paper and three soul husks are also beside the alchemy lab. After a conversation between you and Valerica, she will lead the way into the Boneyard.
The Boneyard[edit]
The Boneyard is an enclosed graveyard within the Soul Cairn that is only accessible after defeating the three keepers. Upon entering the Boneyard, you will pass along a narrow passage before it opens into a large courtyard. Surrounding the central courtyard are raised sections, with stairs leading up to healing wells. As soon as you enter, Durnehviir will be flying around in the sky, and bonemen will begin to rise. It is best to concentrate on fighting the dragon, as bonemen will continue to rise to replace their fallen until you defeat Durnehviir, at which point any remaining bonemen will immediately die.
Gallery[edit]
-
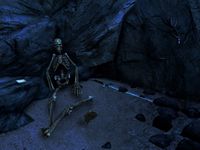
A boneman rising to attack
-
The remains of an unfortunate and foolish adventurer
-
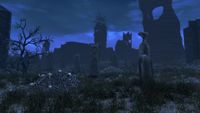
A graveyard
-
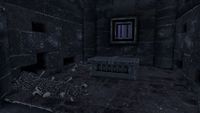
An altar
-
Durnehviir arrives for battle
-
The Blood Elder Scroll
-
An Ideal Master
-
Valerica leads the way into the Boneyard
-
The Soul Cairn
-
The Soul Cairn
-
The Soul Cairn


Notes[edit]
- Serana is the only follower who can enter the Soul Cairn with you.
- If you view the map while in the Soul Cairn, the marker will place you in the Sea of Ghosts, just north of Orphan's Tear.
- All enemies defeated here, except for Durnehviir, will have at least one soul gem in their inventory.
- The bonemen, mistmen, and wrathmen may have soul husks in their inventories, and some of them may also drop ectoplasm, making them the only respawning enemies in the game that drop ectoplasm.
- Once the enemies here are defeated, they cannot be resurrected in any way.
- Soul husks in your inventory are classified as food, not ingredients.
- The rods for the lightning attractors will eventually reset, though the attractors themselves can only be used once.
- A half-buried word wall exists here, though it isn't active.
- As the Soul Cairn is technically outside, it is possible to use the Storm Call shout to summon a storm. The area becomes cloudy, and almost appears as if it's part of Tamriel.
- The Flawed Varla StoneCC and Soul TomatoCC won't be filled if you activate a fissure here.
Bugs[edit]
- In the Special Edition, you may experience significantly reduced framerates while in the Soul Cairn.
 Use the console command
 tgto completely disable grass display while in the Soul Cairn. (Repeat the command to reenable grass, if desired.) You may have to do this multiple times as you explore.
- Killing the enemies in the Soul Cairn might freeze the game if their remains fall between rocks or partially sink below the ground. ?
- The Soul Cairn may be reentered at any time. However, if you first enter as a vampire and are subsequently cured of vampirism, you'll need to become a vampire again in order to reenter.
- The Unofficial Skyrim Special Edition Patch, version 4.1.8, addresses this issue. (details) It enables you to reenter even as a mortal, since Valerica's dialogue implies this to be possible.
- If you turn back into a vampire in Valerica's study, you'll need to exit and reenter the room before you'll be able to reenter the Soul Cairn.
- The Special Edition for Xbox appears to have this bug already fixed.
- Sometimes after defeating Durnehviir, Valerica will tell you to follow her, but will then not move.
- Using the Unrelenting Force shout will blow her away, after which she may pick herself up and begin moving normally again. However, this may not always work.
- It is possible to pass beyond the blue barrier surrounding the Soul Cairn. In the first half of the world, access an enclosed area (where page 3 of Jiub's Opus can be found) through a building to the left of the passage to the other half. There is an invisible gap between the wall to the left and the barrier through which you may pass.
- The "health drain" visual effect may remain on your character, even when you are not in range of one of the Ideal Master Crystals. The health drain effect does not follow, but the visual effect can become obstructive. This is easily remedied by walking within range of one of the crystals without using the effects of a soul husk, and then stepping away.
- The Conjure Mistman spell tome may be stuck at the bottom of the podium with only one corner visible, and not able to be grabbed.
- A workaround is to press ~ to bring up the console, enter
tclto enable noclip mode, and go underneath the pedestal to reach the tome. Then, return above ground and entertclto disable noclip mode again. - You can also shoot an arrow at the tome to knock it down.
- When using Dawnbreaker within the Soul Cairn, the mass turning effect from exploding undead can sometimes cause neutral souls to enter combat. While they will not attack and cannot be harmed, Serana will become stuck constantly casting spells at them until you load a previous save or fast travel. ?
- At night, you might see Masser and Secunda in the sky, even though you are obviously not in Tamriel. ?
- The skeleton by the Reaper's Lair is not detected by the spells Detect Dead or Detect Undead. ?
Maps[edit]

| Key | ||||||||||||||||||
|---|---|---|---|---|---|---|---|---|---|---|---|---|---|---|---|---|---|---|
|