Skyrim:Ustengrav
|
|||
|---|---|---|---|
| # of Zones | 2 | ||
| Clearable | No | ||
| Dungeon | Yes | ||
| Respawn Time | Never (storage is safe) | ||
| Level | Min: 6 | ||
| Occupants | |||
| Bandits, Warlocks, Draugr, Skeletons, Frostbite Spiders | |||
| Important Treasure | |||
| Mystery of Talara, v 2 | |||
| Console Location Code(s) | |||
| UstengravExterior01, Ustengrav01, Ustengrav02 | |||
| Region | |||
| Hjaalmarch | |||
| Location | |||
| Northeast of Morthal South of High Gate Ruins |
|||
| Special Features | |||
| Word Wall | Become Ethereal | ||
| # of Arcane Enchanters | 1 | ||
| Ore Veins | |||
| # of Corundum | 2 | ||
| # of Iron | 1 | ||
| # of Silver | 1 | ||

Ustengrav is a medium-sized Nordic ruin northeast of Morthal containing bandits, warlocks, draugr, skeletons, and frostbite spiders. It contains two zones: Ustengrav and Ustengrav Depths.
Its word wall teaches part of the Become Ethereal dragon shout. Bandits have occupied the ruins and set up a camp outside the entrance. However, warlocks have tried to occupy the ruin, resulting in many casualties between the rival groups. The ongoing battles have alerted the sleeping draugr, who have engaged with both groups. Most of the ruin will be inaccessible before the quest The Horn of Jurgen Windcaller; if the ruin is entered prior to this quest, bandits and warlocks will be engaged in battle in the first main chamber, the exit from which will be blocked.
Related Quests[edit]
- Bandit AttackHF: Rescue your beloved from kidnappers. (radiant)
- The Horn of Jurgen Windcaller: Retrieve a Greybeard artifact from Ustengrav.
Walkthrough[edit]
Exterior[edit]
There are two bandits outside by the camp, and the corpses of two more can be found nearby: one by the campfire, and one slightly north of the fire. When you first approach the campsite, the living bandits are already zombies of a necromancer, who will likely also raise one of the dead bandits.
The camp itself consists of two bedrolls (one under a lean-to shelter), a woodpile with a woodcutter's axe nearby, a bucket, and a tankard on a rock. There are four deathbell plants growing alongside the rough path from the lake. Inside the barrow mound is another dead bandit, an unlocked chest, a few sacks, and a barrel with two bottles of skooma on it.
Ustengrav[edit]
There is a dead bandit to the right as you enter the ruin, and human bones to the left with an iron weapon among the bones. There is another dead bandit near the bottom of the stairs ahead. There is a dead bandit by the pillar in the middle of the first room, and another at the far side; both are liable to be reanimated by warlocks during any fight. All of the remaining living bandits are zombies of a High Elf necromancer. If you remain hidden, shortly after you arrive, these enemies will head deeper into the ruin.
To the left of the entrance to the large chamber is a platform with a dead draugr, a potion of minor healing, and a random potion. In the area with the warlocks is a table and a chest. On the table is a potion of minor healing, a loaf of bread, a gourd, an iron sword, an iron dagger, and two random books. The path continues to the north of the table.
Along the path are three dead warlocks and a draugr. The tunnel opens to a short corridor occupied by four draugr; another two warlocks have engaged in a fight with them. There is also a spellcaster trap to the left. In the first alcove to the right by the brazier are two potions of minor healing. Through the door to the left are two rooms filled with urns, one to the west and one to the northeast. The western room contains six intact urns, one burial urn, one broken urn, a chest, and a potion of minor healing. In the broken urn are two additional potions. The northeastern room contains twelve intact urns, two burial urns, a canis root, a chaurus egg (inside a cast iron pot), a potion of minor healing, a potion of health, a draught of the healer, and a copy of the Restoration skill book Mystery of Talara, v 2.
Continuing east then south along the path, there is a partially hidden staircase to the right just before the next large room. There is a table in the room down the stairs holding eighteen loose gold coins and a random ancient Nord weapon. To the left of the table on the wall is a partially hidden pull chain, which reveals a secret passageway ending in a room with a chest.
The last room in the zone consists of a narrow, two-level main chamber with an overlooking balcony. A draugr will burst from its sarcophagus to the right as you enter, while another already patrols the far side of the room. Another slumbering draugr is between the two active ones, and a dead draugr lies by the first of three alcoves on the right. There is an iron battleaxe by the middle alcove, and an iron helmet by the last alcove. The stairs up to the balcony are at the far end of the room, and there is a chest, two potions of minor healing, and a random potion. A stone bridge leads to the door to Ustengrav Depths. In the corner before the final steps down to the door is a petty soul gem, and there is a large coin purse by the door.
Ustengrav Depths[edit]

As you descend the stairs into the depths of the ruin, there is a hole in the wall to the right providing a view of the main chamber, with an iron sword on the floor nearby. Farther down the stairs, where the wall opens to reveal another view of the main chamber, is a patrolling draugr. An ancient Nord bow lies near a lantern and a spent brazier. On a rocky ledge just over the wall that the lantern sits upon is a leveled shield. Take precaution, as it is somewhat difficult to get back if you choose to retrieve the shield. This is a good spot to ambush the skeletons that patrol the main chamber with long-range attacks.
Down the stairs to the south is an iron ore vein on the southwest wall. The path forward is to the left of the vein, but is trapped. There are four pressure plates on the ground, two of which are flame spout traps. The traps can be safely bypassed by staying to the left, as only the two right-hand plates are traps. Farther along, the path is blocked by some rubble. The path forward is to the east, where the tunnel opens to a stone bridge over a feasting hall.
Two draugr patrol the area: one in the main area, and another on another stone bridge on the other side of the room. Across the bridge are some stairs leading in a rough circle down to the level below. This level of the room contains a table to the right of the lower entrance, five stone tables along the left-hand side of the raised platform ahead, two tables to the right in front of a throne, and one more table and an urn on the other side of the platform. Along with three loaves of bread and two grilled leeks, the five tables to the left hold a charred skeever hide, a branch of lavender, some jazbay grapes, and a purple mountain flower. There are several cheeses on the tables by the throne, and a sheaf of wheat is on the far table. It is entirely possible to avoid the first draugr here. There is a room to the east running the length of the main room, with doors on either side. There is a chest and two potions of minor healing in this eastern room.
After climbing stairs exiting the lower level to the south, then crossing the other bridge, the path returns to the tunnel on the other side of the blockage. The next room looks rather bare, but to the left is a small room. The entrance to the small room is blocked by two gates, which are raised by two separate handles. One handle is beside the gates, but the other is beside a sarcophagus to the west of the gates. Upon approaching the sarcophagus, a draugr will awaken, while another awakens from another sarcophagus to the north; there is also a third dead draugr that by the third sarcophagus. There is an oil slick between the sarcophagi that can be used to deal damage to the draugr. The small room contains an arcane enchanter, a random dagger, a chest, a potion of healing, an empty soul gem, and a random potion. Returning to the main room, through the tunnel to the west and up the stairs to the left is a table with a poison. The path continues north from here.

The tunnel opens to a ledge in the main chamber. There is a stone path heading left that has collapsed and leads down to the main room. Three skeletons patrol this open chamber, and another two patrol a raised walkway along the south and west walls. There is one last skeleton sitting in the throne in the northwest corner; it will awaken if it detects any non-skeletons. There are pedestals to either side of the throne, each with a random potion. The stairs up to the walkway are to the left of the entrance in the room's southwest corner, and at the top is a fire spout trap. A dead draugr lies across the trap, leaving it in a state of perpetual activation. There are seven tiles on the ground by the trap, and the safe path is straight through the middle. Immediately after passing the trap, along the wall to the left and behind some rubble is a chest. Farther along is a small alcove to the left with a petty soul gem, a garnet, and a flawless garnet. At the end of the walkway, you can see a chest in a chamber blocked by rubble; there is an unorthodox way to reach it. By the first stone pillar are a series of pillars that were once connected to lead across the chamber, but the walkways between them have collapsed. The key to accessing the blocked chamber is the Whirlwind Sprint shout. The broken parts still point to each other, and careful use of the shout allows the gaps to be crossed. The chamber contains the chest, a dead draugr, and a lesser soul gem.
Just to the left of the bottom of the entrance pillar, there is a dirt path along the wall that leads southeast to a corundum ore vein. Note that it is very difficult to return up the path after this point. Dropping from the ledge past the vein, at the bottom and to the left is a well-lit alcove, with a chest, a random potion, and a potion of minor healing. To the northeast is another corundum ore vein on the same level, while from the alcove, along some descending ledges to the north and past a dead draugr, is a silver ore vein, with another dead draugr around the corner after the vein. The word wall to the east should now be clearly visible. Before approaching the wall, there is a secret room behind the nearby waterfall. This small treasure room contains a chest and a random sword, and is guarded by a slumbering draugr. The word wall teaches a word for the Become Ethereal shout.

There is a dirt path behind the word wall that circles back up to the throne chamber. The earthen bridge to the east leads to the final part of the large main chamber. Three stone posts stand in a triangle, with a series of closed gates straight ahead. A skeleton patrols a balcony above and to the right, with two burial urns and a potion of minor healing on the balcony. To the left of the stones lies a dead draugr and a potion of minor magicka amid some rubble. This puzzle requires speed to solve, literally. Each stone activates one of the three gates blocking the path ahead, but on a timer. It is impossible to sprint through the stones and the gates. The Whirlwind Sprint shout needs to be used, but only once you have sprinted through all three stones. Between the first two gates are pull chains to open the preceding gates.
At the top of the stairs past the gates is a room with the entire floor covered in flame spout traps. However, none of the pressure plates on the raised section ahead work. The area may be passed safely by proceeding straight ahead, jumping over the piles of rubble into the next room, moving to the left, then jumping across to a small set of steps. This next room contains two frostbite spiders and a giant frostbite spider that drops from the ceiling, as well as three spider egg sacs. The exit to the east is blocked by two thick spider webs. There is an inaccessible ledge above the exit.

Beyond the exit, a short tunnel past a door leads to a closed gate. A pull chain to the left activates the gate, with another to the right on the other side. Passing the pillars causes four large stone statues to emerge from the water on either side of the room. This is the resting place of Jurgen Windcaller. There are two burial urns in front of the coffin, and a mysterious note in the stone hand at the top of the coffin. There are two sarcophagi, one on either side of the coffin, with a dead draugr lying outside each. Behind the coffin is an urn and a door. Through the door is a room filled with six more urns, two burial urns, a chest, and twenty-four loose gold coins scattered near the chest. To the left is a tunnel leading up to a door back to Ustengrav. Farther up the tunnel, a lever opens a secret door to the western urn room found shortly after the main chamber.
Notes[edit]
- When passing through the stone posts puzzle, it is possible to use the Whirlwind Sprint shout twice in a row in quick succession.
- If you return to Jurgen Windcaller's coffin after completing The Horn of Jurgen Windcaller, you can activate it to release a dragon soul.
Bugs[edit]
- The frostbite spiders in the room before the giant frostbite spider may get stuck in the walls.
- Disturbing the desiccated corpse on the ledge to the right will make them emerge.
- The three puzzle gates in Ustengrav Depths are supposed to stay open after you have sprinted through, but may not.
- Waiting an hour once through the gates will teleport followers to your side.
 You can get through using the console command
 tcl, but this doesn't help followers. There are pull chains that can be activated on the other side of two of the gates. You can also, through the console, use the follower's reference ID and themoveto playercommand to move your follower to your location, should they get stuck on the other side. The three puzzle gates in Ustengrav Depths can be tricked into staying open if you're quick enough to enter and exit each of the three stones' activation ranges, making them stay active.
Maps[edit]
-
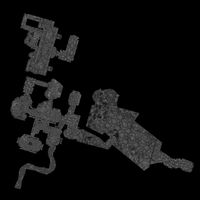
Ustengrav
-
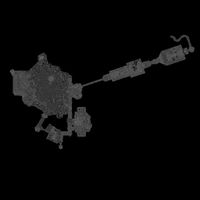
Ustengrav Depths


- Skyrim-Places-Nordic Ruins
- Skyrim-Places
- Skyrim-Places-Level 6
- Skyrim-Places-Hjaalmarch
- Skyrim-Places-Corundum Veins
- Skyrim-Places-Iron Veins
- Skyrim-Places-Silver Veins
- Skyrim-Places-Arcane Enchanters
- Skyrim-Places-Word Walls
- Skyrim-Places-Safe
- Skyrim-Places-Discoverable
- Skyrim-Places-Bandit Camps
- Skyrim-Confirmed Bugs