Skyrim:Volskygge
|
|||
|---|---|---|---|
| # of Zones | 2 | ||
| Clearable | Yes | ||
| Dungeon | Yes | ||
| Respawn Time | 10 days or 30 days | ||
| Level | Min: 24 | ||
| Occupants | |||
| Bandits, Draugr, Frostbite Spiders, Volsung | |||
| Important Treasure | |||
| Surfeit of Thieves Volsung |
|||
| Console Location Code(s) | |||
| VolskyggeExterior01, VolskyggeExterior02, VolskyggeExterior03, VolskyggeExterior04, Volskygge01, Volskygge02 | |||
| Region | |||
| Haafingar | |||
| Location | |||
| West of Solitude Southeast of Pinefrost Tower |
|||
| Special Features | |||
| Word Wall | Whirlwind Sprint | ||
| Ore Veins | |||
| # of Orichalcum | 1 | ||

Volskygge is a medium-sized Nordic ruin west of Solitude containing bandits, draugr, frostbite spiders, and the dragon priest Volsung. It contains two zones: Volskygge and Volskygge Passages.
Its word wall teaches part of the Whirlwind Sprint dragon shout.
Related Quests[edit]
- Alteration Ritual Spell: Acquire Kahvozein's Fang and use it to get heartscales from a dragon for Tolfdir. (radiant)
- Volskygge: Climb your way to the evil of Volskygge.
Walkthrough[edit]
Exterior[edit]
There are three bandits near the entrance, two of which are melee fighters, while the third is an archer. As you approach, there is a long flight of stairs leading down to a pressure plate at the bottom, which triggers a battering ram from a doorway on the left. Through the doorway is a room with two upright sarcophagi against the rear wall. The one on the right is already open and has a dead draugr lying on the ground in front, but the one on the left conceals a slumbering leveled draugr. Between the sarcophagi is a doorway that is completely blocked by rubble. At either end of the room are stone tables; the one to the east has four burial urns on top, and the other is broken with a single burial urn among the remains. Stairs lead back up to ground level past the pressure plate outside. There are stairs leading up to walls, with a walkway linking them in front of the entrance. On a raised section to the left is a campfire with a charred skeever cooking over it and a wooden table nearby with a medium coin purse, a skeever tail, and an iron dagger on top. The entrance is an iron door under a covered area.
The fast travel point will take you to a point a few paces in front of a stone hut to the east of the entrance, with a sunken path to the right of the hut that takes you to a round-topped barrow with a circular passage around a central chamber that has an adept-trapped iron door. Beyond the door is the circular chamber, with two sideboards to the left as you enter. The first has two burial urns on top, while the second is broken. Beside the second sideboard is one of two large urns flanking an altar with some skeletal remains on top. Farther to the right is a set of shelves holding two random potions of healing.
Volskygge[edit]

The entrance leads into an antechamber with stone benches along both side walls and another iron door ahead. This door leads into a large chamber, with banners on posts flanking a short flight of stairs leading up to a raised platform with a throne at the top. The raised platform is in front of you as you enter. In front of the throne is a pressure plate that triggers poison darts. To the west is a wide passage that descends to the north. Two bandits will emerge from this passage. There are roots descending from the ceiling and covering the floor of this passage, which turns west at the end. There are blood splatters on the floor ahead, followed by a pressure plate that triggers a spike wall. Past this trap are stairs leading down to an apprentice-locked chest at the bottom, guarded by a leveled bandit. At this point, the passage turns north and descends further. At the bottom is a T-junction, with a doorway on the left, and the passage continuing to the right. The room through the doorway contains two leveled bandits hidden by a stone pillar. Against the west wall is a set of shelves holding a random potion of healing and a copy of the Lockpicking skill book Surfeit of Thieves. To the left is a concealed door that is opened using a lever locked behind an adept-locked cage door on the left. The door opens to reveal a tunnel descending to a small room containing an unlocked chest and a sideboard with two random potions of magicka on top.
The passage heads down, passing a set of shelves set back against the wall on the right with three random potions of health atop them. Beyond is an entrance into a large banqueting hall, with two doorways along the hall's north wall. These lead into a narrow horseshoe-shaped corridor, with a room immediately on the left, and a leveled bandit patrolling between this and a second room farther along. In the second room is another bandit who will be alerted by any fighting and converge on you. The first room, to the west, contains several sets of shelves holding ancient crockery and four large urns. The second room, to the north with two doorways leading into it, contains more shelves of crockery and a central stone table and benches with two potions of minor healing on top. Continuing along the narrow corridor to the east, there is a third room containing nothing much of interest.
Back in the banqueting hall, there are sets of shelves along the north wall holding more clutter, two random potions of healing, and a random potion of health. Down the center of the room is a very long stone table with stone benches on either side and a throne at the far end. There is the body of a draugr on the floor, and another lying across part of the table. At the far end of the room is an iron door.
In the middle of the doorway is a pressure plate that triggers a battering ram, with a dead bandit lying beyond it. There are three large urns along the corridor beyond, which then turns north. Ahead is a chamber containing four upright sarcophagi in a square in the middle of the room, with a doorway to the north blocked by a lowered gate. In each of the corners of the room are raised sections, with plinths holding handles and symbols of one of four animals beneath them. In front of the exit is a fifth plinth with a copy of The Four Totems of Volskygge on top. This book contains a riddle for the solution to raise the gate. The four handles must be operated in the correct order to raise the gate, which is Snake—Bear—Fox—Wolf. A fire will light atop the central pillar each time you pull the correct handle. The first four times an incorrect handle is pulled, one of the four sarcophagi will open. Three of the sarcophagi contain slumbering draugr, and the fourth contains skeletal remains and some loose low-level equipment.
The room beyond the gate contains a central spiral stairwell that descends to a passage heading west to an iron door to Volskygge Passages. There is also an unlocked chest at the back of the room, and a skeleton to the left in front of another hidden door. The lever to open it is to the left. The door opens to reveal another tunnel descending to a small room, with a pressure plate in front that triggers a poison dart trap. The room contains a sideboard with a random potion of stamina and two random potions of resist cold on top, and a large urn opposite.
Volskygge Passages[edit]

This area contains several leveled draugr. It starts with a wide passage descending stairs heading west. At the bottom, the path turns north and passes four statues, then reaches an open door into a chamber with five large urns around the sides, an iron door opposite, and a random empty soul gem on a stand. Beside the stand is a lever that raises a gate to a tiny alcove that is empty. If you want to be sneaky, do not pull the lever where the soul gem is, as doing so will alert the draugr in the next room. Through the iron door is a room containing a magic-using draugr standing near an altar on a raised section with a skeever tail and two empty petty soul gems on stands. Flanking the altar are two urns, and in the northeast corner is an apprentice-trapped chest. To the west is a doorway blocked by a gate; the lever to operate it is to the right.
Through the doorway is a small room with a large trap door in the floor with sharp stakes beneath it. There are two urns and two burial urns in the room, and a doorway to the west. Between the trap door and the doorway is a pressure plate that triggers a swinging blade trap in the doorway. The next room looks similar to the last, with a large trap door in the floor. Beneath this trap door are small broken sections of a wooden staircase above stakes. The trap door will probably open as you approach, but can be closed again using the screen prompt when it appears. Once closed, it can be safely walked on. If you choose to go down through the trap door, carefully descending the broken staircase will bring you to the end of a passage patrolled by a single draugr (see next paragraph); it is not possible to climb back up the broken staircase, but killing the lone draugr and climbing the stone stairs at the far end of the passage will lead you further into the ruin (see below). In the northwestern corner of the room with the trap door is a doorway, and in the north wall is a concealed door with a dead bandit in front under the lever that opens it, while to the right are two more urns. Behind the hidden door is a second with the lever on the right. Activating the second lever opens the second door and closes the first. Past the second lever is a room with some grating on the floor, two urns, an adept-locked chest at the rear, and a weight sensitive plinth in the center with a leveled potion of healing on top. Taking the potion triggers spears to come up from the floor through the grating.
The doorway in the northwestern corner enters a catacomb area, where there is a large urn and several dead draugr and slumbering draugr in alcoves as you descend. There is a pressure plate at a crossroads that triggers a spike wall. To the west is an alcove area with three burial urns; a fourth burial urn is next to the spike wall. To the east is a narrow flight of stairs descending and passing through a small catacomb with a single draugr patrolling. At the end are the sharpened stakes underneath the second trap door over the broken staircase (see previous paragraph), with a dead bandit lying among the stakes. Climbing back to the crossroads and heading south leads to an apprentice-locked chest and a burial urn where the passage turns west. At the end, after passing a large urn on the left, turn north and descend to another area with even more leveled draugr in alcoves. There is a central area with many roots descending from the ceiling and pathways to either side. In front of the central area are two large urns, while a dead draugr is in an alcove on the western wall. To the north after the pathways merge are ascending stairs with a leveled draugr patrolling at the top. The area at the top of the stairs contains a large urn and three dead draugr in wall alcoves. To the north is a room patrolled by another leveled draugr, containing five large urns, an altar on a raised section opposite the door with three random potions of health, and an open sarcophagus at either end.
To the west is another long flight of stairs with a pressure plate near the top that triggers a battering ram. The passage enters a natural cave system with cobwebs everywhere, winding as it continues to rise. There are a number of frostbite spiders in this area, as well as several web sacs that can be looted. The passage eventually opens into a narrow cave, with several levels above you, many more spiders and egg sacs, and a dessicated corpse hanging from the ceiling. Keep following the passage as it twists and turns, passing thick cobwebs you have to burn or chop your way through, until you reach a brightly lit cavern with waterfalls dropping from above and two hanging dessicated corpses. Three frostbite spiders will descend from above.
At the far end, break through more cobwebs and follow the passage as it rises to the east. The passage soon reenters the ruin, where after climbing a flight of stairs you will find an adept-trapped chest and three large urns. The passage then turns south and descends to a large chamber with three bridges, one of which is broken, crossing a fast-moving stream. There are two draugr patrolling back and forth across the bridges, and a third standing at the top of stairs to the rear.
The chamber contains three large urns, while downstream to the west is an unlocked chest and a pickaxe on the ground next to an orichalcum ore vein. Across a bridge and up the stairs is another room with three large urns. A second flight of stairs to the east then ascends to a small room with a Draugr Death Overlord sitting on a throne opposite, who will arise when you enter. There are two large urns and a sideboard in the northwestern corner with three leveled potions: one of health, one of healing, and one of magicka. In the southwestern corner is an unlocked boss chest, and in the southeastern corner is a set of shelves holding an ancient Nord bow and quiver of arrows, a medium coin purse, and eight loose coins. Behind the throne to the east is a narrow flight of stairs leading up to an iron door and the exit to Volskygge Peak.
Exterior: Volskygge Peak[edit]

Once you exit Volskygge Passages, you find yourself atop a nearby mountain, at the base of a staircase. At the top of the staircase is a word wall that teaches part of the Whirlwind Sprint shout. Once you have learned the word, the sarcophagus at the top of the stairs will open, and the dragon priest Volsung will emerge. He is a powerful undead foe who uses strong frost magic and carries the dragon priest mask Volsung. The only other loot is a pair of emeralds, embedded in the eyes of the statue at the bottom of the staircase. Be wary of using area-of-effect spells or shouts (such as Fireball and Kyne's Peace) near the statue, as this can dislodge and scatter the emeralds across the snow. The emeralds may also have fallen from the eye sockets before you reach them (perhaps due to the activity of a battle or a dragon before you reach the immediate area, for example when you encounter the initial bandits before entering Volkskygge further down), in which case they will be on the snow near the adjacent statue.
Notes[edit]
- It is possible to reach Volsung and the word wall by simply running up the mountain. Volsung will rise from his grave after you learn the word from the wall. You can then go through the dungeon from the exit until almost the start of the second zone, where a gate just beyond the trap door rooms only opens using a lever on the other side. You can open the gate by crouching, getting close to the gate on the left side, and using the lever through the gap. In this way, as also noted in the Prima Guide, Volskygge can be entered and explored from both the bottom and the top (near the word wall). It is therefore possible to play through the dungeon in the opposite direction from that described in the above walkthrough. (However, note that a follower may not appear if you pass through the ruin in this direction, as they may be stuck on the other side of the gate.)
- Scaling the peak to reach the word wall (versus going through the entire ruin) has caused confusion about the puzzle room. Returning from the direction of the peak and trying to solve the puzzles, they will be backwards compared to the walkthrough. The simple way to avoid such confusion is to explore the ruin from the main entrance and solve the puzzle as you go along.
- You may want to complete the puzzle incorrectly to start with, in order to loot the three draugr and the dead skeleton with loose armor and weapons. Alternatively, casting a rune spell next to one of the sarcophagi will cause them to burst open.
- There is no return shortcut from within the ruin, so the simplest methods to leave the area are to fast travel from the peak or descend the mountain to return to the entrance.
- The Draugr Death Overlord at the end (or beginning, depending on which door you used to enter the ruin) is present regardless of level, meaning a tough fight for low-level characters. However, victory is rewarded with a guaranteed one-handed ebony weapon, which would usually only be available elsewhere at level 30+.
- Volskygge also appears in ESO as Lendoran Ruin and Dragon's Belly.
Bugs[edit]
- If you have completed the puzzle but fast-traveled from the mountains without killing Volsung, the puzzle gate may be closed when you return, with the handles locked in place, preventing you from reaching the summit.
- The swinging blade trap in Volskygge Passages can become stuck in the "open" position after being triggered, trapping followers behind it. Clicking on and disabling the trap with the console will free the follower. This may happen more often if you have more than one follower, such as one humanoid and one Riekling/dog/automaton. ?
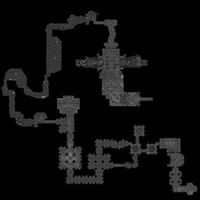
Maps[edit]
-

Volskygge
-
Volskygge Passages

