Skyrim:Treva's Watch
|
|||
|---|---|---|---|
| # of Zones | 2 | ||
| Clearable | Yes | ||
| Dungeon | Yes | ||
| Respawn Time | 10 days or 30 days | ||
| Level | Min: 6 | ||
| Occupants | |||
| Bandits | |||
| Important Treasure | |||
| Spell Tome: Bound Sword Spell Tome: Courage Twin Secrets |
|||
| Console Location Code(s) | |||
| TrevasWatchCamp, TrevasWatchExterior01, TrevasWatchExterior02, TrevasWatchStalleosCamp, TrevasWatch01, TrevasWatch02 | |||
| Region | |||
| The Rift | |||
| Location | |||
| Southeast of Ivarstead North of Angarvunde |
|||
| Special Features | |||
| # of Arcane Enchanters | 1 | ||
| # of Forges/Anvils | 1 | ||
| # of Grindstones | 1 | ||
| # of Workbenches | 1 | ||
| # of Cooking Pots/Spits | 1 | ||

Treva's Watch is a medium-sized fort southeast of Ivarstead containing bandits. It contains two zones: Treva's Watch Escape Tunnel and Treva's Watch.
You may wish to get the quest Infiltration from Stalleo before entering the fort for the first time; Stalleo is camped with two bodyguards just east of the fort. The quest directs you to access the fort through its secret escape tunnel.
Related Quests[edit]
- Amulet of the Moon: Find the Moon Amulet for Kharjo. (radiant)
- Infiltration: Help Stalleo take back Treva's Watch.
- Retrieval: Journey to a random location to retrieve a fragment of Wuuthrad. (radiant)
- This location is one of many potential targets for one or more of the Radiant quests.
Walkthrough[edit]
Exterior[edit]
The fort is off the road between Ivarstead and Riften on the north shore of the Treva River. A camp with two small tents and bedrolls occupied by Stalleo and his two bodyguards is located near a secret back entrance to the fort east of the main entrance. There is a cart containing a food barrel and a sack nearby. Speaking with Stalleo, you can offer your services to help reclaim his home. Approaching the fort will cause several bandit archers to fire upon you from the walls. The main courtyard area comprises several levels, and is initially occupied by six bandits, including archers and some heavy hitters. If exiting into the courtyard from the main keep, you appear inside a wooden hut with a lever that lowers the spears blocking access to the courtyard for Stalleo and his bodyguards, although you may wish to wait until you've taken care of any remaining bandits, especially at higher levels. Opposite the hut are wooden stairs leading up to the battlements, which feature a campfire with four whole salmon hanging over it, a long wooden table with five seared slaughterfish steaks and three bottles of wine, and a set of shelves holding two more bottles of wine. To the east are more stairs leading up to a higher level, where another campfire has been lit. Two lean-tos with unowned bedrolls under them are around the fire, with an unlocked chest and a long wooden table beside one of the lean-tos.
Treva's Watch Escape Tunnel[edit]
Typically you will enter this fort through the secret entrance, which leads to the basement. The entrance places you in a man-made tunnel descending to the west, then turning to the south and climbing a flight of stairs. At the top are three bandits: two archers and a melee fighter. They are all standing in an oil slick, with an oil lantern hanging above. Behind them is a long wooden table holding six loose iron arrows, a loose random arrow, a bottle of wine, and a loaf of bread, with a random bow leaning against the table. To the left is a food barrel, and to the right is a set of shelves holding two sheaves of wheat, two loaves of bread, and four sliced and whole cheese wheels. The room opens up to the west, with a passage heading south, and beyond this to the west a storage area on a slightly raised platform guarded by a bandit sitting at a long wooden table. On the table is a random sword, a random cuirass, a medium coin purse, and a leather strip. Behind this are two sets of shelves separated by an unlocked chest, with a second unlocked chest to the right of the shelves. The shelves hold a single random arrow, two empty random soul gems, and two food sacks.
Following the passage south, you can hear someone hammering metal at an anvil. A bear trap is on the floor in the middle of the passage, after which the passage turns to the east. In front is a flight of stairs leading up into an L-shaped room, with a smaller room ahead through a large doorway. This is where the person working with metal is located. The smaller room contains a workbench, a grindstone, an anvil, and two sets of shelves. One of the sets of shelves holds a piece of iron ore, six iron ingots, and four leather strips, with a fifth strip on the workbench. The other set of shelves holds a random light armor cuirass, two pairs of light armor boots, a shield, and two swords. There is a second wide doorway out into the L-shaped room. Here there are three more sets of shelves and a smaller shelving unit, which between them hold many small barrels of mead, a woodcutter's axe, three bottles of alto wine, seven bottles of wine, six bottles of Nord mead, two random potions of healing, and a random potion of regeneration. To the west is a small storeroom filled with many food barrels and the bodies of two Nords and an Imperial, presumably family and members of Stalleo's household related to the storyline of the quest Infiltration. A door to the south opens into Treva's Watch.
Treva's Watch[edit]
The entrance from the escape tunnel leads into a passage that twists and turns, with two bear traps on the floor. Ahead are stairs leading up to a wider passage. Just before the stairs is an alcove on the left with a short passage opposite that ends at a cave-in. At the top of the stairs is a bandit, with a second farther back out of sight who will be alerted even to a stealthy kill of the first ruffian. Where the passage widens, a cupboard is on the left, with a long wooden table opposite. On the table is a bucket containing two bottles of wine, while the cupboard holds a knapsack, an iron mace, and a woodcutter's axe. The passage continues to the south, where a doorway on the right opens into a dormitory with two bandits: one sleeping in the first bed, the second standing at the rear of the room. Any fighting may alert one of the bandit chiefs to your presence. There are three single unowned beds in the room, an unlocked chest at the foot of the middle bed, and two sets of shelves against the wall holding three random cuirasses, a random poison, a potion, a flute, and several common books. Opposite the doorway is an adept-locked door that opens into a small storeroom containing an unlocked chest, a tall wardrobe, and a set of shelves holding a random greatsword, an apothecary's satchel, a bottle of poison, a random potion of healing, a random potion of magicka, a helmet, and two food sacks. There is also a food barrel with a large coin purse on top.
Continuing along the passage, you pass an alcove on the right containing a set of shelves holding a random sword, mace, and bow, two random pairs of boots, and a random helmet. Just beyond the alcove, the passage turns to the west and passes a doorway on the left, which is where the bandit chief will be found if not previously alerted to your presence. In this room is an unowned double bed, a dresser, a tall wardrobe, an unlocked chest, and a long wooden table with a Spell Tome: Bound Sword on top. The passage turns to the north at the far end, and leads out onto a balcony over a dining room, where you can see three bandits sitting and chatting to each other at a pair of tables laid end-to-end. On the balcony is a long wooden table with two common books and a goat cheese wedge on top. Farther along is a set of shelves holding a leather strip, a leveled potion of strength, and a leveled potion of regeneration. To the left is a stack of straw bales, with stairs leading down to the left. At the bottom is a second pair of tables under the balcony, with many chairs pulled up to both pairs of tables. To the left of the stairs is a tall wardrobe containing clothes. To the west is a doorway out into a narrow passage.
There is a cave-in at the south end of the passage. After a few paces north, the passage turns west and opens into a kitchen where you will encounter two more bandits. There are several tables and small shelving units down the middle of the room, with two campfires against the west wall, one with a kettle in the flames, and the other with a proper cooking pot over it. On the tables and shelves are two joints of raw beef, three carrots, an apothecary's satchel, a rack of dog meat, three chicken breasts, an eidar cheese wedge, a woodcutter's axe, a bottle of alto wine, three bottles of wine, a random potion of stamina, and two random potions of healing. Hanging from racks over one of the tables are two rabbits, a pheasant, two garlic braids, and a bunch of dried elves ear. There is a set of shelves against the west wall holding clutter, and a long wooden table against the north wall with a bottle of wine between two small mead barrels. In the northwestern corner is a doorway into another room containing several food barrels and sacks, two more sets of shelves holding several more food sacks, and an unlocked chest, with a wooden door to the north.
This door opens into a wide passage. To your right on the floor is a bottle of alto wine and a large coin purse, and beyond that a doorway with some rubble on the left, behind which is a raw leg of goat and a small coin purse. The passage ends at the other side of the cave-in seen previously. Take care heading west, as just before the corner, there is a pressure plate on the floor that triggers a spike wall hinged on the right wall. Around the corner, a narrow passage leads off to the west and climbs a short flight of stairs before opening into a large circular room, with a table and a set of shelves in the middle, many food barrels in stacks around the outside, a second set of shelves on the west wall with two bottles of Nord mead and a bottle of wine, and a couple carts on the right holding seven cabbages. On the first set of shelves is a piece of iron ore, six iron ingots, and two leather strips, with another piece of iron ore on the table. To the south is a wide doorway, with a passage opposite and curved stairs rising on your right.
Partway up the stairs is a bandit standing guard near a long wooden table. The bandit is standing in an oil slick, with an oil lantern hanging above. At the top of the stairs is another large circular room, half of which is raised up a couple feet, with stairs at either end. On this raised section you will find the second bandit chief along with one more bandit. There is an arcane enchanter, an unlocked boss chest and a set of shelves holding six iron ingots, an iron mace, and a red apple to the left, and a tall wardrobe and a dresser back-to-back with them. The wardrobe and dresser both contain clothes, while beside them is a ladder leading outside to the roof of the tower, where you can loot an unlocked chest and snipe any remaining bandits outside. To the right of the enchanter is a long wooden table holding a knapsack, a bottle of the rare enchanter's elixir, an iron dagger, a bottle of wine, a small coin purse, a Spell Tome: Courage, and copies of Ruins of Kemel-Ze and the Enchanting skill book Twin Secrets. Behind the table is another tall wardrobe and a set of shelves holding a giant apothecary's satchel, a salt pile, an iron dagger, and a copy of On Oblivion. On the lower level between the two flights of stairs is another set of shelves holding five more common books, a pair of leather bracers hidden in a cast iron pot, two sheaves of wheat, and a thistle branch.
From the bottom of the stairs, following the passage to the south, you pass two doorways into a prison area on your left, where two bandits are found talking. There are two cells along the eastern wall, one adept-locked, and the other apprentice-locked. Between the two cells, on a hook on the wall or fallen to the floor is a key that opens the cells. In the center of this room are two long wooden tables side-to-side, with many empty wine bottles in a stack of open crates beside them and loose on the floor. On the tables are two legs of goat roast, a horse haunch, two bottles of wine, and three pieces of bread. On the floor beside the table is a basket of red and green apples. Between the two doorways are two tables, one of which has a random dagger on top. Beside this is another basket of apples. In the northwestern corner is a cupboard, with three bulbs of garlic, a gourd, a gold coin, a pair of boots, and a set of fine clothes on the shelves. Hanging from a rack from the ceiling are three garlic braids. Against the north wall is a tall wardrobe with an unlocked chest to the right. More food barrels are in the northeastern corner. Finally, against the south wall is another table with an eidar cheese wheel on top.
Take care when continuing along the passage, as a pressure plate that triggers a dart trap is a short distance past the prison area. Past this on your left is a doorway into a room with a bandit sitting at a long wooden table on the left with a bottle of wine on top, while against the south wall is a tall wardrobe and a set of shelves holding several tiny food barrels and an iron greatsword. There is a pile of firewood opposite, with a woodcutter's axe leaning against it. To the east is a door leading outside into the courtyard. Before exiting, the passage continues past this room and another pressure plate that triggers a swinging mace trap before ending at a cave-in, with an unlocked chest containing minor loot among the rubble.
Notes[edit]
- There are two iron ore veins on the shore to the south and west of the fort, and on the far side of the river to the west is a clay depositHF.
- Treva's Watch is built on the land of the former Treva's Farm found in ESO.
Bugs[edit]
- Despite returning the fort to Stalleo's care through the related quest, Stalleo and his bodyguards return to the camp and never take control of the fort, while the bandits respawn, enabling you to repeatedly clear the fort.
Maps[edit]
-
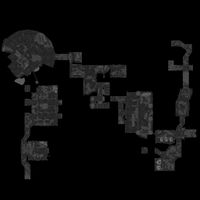
Treva's Watch
-
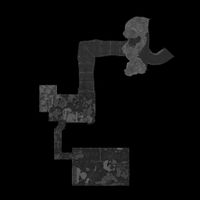
Treva's Watch Escape Tunnel


- Skyrim-Places-Military Forts
- Skyrim-Places
- Skyrim-Places-Level 6
- Skyrim-Places-Bandit Camps
- Skyrim-Places-The Rift
- Skyrim-Places-Arcane Enchanters
- Skyrim-Places-Forges
- Skyrim-Places-Grindstones
- Skyrim-Places-Workbenches
- Skyrim-Places-Cooking Pots
- Skyrim-Places-Clearable
- Skyrim-Places-Discoverable
- Skyrim-Confirmed Bugs