Oblivion:Vilverin
|
|||
|---|---|---|---|
| # of Zones | 4 | ||
| # of Welkynd Stones | 20 | ||
| # of Varla Stones | 1 | ||
| Occupants | |||
| Bandits, Undead Enemies, Jalbert (1 boss-level Bandit) (1 boss-level Bones Undead) |
|||
| Important Treasure | |||
| Immortal Blood 1 Ayleid Statue 1 boss-level Ayleid Reliquary |
|||
| Console Location Code(s) | |||
| VilverinExterior, Vilverin, Vilverin02, Vilverin03, Vilverin04 | |||
| Region | |||
| Heartlands | |||
| Location | |||
| Northeast of the Imperial City, across the water from the Imperial Prison Sewer | |||
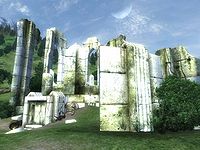
Vilverin is a large Ayleid ruin northeast of the Imperial City containing bandits and undead (quest-related). It contains four zones: Vilverin, Vilverin Canosel, Vilverin Wendesel, and Vilverin Sel Sancremathi.
Related Quests[edit]
- The Collector: Help Umbacano, a collector of ancient artifacts, recover the "Ten Ancestors", a set of ancient Ayleid statues.
Notes[edit]
- This ruin can be fully explored and looted without starting the related quest. Selling the Ayleid Statue found in Vilverin is one way to start the quest.
- This ruin appears to be on an island on the game map, but is actually on a peninsula.
- There is an Ayleid Well next to the entrance, which will supply you with some potentially useful extra Magicka.
- There are several environmental storylines present in Vilverin, as well as a large variety of features typical of Ayleid ruins. This is presumably because, as Vilverin is the first dungeon you see after exiting the sewers at the end of the tutorial, it is intended as a sort of introduction to Ayleid ruins and dungeon exploration in general.
- On the bed in the room containing the Dirty Scroll and Welkynd Stones in the first zone of the ruin, there is a nearly unreachable iron dagger hidden under the pillow. It is easiest to obtain with a cheap ranged spell.
- Vilverin appears in ESO as Lake Mist Ruins.
Bugs[edit]
- There are supposed to be 11 iron arrows at the camp near the entrance. However, two of them fall through the ground when the cell is first entered and are rendered inaccessible.
- On the second lowest level of the first zone, it is possible to become trapped behind the two planks standing against the wall. You can walk into them easily, but it is impossible to walk out.
Exterior[edit]
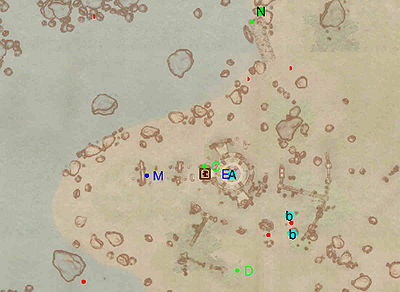
- The exterior is located at coordinates: Tamriel 12, 21
- This location's map marker (M on map) is named Vilverin (editor name VilverinMapMarker01). The entrance door is E of the marker, 60 feet away.
- 1 archer Bandit is near the entrance
- 1 melee Bandit is near the entrance
- 0-2 Mud Crabs are near the entrance
- 1 Nirnroot is at location N on map
- 1 Hand to Hand Skill Book: Immortal Blood is near the entrance
- 1 Chest 02 is near the entrance
- 1 Jewelry Box (contains 50% chance jewelry, 50% silver nugget, gold coins; non-respawning) is near the entrance
- The following ingredients can be found near the entrance: 1 Apple, 2 Lettuces, 1 Mutton, and 2 Onions
- The following weapons can be found near the entrance: 9 Iron Arrows (see bugs)
- The following plants can be found near the entrance: 3 Bergamot plants, 2 Foxglove plants, 1 Garlic cluster, 6 Monkshood plants, and 1 Motherwort plant
- Some of the above items are clustered at the following locations:
- At C: 1 Chest 02, 2 Lettuces, and 2 Onions
- At D: 1 Apple and 5 Iron Arrows
- 1 Ayleid Well is at A
- 2 bedrolls are at b
Zone 1: Vilverin[edit]
In the first zone of the ruin you will only encounter bandits. These bandits are all relatively weak, being about two levels lower than bandits anywhere else in Oblivion; see Bandit for details.
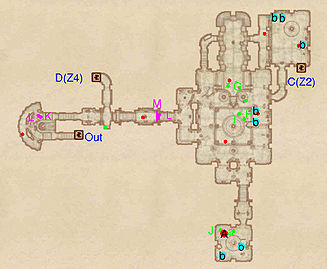
Upon entering, you will immediately face a bandit. Dispatch them and take care to avoid the Swinging Mace trap (L) triggered by the Pressure Plate at K. Head down the stairs, defeat another bandit, and take care to avoid the Tripwire (M) triggering the two Swinging Mace traps at L. In the large room you arrive in you will find two bandits, two bedrolls (b), two minor loot chests, a Welkynd Stone, and an assortment of food, iron weapons and armor (H and I). Up the stairs to the south is a small room guarded by the boss-level bandit ringleader (A). Inside you will find a bed and a bedroll (b), a minor loot chest, six Welkynd Stones clustered near a table (a), and some gold, food, and bottles of ale (J).
Also on the table is a Dirty Scroll written by the bandit ringleader with some background information on their activities. It also mentions that two bandits, "Two-Coins" and a "Khajiit from Vvardenfell", chose to camp in the tombs, and the Khajiit has gone missing. The bandit's note also mentions blue stones found in the ruin, which are Welkynd Stones.
Backtrack to the main chamber and follow the stairs leading to a lower level. Here you will find another bandit and some food items (G). The bandit guarding the nearby passage will likely be alerted to your presence and join the fray. Continue east and you will arrive in a passage overlooking the final room, from where you can snipe at the bandit below. Also in the room are three bedrolls (b) and the door to Vilverin Canosel (C).
When returning from Vilverin Sel Sancremathi via door D, you will arrive in an elevated area overlooking the first long passage. Search the nearby minor loot chest and jump down to make your way out.
Occupants:
- 1 Bandit Ringleader (Vilverin-specific variety; non-respawning) at location A on map
- 4 Bandits (Vilverin-specific variety; non-respawning)
- 2 archer Bandits
- 1 melee Bandit
Treasure:
- 2 Chests 01 (both locked)
- 1 Chest 02 (locked)
- 1 Restoration Ayleid Chest
- 1 Dirty Scroll
- 9 Stone Bricks (at the bottom of the second stairwell; these items have no practical use)
- 7 Welkynd Stones (one is on the floor just south and east of H, and the other six are at a)
- The following armor will always be found: 1 Green Robe, 1 Green Robe Hood, 1 Iron Boots, 1 Iron Cuirass, 1 Iron Greaves, and 1 Iron Shield
- The following ingredients will always be found: 2 Apples, 2 Bread Loaves, 2 Carrots, 5 Cheese Wedges, 3 Corns, 3 Crab Meats, 1 Flour, 1 Ham, 3 Lettuces, and 1 Mutton
- The following weapons will always be found: 1 Iron Claymore and 1 Iron Dagger
- Some of the above items are clustered at the following locations:
- At G: 2 Cheese Wedges, 2 Corns, 2 Crab Meats, and 3 Lettuces
- At H: 1 Chest 01 (locked), 1 Green Robe, 1 Green Robe Hood, 1 Iron Boots, 1 Iron Claymore, and 1 Iron Cuirass
- At I: 1 Apple, 1 Bread Loaf, 1 Carrot, and 1 Mutton
- At J: 1 Apple, 1 Bread Loaf, and 2 Cheese Wedges
- At a: 1 Dirty Scroll and 6 Welkynd Stones
Traps:
- 1 Pressure Plate trigger at location K on map
- 3 Swinging Mace traps at L
- 1 Tripwire trigger at M
Doors and Gates:
- There are three doors in/out of this zone
- 1 door (at Out) leads outside
- 1 door (at C) leads to the zone Vilverin Canosel
- 1 door (at D) leads to the zone Vilverin Sel Sancremathi
Other:
- 1 bed at location b on map
- 6 bedrolls at b
Zone 2: Vilverin Canosel[edit]
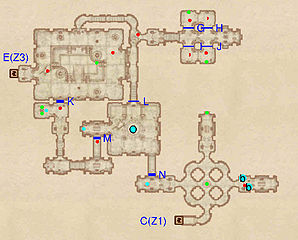
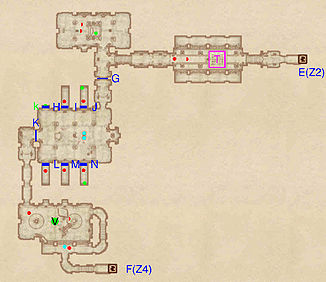
The second zone appears at first to be a dead end with a lone bandit, presumably the "Two-Coins" mentioned in the bandit's note. A minor loot cask is immediately in front of you when entering, while another lies at the end of the northern passage. Two bedrolls (b) are at the end of the eastern passage. Explore the western passage to find a pressure plate (cyan dot on map) which opens the hidden door at N and provides access to the rest of the zone.
In the first room, you will find the sprawled body of the missing Khajiit (O) and the first undead of the ruin. You may continue via one of two paths. To the north is an easy-locked gate (L) which leads to a corridor containing another undead. A passage to the east leads you to a small room with a Welkynd Stone high atop a pedestal (an iron arrow nearby can help you knock it off) and four cells with gates with leveled locks (G, H, I, and J). All four have a chance of containing an enemy, with those in the northwest and southeast guaranteed to host one in addition to a minor loot cask each. Returning to the corridor and following it north and west leads to a flooded tunnel, which takes you to the final room of the zone.
The alternative path is to open the hidden door at M using the nearby pressure plate. After battling past a zombie and descending a set of stairs, you will find another zombie guarding a Welkynd Stone and two minor loot chests. Use the pressure plate nearby to open the hidden door at K and access the final room. This is guarded by two enemies and contains a flooded central section, which hosts a submerged minor loot cask. Once you're finished, head through door E to access Vilverin Wendesel.
Occupants:
- 1 melee Bandit
- 2 Bones Undead
- 1 Skeleton Archer
- 1 Zombie Undead
- 1 Zombie Undead (always best possible level)
- 2-4 Undead Enemies (each 83% probability Undead, 17% Rat)
Treasure:
- 3 Ayleid Casks 01 (2 locked)
- 2 Ayleid Casks 02 (1 locked)
- 2 Restoration Ayleid Chests
- 2 Welkynd Stones (one is on the floor by the cyan dot near K, and the other is on a high pedestal in the easternmost part of the northeast area near gates H and J)
- The other following items will always be found: 2 Iron Arrows, 1 Iron Warhammer, and 3 Lockpicks
Doors and Gates:
- There are two doors in/out of this zone
- 1 door (at C) leads to the zone Vilverin
- 1 door (at E) leads to the zone Vilverin Wendesel
- 4 Gates at G, H, I, and J (all locked)
- 1 Gate at L (easy-locked)
- 3 Hidden Doors at K, M, and N (each opened by nearby pressure plates (cyan dots))
Other:
- 1 Dead Bandit at location O on map
- 2 bedrolls at b
Zone 3: Vilverin Wendesel[edit]
The first room is a wide passage flanked by six low pedestals, each holding a Welkynd Stone. Up to two enemies are patrolling nearby and can be weakened or dispatched by luring them into the Spike Pit trap at T. At the intersection nearby, head first to the north to a room with a minor loot chest and four Welkynd Stones, guarded by up to two enemies.
Next head south, where an iron gate (G) will seal behind you. In the next room are six alcoves behind as many hidden doors (H, I, J, L, M, and N). Each is controlled by one of the six press blocks attached to two pillars (cyan dots on map). The blocks correspond to the various doors' positions: for example, the top block on the northern pillar opens the third (farthest) door on the north wall. Every alcove conceals an enemy except for the northwestern one (k), which hosts an Ayleid chest with the key to the gate at K. The two alcoves closest to the pillars each hold a minor loot chest.
To progress, pick the hard-locked gate K or use the relevant key. The next room hosts up to two enemies, with another patrolling the overlooking balcony to the south. A closed cage (V) hosts a Varla Stone; to open it, use the press block (cyan dot) on the overlooking balcony. Door F leads to the final zone, Vilverin Sel Sancremathi.
Occupants:
- 0-2 Bones Undead
- 6-8 Melee Skeletons
- 2 Skeleton Archers
Treasure:
- 1 Ayleid Chest (contains Vilverin Chamber Key to open gate K) at location k on map (accessed by opening the hidden door at H)
- 1 Chest 01 (locked)
- 2 Restoration Ayleid Chests
- 11 Welkynd Stones (six are on pedestals in the northeastern room, four are on pedestals in the northwestern room, and one is on a pedestal in the eastern alcove of the room with the six hidden doors)
- 1 Varla Stone at V (in a cage; opened by the press block on the balcony to the south (cyan dot))
- The other following items will always be found: 1 Iron Shield and 1 Iron Shortsword
Traps:
- 1 Spike Pit trap at location T on map
Doors and Gates:
- There are two doors in/out of this zone
- 1 door (at E) leads to the zone Vilverin Canosel
- 1 door (at F) leads to the zone Vilverin Sel Sancremathi
- 1 Gate at K (hard-locked, opened by Vilverin Chamber Key)
- 6 Hidden Doors at H, I, J, L, M, and N (each opened by one of the press blocks in the middle of the room (cyan dots))
- 1 Iron Gate at G (this gate is initially open, but will close as soon as you enter the room containing the six hidden doors; it will reopen shortly after walking through gate K)
Zone 4: Vilverin Sel Sancremathi[edit]
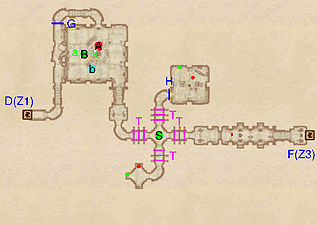
After dispatching a potential enemy, you will arrive at a four-way intersection. A set of Swinging Blades traps (T) guards each passage leading to and from a central pillar, atop which sits an Ayleid Statue (S) needed for the quest The Collector.
While the two side rooms (accessed by the northern and southern passages) contain both enemies and minor loot chests, the western passage leads to the climax of Vilverin's "story". The final room is the headquarters of the necromancer Jalbert. Alongside the Redguard you will find the boss reliquary (B), a unique Necromancer's Sack, a bedroll (b), various items clustered at a (including gold, weapons, books, and lockpicks), and two skeleton corpses. On subsequent explorations, a boss-level undead (A) will replace Jalbert.
Next to the boss reliquary on the pedestal is an Undelivered Letter, which suggests Jalbert fled his native Daggerfall when his necromancy was discovered, and was only able to escape thanks to a good friend in the city guard (the person to whom he was sending the letter). The letter also suggests Jalbert either killed or took advantage of the death of the Khajiit bandit to further his necromantic experiments.
You can exit the room via the locked gate at G, which you can either pick or open with the key found at k on top of the boss reliquary. It is also possible to jump up the broken masonry behind the reliquary to bypass the gate entirely. Door D leads back to the first zone, Vilverin.
Occupants:
- 1 boss-level Bones Undead at location A on map
- Jalbert (non-respawning)
- 2-3 Bones Undead
Treasure:
- 1 Ayleid Statue at location S on map
- 1 boss-level Ayleid Reliquary (Undead variety) at B
- 2 Restoration Ayleid Chests
- 1 Necromancer's Sack (contains ingredients and clutter)
- 1 Undelivered Letter
- Vilverin Sepulcher Key at k (opens the gate at G)
- The following plants will always be found: 1 Sacred Lotus plant
- The other following items will always be found: 1 Fine Iron Longsword, 9 Gold, 1 Iron Shield, 2 Lockpicks, 1 Novice Mortar & Pestle, and 1 Sacred Lotus Seeds
- Some of the above items are clustered at a: 1 boss-level Ayleid Reliquary (Undead variety), 9 Gold, 2 Lockpicks, 1 Novice Mortar & Pestle, 1 Sacred Lotus Seeds, 1 Undelivered Letter, and Vilverin Sepulcher Key
Traps:
- 12 Swinging Blades traps at locations T on map
Doors and Gates:
- There are two doors in/out of this zone
- 1 door (at D) leads to the zone Vilverin
- 1 door (at F) leads to the zone Vilverin Wendesel
- 1 Gate at G (locked, opened by Vilverin Sepulcher Key)
- 1 Gate at H (locked)
Other:
- 1 bedroll at location b on map
