Tribunal:Bamz-Amschend
| This place page is currently being rewritten as part of the Morrowind Overhaul Project. The page is being rewritten and checked in several stages. All users are welcome to make changes to the page. If you make a change that is relevant to the project, please update this template accordingly, and make sure you have observed the project guidelines. Details
Walkthrough: not written
Interior Images: not added |
|
||
|---|---|---|
| # of Zones | 8 | |
| Occupants | ||
| Dwemer constructs, fabricants | ||
| Console Location Code(s) | ||
| Bamz-Amschend, Hall of Wails Bamz-Amschend, Hall of Winds Bamz-Amschend, Hearthfire Hall Bamz-Amschend, King's Walk Bamz-Amschend, Passage of the Walker Bamz-Amschend, Passage of Whispers Bamz-Amschend, Radac's Forge Bamz-Amschend, Skybreak Gallery |
||
| Location | ||
| Mournhold, beneath the Plaza | ||

Bamz-Amschend is a hidden Dwemer ruin accessible from the Plaza Brindisi Dorom.
Unbeknown to the leaders and citizens of Mournhold, beneath the Plaza Brindisi Dorom is hidden not the ruins of the old city but rather a massive Dwemer ruin, Bamz-Amschend. The ruins only become accessible after a surprise attack on the city destroys the Plaza's central statue, leaving beneath it an opening through the ceiling of the old fortress. Bamz-Amschend is unique due to the fact that its architecture is remarkably different from any other Dwemer ruins encountered in the game. It has a much higher roof, completely different wall structures and supports, and also is the only ruin to contain Centurion Archers. Throughout Bamz-Amschend you will find piles of ash and pieces of armor and weapons, which may give clues to the disappearance of the Dwemer.
Related Quests[edit]
Main Quest[edit]
- A Show of Power: Further investigate the Plaza attack for Helseth by working for Almalexia.
- The Blade of Nerevar: Gather the three broken pieces of this legendary blade to reforge it.
Interior[edit]
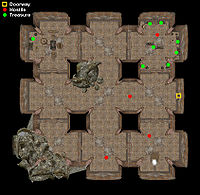
Hearthfire Hall[edit]
This is the first room you will enter, accessed by a collapsed tunnel underneath the statue. When you arrive, there will be a battle already in progress between several Fabricants and some Dwemer constructs. They will both ignore you at first, so you might as well just sit back and watch them destroy each other, then clean up after one side wins (Usually the Dwemer). Make sure you loot any Dwemer Archers you find here and further in - their darts are among the best throwing weapons in the game, and can make short work of some of the more powerful opponents.
Hall of Winds[edit]
The door to the right of the Hearthfire Hall leads to the Hall of Winds. This dead end set of rooms is notable only for the fact that it contains one Dwemer Satchel Pack, which will be needed later on. (You will eventually need two packs, and there are two more found elsewhere, so it's not essential to pick up the pack in this room.)
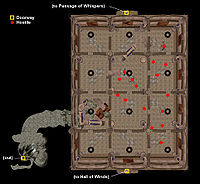
Passage of Whispers[edit]
The left door from the Hearthfire Hall leads here. It's basically just a downward leading hallway, with one branch leading to the Hall of Wails, and the other going down to Radac's Forge. There is little to note here aside from Dwemer weapons and armor, as this area mainly serves as a hallway to separate other, more important halls.
Hall of Wails[edit]
Almost identical to the Hall of Winds, there is pretty much nothing of note here beyond some assorted Dwemer loot.
Radac's Forge[edit]

In one room here, you will see a giant Dwemer automaton under construction. Remember this room, as you will have to come back here later to meet the ghost of a long-dead Dwemer engineer. Outside this room, at the end of a long passage, is a collapsed wall leading to the next section. To get through, you will need a Dwemer Satchel Pack. Fortunately, there are two of them nearby in a chest in a closet (both locked). Set the Satchel down and back away before it blows, and it will open a crawl-space to the next section.
Passage of the Walker[edit]

This is a hallway leading down further to the King's Walk. To your right, shortly after you enter, there is another collapsed wall, which leads to the Daedric Shrine of Norenen-dur. Getting into the Passage of the Walker requires a Dwemer Satchel Pack (see section above).
King's Walk[edit]
This is a linear series of rooms and hallways which leads straight down to the final section of this ruin:
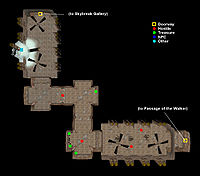
Skybreak Gallery[edit]
This room houses the Dwemer weather machine. You will need a Powered Dwemer Coherer to activate it - Almalexia will provide you with one. Once it is active, you can use the three levers there to change the weather over Mournhold. A large rotating wall with carved images will indicate to you what the current weather is.
Notes[edit]
- Bamz-Amschend was mentioned in the book Chronicles of Nchuleft.
- You may encounter a bug in the area called 'Passage of the Walker', in which your local map is reset each time you exit the cell. This bug does not seem to be fixed by the Morrowind Code Patch; however, the other cells within Bamz-Amschend appear to be unaffected.
- Bamz-Amschend also appeared in ESO, although it is titled "Clockwork City Vaults".
Maps[edit]
-
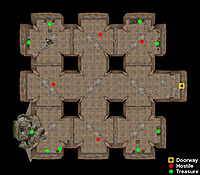
Map of the Hall of Wails
-
Map of the Hall of Winds
-
Map of Hearthfire Hall
-
Map of King's Walk
-
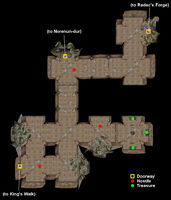
Map of the Passage of the Walker
-

Map of the Passage of Whispers
-
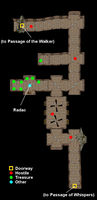
Map of the Radac's Forge
-
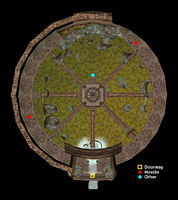
Map of Skybreak Gallery


