Redguard:Escape the Catacombs
The UESPWiki – Your source for The Elder Scrolls since 1995
< Redguard: Quests(Redirected from Redguard:Catacombs)
|

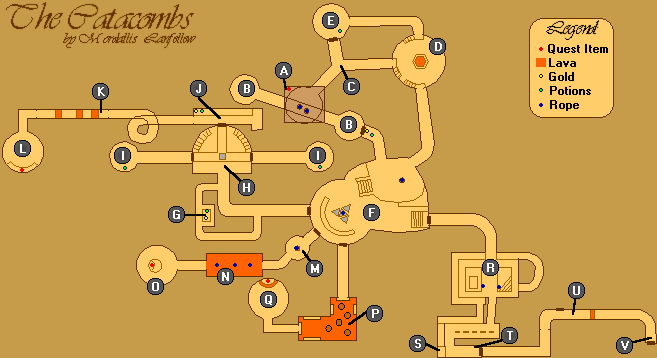
Quick Walkthrough[edit]
- Talk to the prisoner in your cell and get his key.
- Use the key to loosen a stone block on the wall and climb the rope.
- Retrieve your equipment from E.
- Travel to F and use the triangular buttons on the ground to open the three doors one at a time.
- From behind each door, obtain the three runes.
- Use the three runes to solve the puzzle at F to open the door and continue.
- Climb up to reach the ropes at R, swing over to the balcony, and pull the lever at S.
- Continue on to the exit at V.
- (Optional) Collect the remaining 200 gold from Kotaro for the amulet delivery job.
- (Optional) Talk to Brennan and kill him.
Detailed Walkthrough[edit]
- Point A — Cell
- You find yourself in this cell after confronting Lord Richton and being subdued by Dram. There is a hole with a rope in the ceiling, but it's too high to reach by jumping. A prisoner is lying on the floor in the corner. He briefly explains how to contact the Restless League and gives you a rusty key that unlocks the Saintsport lighthouse's door. Use the key on the opposite wall to loosen a block. Do this three times and it will fall out so that you can reach the rope in the ceiling. If you examine the block instead, Cyrus says, "Looks like this block is loose. Maybe I can pry it out with something."
- Point B — Lower Hallway
- At the top of the rope, hold the up arrow or down arrow key and jump into the hallway. There is a guard nearby and a rope going further upward between you and him. The guard will not notice you until you come a bit closer. Since you don't have a weapon, ignore the guard and climb the rope up to the next area. The door on the far side of the hallway cannot be opened; you can reach the other side from F.
- Point C — Upper Hallway
- Continue on down the hallway and avoid the two guards. The door on the left cannot be opened and the room beyond it is actually E.
- Point D — Circular Room
- You reach a large room with a lava pit and three sets of stairs leading out. The south exit will be closed until you find your equipment. Climb up the north stairs and run down the hall to E.
- Point E — Equipment Room

- In this room you'll find all of your equipment (except for torches), as well as three health potions, a strength potion, and a torch. When you pick up the equipment, Cyrus says, "Finally, my equipment. This should even the odds with Richton's men." Continue back to D where you can kill those guards now.
- Point F — Great Hall


- This is a large open area with many interesting things. A veteran guard stands at the end of the passage coming from D. For some extra loot, go down the hallway on your right as you enter to find three health potions and some gold. The rope going down from the upper level leads to a puzzle which you'll solve later. First, you need to find three runes throughout the dungeon. Continue down the stairs and kill the guard. At this end of the room, you'll find three closed doors and four triangular buttons. The combinations to open each door are outlined below, using the numbers on the diagram to the right.
-
- 1: Clears set buttons, closes any open door
- 2 + 3: Opens right door
- 3 + 4: Opens center door
- 4 + 2: Opens left door
- Behind each door is a series of obstacles you must overcome to reach a rune for the puzzle. You can choose the doors in any order: G for right, M for center, and P for left.
- Point G — Through Right Door
- The hallway behind the right door has two side passages on the left that connect to a small room. Two elite guards patrol these halls. The room contains two health potions, a potion of ironskin, two gold pouches, and a chest with another gold pouch inside.
- Point H — Three Doors
- At the end of the hallway, you enter a room with an upper walkway that joins three doors together. The pressure plate in the middle opens all three doors at once, and there are two guards behind the side doors. You can find a torch on the ground near the east stairs.
- Point I — Side Rooms
- The rooms behind the east and west doors of H each contain a health potion and torch.
- Point J — Narrow Room
- From the north door of H you are led into a long, narrow room. You can climb onto the high platform from the east side to find a strength potion, potion of ironskin, and two gold pouches.
- Point K — Three Lava Pits
- Go down the spiral passage from J and be extra careful in the next hallway. The hall slopes downward, which makes it difficult to see the three lava pits ahead. Save before attempting the jumps and do the same for other lava areas. There is a guard after the last pit so be ready to fight.
- Point L — Rune with Two Lines

- On the raised section in this round room you find a rune with two lines on it. You'll need this to solve the puzzle at F. Head back to F now.
- Point M — Through Center Door
- Climb up the rope here or use the rope above the triangular buttons at F to swing and jump up to the overlook.
- Point N — Swinging over Lava

- Walk slowly toward the next room, which is filled with lava and has three ropes hanging from the ceiling. You must make a running jump toward the first rope because the door closes behind you and the small ledge disappears. While on the rope swing back and forth with the left and right arrow keys until you get enough speed to jump to the next rope. You can change direction by holding shift.
- Point O — Rune with a Line and Dot
- This is another round room with a rune on the opposite side of the object in the center of the room. The rune has a line and a dot on it. An elite guard patrols here. When returning through the lava room you'll need to run and jump again to the first rope. As you jump off the rope to the other side be wary of the door which will close as soon as you hit the ledge. Return to F and, if you have all three runes, drop down to the puzzle.
- Point P — Through Left Door

- There is a room filled with lava at the end of the hallway behind the left door. The path consists of various ledges and circular platforms. Be careful with the jumps and keep the relative height of platforms in mind. Walk instead of run by holding shift so you don't fall over the edge. Around the corner, you will have to get past two fireball traps; the right ledge may be easier because you can see the fireball coming. Wait to jump until right after the fireball hits the wall, then jump again to the final ledge.
- Point Q — Rune with Two Lines and a Dot
- Two elite guards patrol the round room here. The rune, which has two lines and a dot on it, sits on the platform across the room. The rune is protected by a small lava trench and spinning blades trap. Walk up to the edge of the lava and jump just after the blades go by. The rune has two lines and a dot on it. Head back to F again.
- Point F — Rune Puzzle

- This puzzle utilizes the dial, lever, and wall of symbols. The red symbols on the wall match the ones on the dial, which you can turn if you aren't holding a rune. Note that the symbol wall is actually duplicated: the left half is identical to the right half. Look at the wall and try to match all three of your runes with a column of black symbols on the wall. Then turn the dial to the red symbol above that column and insert your runes into the notch in order from top to bottom according to the wall.
- The solution is to turn the dial to the triangle shape, then insert the runes in the following order: two lines, two lines and a dot, and a line and dot. Finally, pull the lever and the door in the southeast will open. The only way out of this lower area is up the rope around the corner; a torch can be found nearby.
- Point R — Square Room

- This is a very tall square room with one guard on the ground floor. Climb up the stairs on the southeast side of the left platform and jump over to the other platform. Climb onto the archway and jump to the nearest rope. The intended path is for you to swing to the next rope and then to the high doorway. Once there, you can walk around the balcony to the veteran guard. However, it is possible (and not difficult) to jump directly to the guard from the first rope.
- Point S — Lever
- You'll find a lever here that opens the door below you at T. The easiest way to get down is to drop from the ledge next to the lever, but you will lose at least 10 health from the fall. To avoid losing health, go back to the last edge, which is above a line of torches. Hang from the edge over a torch sconce and drop onto it.
- Point T — Door Opened by Lever
- There is one veteran guard here and the door which is opened at S.
- Point U — Treasure Vaults Door

- Continue through the halls. Two more veteran guards will try to stop you from escaping. In this area is a locked door to the Palace Treasure Vaults, which can only be opened when you come back later in the story. Watch out for the small lava trench crossing the hallway east of this door.
- Point V — Catacombs Exit
- Head into the tunnel at the end of the hallway to find the exit to the Catacombs. The escape scene will play when you leave. You come out near the docks, to the east, above a drain grate. Once you exit, all guards will attack you on sight. Don't forget to collect your 200 gold for the amulet delivery job from Kotaro. Make sure you have less than 300 gold when you see him or you'll lose some due to the 500 gold limit.
- Brennan's Betrayal
- After this quest, Dreekius or Siona will tell you Brennan was looking for you. If you became friends with Siona by mentioning your history with Tobias, she also warns you that Brennan was paid by the Imperials to set a trap. You can also go directly to Brennan. Note that this is completely optional.
- Talk to Brennan and he will ask you to come below deck where it's safe to talk. If Siona warned you, you can confront Brennan; a fight to the death will ensue. The other options will cause him to enter the ship's hull. Inside there are two veteran guards and Brennan as well if you didn't fight him earlier. They all attack at once. Your only reward for coming here is 50 gold in the cabin's chest.
Notes[edit]
- You wake up in the Catacombs with full health.
- The Catacombs also appear in ESO, albeit much smaller, as "The Grave".
Map[edit]

Scenes[edit]
Escape Scene[edit]

This is the scene that happens right after exiting the Catacombs. It takes place in one of the Palace's large chambers.
- Guard: "Governor! I have news of the Redguard!"
- Richton: "Which bloody Redguard"?
- Guard: "The one recently put into the Catacombs, sir. The one named Cyrus. He has escaped!"
- Richton: "What?!"
- Guard: "He is nowhere to be found, sir. We are combing the streets for him now."
- Richton: "But escape is impossible from the Catacombs? The traps and so forth, right, Dram?"
- Dram: "I hear you."
- Richton: "Thank you, guardsman. Carry on. And keep me posted."
The guard leaves.
- Dram: "I underestimated the Redguard."
- Richton: "Bah! Overestimated the dungeons of our enemies, more likely! Never trust another man's deathtraps.
-
- "Double the guard, immediately, and increase the patrols in town and along the waterfront.
- "The Redguard must not find his sister."
-
- Dram: "Leave him to me."
Gallery[edit]
-
Location-specific loading screen, showing a partially transparent sketch of Attrebus
-
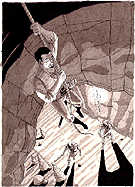
Cyrus descending a rope in the Catacombs


| Prev: N'Gasta's Amulet | Up: Quests | Next: Contact the League |