Skyrim:Mzulft
|
|||
|---|---|---|---|
| # of Zones | 4 | ||
| Clearable | Yes | ||
| Dungeon | Yes | ||
| Respawn Time | Never (storage is safe) | ||
| Level | Min: 16 | ||
| Occupants | |||
| Dwarven Automatons, Falmer, Chaurus | |||
| Important Treasure | |||
| Spell Tome: Flames Spell Tome: Frostbite The Lunar Lorkhan |
|||
| Console Location Code(s) | |||
| MzulftExterior, MzulftExteriorB01, MzulftExterior03, Mzulft01, Mzulft02, Mzulft03, Mzulft04z | |||
| Region | |||
| Eastmarch | |||
| Location | |||
| South-southeast of Windhelm North-northwest of Stony Creek Cave |
|||
| Special Features | |||
| # of Alchemy Labs | 1 | ||
| Ore Veins | |||
| # of Moonstone | 7 | ||

Mzulft is a large Dwarven ruin south-southeast of Windhelm containing Dwarven automatons, Falmer, and chaurus. It contains four zones: Mzulft, Mzulft Boilery, Mzulft Aedrome, and Dwarven Storeroom (a separate building).
Access to almost the entire main ruin is blocked by a locked door (which cannot be picked) until you begin the College of Winterhold quest Revealing the Unseen. It is the location of one of two Oculories in Skyrim (the other is deep underground in Blackreach), and this feature in particular made it a target of a secret project conducted by the Synod. However, the locals aren't too happy, and have decimated the mages' numbers. Only two remain alive within the ruin upon your arrival.
Mzulft contains a multitude of Dwemer metal items, which can be smelted into Dwarven metal ingots or sold directly for a significant profit. You can also collect all ten of the Dwarven cogs needed to complete the quest Arniel's Endeavor here. There are several moonstone ore veins in the first two zones, and one in the last. Two Dwemer convectors can be found in Mzulft: one inside the main ruins, and another in the Dwarven Storeroom.
Related Quests[edit]
- Arniel's Endeavor: Uncover an ancient Dwemer secret. (radiant)
- Lost to the AgesDG: Search for the Dwemer's Aetherium Forge.
- Revealing the Unseen: Learn the location of the Staff of Magnus.
Walkthrough[edit]
Exterior[edit]
Mzulft has three main structures: a wall with an extending archway to the northwest, the Dwarven Storeroom to the southwest, and the main entrance to the ruins between them. An iron ore vein is at the northwestern end of the wall, against the cliff face. If Dawnguard is installed, a dead adventurer carrying a copy of The Aetherium Wars lies under the archway in a pool of blood. In addition, a hidden chest is on top of the wall, near a pipe belching steam. You may reach it by zigzagging up the hill, starting from just north of the ore vein, and working your way up until you can jump down onto the wall.
Mzulft[edit]

The first room is a small antechamber. Gavros Plinius is against the wall ahead and to the right. Loot him when he dies to find, among other things, the key to the unpickable door, the only way forward. Head east along the corridor. The right wall seems to have collapsed partly; earth and plants intrude into the typical Dwemer architecture. A few pieces of Dwemer scrap metal, along with some pottery, are scattered on and underneath the stone shelves to either side as you climb the ramp. Avoid the small pressure plate that will trigger rows of spikes from the ceiling ahead. You'll stumble upon the corpse of a Synod researcher on the path just after the spikes; step over them, but be sure to grab the random potion near their body. Turn right, where two Dwemer bowls, a pot, and an urn are arranged just before a doorway. Beyond you may spy a Dwarven spider worker from a distance as it skitters among the gears in the next room. Another is around the corner, hard to see through the steam. There's also a Dwemer convector on a stone table among some Dwemer pottery and a random potion.
Keep heading east up the ramp, past more pottery and scrap metal. In the next room are two more leveled spiders, one in the northeast corner and one which will pop out of a scuttle on the south wall. Other than the requisite bits of clutter, there's also a random potion of magicka by the west wall, and two doors.

The door to the north is trapped; either step back to avoid the spears from the floor when opening it, or disarm the adept-level tension cable at the bottom right of the door. Beyond is another spider, an unlocked chest, and a moonstone ore vein in a steam-filled dead end.
The door to the east opens to a ramp littered with quite a bit of scrap metal for refining. The corridor takes a left turn at the top, where you'll see another door with a scuttle on either side. The left scuttle houses a leveled spider that will ambush you when you get close. Past the door is a short corridor that quickly becomes a natural rock cavern complete with a tree. Just inside, near the tree, is a pile of rubble; climb over it to find a Dwarven shield tucked away in the corner. There are two patches of Namira's Rot fungus in the area. Down the tunnel, just before the next room and near the second Namira's Rot patch, is an alcove with a moonstone ore vein and a handy pickaxe on a barrel.
A leveled chaurus or chaurus hunterDG feeds on another researcher in the next room. On the right is basket containing two sheaves of wheat, with a third on a food barrel beside it. A scaffold leads up to another, equally dead researcher, two bedrolls, a random potion, a random scroll, a Falmer ear, and an apothecary's satchel. At the base of the scaffolding to the right is a bucket and a basket containing a whole salmon, a piece of cheese, a gourd, and two potatoes, while under the ramp and to the left are two more pickaxes and some leather strips. Across the room is a moonstone ore vein, a table with some sacks of food, a cabbage, three potatoes, a rack of dog meat, and a knapsack. The tunnel leading out has a tripwire rigged to a falling boulder trap, but it is fairly easy to spot. Two leveled chaurus scuttle about among the bones of many different animals (and at least one human) just past this, and the architecture starts to show more Dwemer traits again.

After a right turn and a ramp, a Dwarven sphere will pop out of a scuttle on the wall just before an adept-locked gate. Behind the gate are two unlocked chests, five pieces of pottery, a Dwemer cog, a solid Dwemer metal, a Dwemer gyro, a Dwemer scrap metal, two Dwemer gears, and two Dwarven metal ingots.
Head north, then east up a ramp to another large set of doors. A leveled spider is just past the doors in a corridor filled with steam. At the junction, a sphere will pop out of a scuttle in the dead end to the right. Turning north again, you'll enter a room with stairs leading down into a pit, a corridor leading north on the other side of the pit, and a spider. Down the stairs are lots of scrap, a random potion, and an alchemy lab set into the table. To the south, a level-locked gate leads to an unlocked chest.
Back up the stairs and north into the next room, you might spot a sphere rolling around the far side of the room. Between you and the sphere is a large floor pit down stairs to the right, and a thin ledge skirting it to the left. There's no loot in the pit, but there are two spiders in the scuttles on either side of the stairs. On the ledge leading across to the far side where the sphere patrols is a set of three steam piston traps, then a set of pressure plates, then three more pistons. These aren't very dangerous; they'll just push you off into the pit if you walk into them.
North, the tunnel is filled with rubble, and the corpses of a spider and a Falmer hint at what is to come. An unlocked chest is on the ground near them, and the door to the next zone is up a ramp to the east. Before heading through, loot the next set of corpses (two spiders and a Falmer) in front of the doors, and duck around the collapsed wall on the left to find an unlocked chest.
Mzulft Boilery[edit]

The boilery starts off at the bottom of a ramp, where the remnants of two Dwarven spiders and a sphere guardian litter the floor. Up the incline you'll find another sphere guardian in pieces (part of the sphere is still rocking back and forth, as if it was just destroyed), and the remains of a spider in the open just past that. Beware while looting the spider, as a Falmer (very much alive) is in the corridors nearby. It patrols in a counter-clockwise loop, so if you follow it at a distance, you can sneak by should you desire.
Whichever fork you take, you'll end up in the same place shortly, though the right turn near the spider leads you past another Synod researcher's body. Going straight puts you within grabbing distance of more metal items, plus a Dwarven metal ingot in a bowl. Either way, the only way forward is east up an incline (a destroyed sphere guardian is at the right turn before the ramp). Another Falmer skulks at the top, wandering back and forth. The far eastern pillar has a Dwarven metal ingot in front of it, next to an urn.
Going north, the corridor is scattered with Dwarven metal items. In the next room, a Falmer patrols from one side of the central pillar to the other, while another walks from the right side through an open gate to a smaller room to the east and back again. Three poisons are found on a stone table and a stone shelf to the north. The west gate is level-locked and contains the remains of two sphere guardians and two spiders; one more destroyed spider is in front of the gate. The north room is empty.
In the connecting room to the east, a spider lies broken in the corner, an imp stool is growing in a central planter, and there's a tunnel broken through the wall farther east. A second imp stool is growing beside the entrance to the tunnel. This tunnel leads deeper into the earth, and can be narrow in places. Where the tunnel turns north and widens slightly, a chaurus scuttles back and forth toward the end of the room. At the southernmost point of its patrol route is a small side room containing an unlocked chest, two chaurus egg sacs, a patch of imp stool, and another moonstone ore vein.
The next room contains a Falmer and two chaurus. Up a short incline to the east is a moonstone ore vein. Behind some Falmer fencing is a pair of iron boots, a pair of random gauntlets, a random potion of healing, an apothecary's satchel, and a lute. Opposite is a tent near a pillar to the west with a pickaxe on the ground by the entrance. Inside the tent is an unlocked chest, a birds' nest containing a pine thrush egg, and an additional pine thrush egg on the ground. Another set of three egg sacs is just to the north, next to a tripwire that will release a claw trap from the pillar. The chaurus may trip it for you, if you get their attention.

The path twists west, north, and east, passing two sets of glowing mushrooms on the wall (for a total of four to harvest). Along the north side of the corridor heading east, a gap that you can't squeeze through will give you a glimpse of what is to come. A Falmer stands with its back to you on the other side. A well-placed arrow can kill it, though spells may be more difficult since the slits are so narrow. A spell hitting the near side will draw two Falmer, including the one you can see, to investigate via the eastern end of the corridor. A Synod researcher's corpse lies in the middle of the corridor next to the gap, and another can be spotted in the entrance of the tent visible through the gap.
Keep going east, past an empty wine bottle and a basket containing two eidar cheese wedges, then turn north at the next patch of glowing mushrooms and enter the cavern. The other Falmer patrols directly in front of you as you enter the room. The tent on the lower level contains, aside from the dead researcher, a pine thrush egg, a rock warbler egg, a gourd, and two Falmer weapons. Four more glowing mushrooms can be harvested in this room. Find the tunnel out along the north wall, but be careful, as the next room contains a chaurus directly in your path. Luckily, that's all it contains, aside from plentiful egg sacs and glowing mushrooms. Head left immediately from where you entered the room to find five sacs grouped together, then jump up and behind them to find a semi-hidden chest.
The next room returns to Dwemer architecture. A Falmer pokes its head into the room from the far side every so often, so be careful as you try your hand at the master-locked door that blocks off the northeast part of the room. Behind it is a chest, a key to the same room (if you have Telekinesis, you can actually grab the key off the table with the spell by positioning yourself against the barred window, negating the need for lockpicking), a lootable skeleton reclining on a bed, and, next to the skeleton, a copy of the Alteration skill book The Lunar Lorkhan.

Head north, then west; a moonstone ore vein hides in the shadowy undergrowth at the turning. Take the first right in the corridor beyond to find an expert-locked door, unlocked with the same key as the master-locked door before. Inside is a chaurus. A stone bed is on a dais across from the door, with some scrap metal on the ledge above it. To the right, a table holds a Dwarven helmet and an apprentice-locked chest.
Back out in the corridor, continue west. You'll enter a rectangular room with a shallow pool running down the length of it. Two Falmer are visible on the other side of the pool. Head right to skirt around the water, popping into a nook on the way for a random healing potion and a novice-locked chest.
The door to the next zone awaits via the northwestern exit from the room, but first head all the way around the pool from the entrance to the southwestern door. A leveled tension cable will trigger a spear trap from the side, so step back or disarm as you will. Behind the door, a leveled chaurus or chaurus hunter wanders about in a small room. This room contains an unlocked chest, a random potion, and a random potion of fortify Light Armor, as well as a stone bed and the remains of two Dwarven spiders.
Yet another researcher lies in the shadow of some rubble just before the door to Mzulft Aedrome.
Mzulft Aedrome[edit]

A Falmer paces restlessly at the top of the ramp just inside this area. A chaurus is just around the corner to the north, and is hard to see until you're nearly to the top of the ramp. The corridor ends at a tattered banner on the wall flanked by Dwemer metal heads. There are branches both to the left and right, but both paths lead to the same large room.
A Falmer patrols from one entrance to the other. Another is also in the open area on the ground floor. A third and fourth Falmer are by a tent on the second level to the west, and the level above that, respectively. One of the Falmer carries a focusing crystal, and one is the strongest type possible for your level. Don't forget to loot the focusing crystal before moving on, as it is easy to miss and you will have to backtrack after speaking with Paratus Decimius for the quest to advance without it.
The tent on the second level contains a chest, a salmon to harvest, a birds' nest containing a pine thrush egg, and two more loose pine thrush eggs. The northeast corner of the room features a dead Synod researcher and a destroyed Dwarven spider. The room has three exits. To the north is a master-locked door to a dead end with an unlocked chest and a moonstone ore vein among the rubble. To the west is a locked door that requires the Mzulft observatory key. The key is not in this room, you'll find it in the eastern wing. A chest is mounted to the wall to the left of the door.

.jpg)
To the east is another corridor leading down. The next room to the east has an arena-type layout and contains lots of Dwarven metal items. Past that is another door, then a short passage to the next room which contains two dead Falmer. A closed but unlocked door hides a boss-level Dwarven automaton. It will probably be a centurion, but depending on your level it might be a lesser automaton. Once it is destroyed, you'll find three more Falmer corpses and an unlocked chest containing the Mzulft observatory key. On the ledges on either side of the room is some good loot, including two Dwarven metal ingots, two potions (one fortifying a random skill and the other restoring health, magicka, or stamina), and a scroll of Chain Lightning.
Now you can open the key-required door. Past the door is a ramp up and another key-required door, this time with a dead Falmer in front of it. Try to unlock the door, and you'll hear the voice of Paratus Decimius from behind it. He will unlock the door for you and engage you in conversation when it's open. When you're done talking, follow him, taking note of the door to the south. A small camp is in the corridor, with several food items, books, and bedrolls, as well as a small coin purse, a satchel, and a knapsack. Paratus will lead you to the Oculory, where you'll have to solve a puzzle. The Oculory contains several Dwemer-related books, and two spell tomes, a Spell Tome: Flames and a Spell Tome: Frostbite, near the controls.
Once the puzzle is solved, you can leave via the southern door you saw earlier, though not without one more projection from Nerien, who will tell you to return to the College right away. If you choose to take the long way back, you won't get the cutscene, but it won't affect the quest Revealing the Unseen either way.
If you take the shortcut near the Oculory, you'll end up in the mountains north of where you entered, and can fast-travel from there.
Dwarven Storeroom[edit]

The Dwarven Storeroom is a separate building just south of the main entrance. The storeroom contains no enemies, but does contain a Dwemer convector (needed for the third part of Arniel's Endeavor) and a large amount of Dwemer scrap and other Dwemer items, such as dishware.
To the right as you enter the main chamber, there is an apprentice-locked door leading to a room containing two chests, eighteen Dwarven metal ingots, and more Dwemer clutter and scrap. Looking straight ahead in the main chamber, there is an expert-locked gate leading to a room containing a random enchanted Dwarven axe lying on a shelf, several more Dwarven metal ingots, and more Dwemer clutter and scrap.
An Aetherium shard can be found here for the Dawnguard quest Lost to the AgesDG.
Noteworthy items include:
- Bent Dwemer Scrap Metal x5
- Dwarven Metal Ingot x18
- Dwemer Cog x4
- Large Decorative Dwemer Strut x1
- Large Dwemer Plate Metal x2
- Small Dwemer Lever x1
- Solid Dwemer Metal x3
Notes[edit]
- Mzulft has the highest possible yield of Dwarven metal ingots in one location. There are 498 potential ingots.
- Mzulft is mentioned in the book Herbane's Bestiary: Automatons.
- Mzulft also appears in ESO.
Bugs[edit]
- If you jump from the top of the scaffolding near the beginning of the dungeon, it may cause you to fall through the map and advance farther into the dungeon. ?
- If Mzulft is entered and cleared prior to Revealing the Unseen, it may completely prevent that quest from starting or activating.
Maps[edit]
-
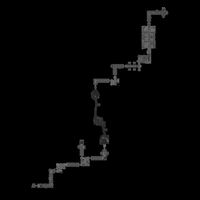
Mzulft
-
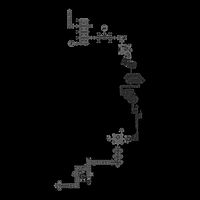
Mzulft Boilery
-
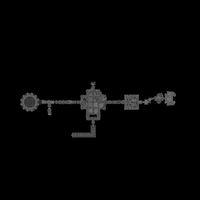
Mzulft Aedrome
-
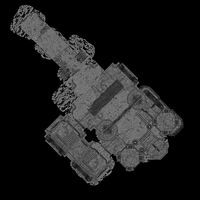
Dwarven Storeroom


