Skyrim:Ysgramor's Tomb
|
|||
|---|---|---|---|
| # of Zones | 1 | ||
| Clearable | Yes | ||
| Dungeon | Yes | ||
| Respawn Time | Never (storage is safe) | ||
| Level | Min: 6 | ||
| Occupants | |||
| Companion Ghosts, Frostbite Spiders, Skeevers | |||
| Important Treasure | |||
| Shield of Ysgramor The Legendary Sancre Tor |
|||
| Console Location Code(s) | |||
| YsgramorsTomb01 | |||
| Region | |||
| Winterhold | |||
| Location | |||
| Northwest of Winterhold East of Pilgrim's Trench |
|||
| Special Features | |||
| Word Wall | Animal Allegiance | ||
| Ore Veins | |||
| # of Gold | 1 | ||
| # of Iron | 1 | ||
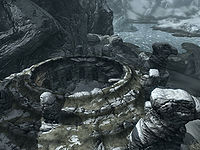
Ysgramor's Tomb is a small Nordic ruin northwest of Winterhold containing Companion ghosts, frostbite spiders, and skeevers. It contains only one zone, Ysgramor's Tomb.
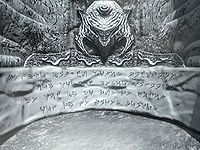
Its word wall teaches part of the Animal Allegiance dragon shout, and is located outside the tomb (see notes). Entry past the first room of the tomb is only unlocked during the Companions quest Glory of the Dead.
Related Quests[edit]
- Glory of the Dead: Cure Kodlak's spirit and become Harbinger of the Companions.
- Purity: Help a member of the Circle give up their beasthood. (radiant)
Walkthrough[edit]
Exterior[edit]
There is an iron ore vein west of the tomb. You may encounter a leveled animal when approaching the entrance. The barrow inside has stairs leading down to a sunken area with two burial urns, one on either side of the iron door.
Ysgramor's Tomb[edit]
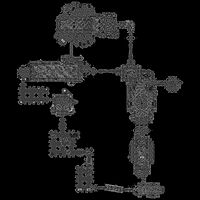
Upon entering, you are faced with a short flight of stairs leading down to a room lit by two braziers. There is a statue of Ysgramor himself on a raised platform in the middle of the room. Hidden doors can be found in recessed areas to the north, east, and south. Around the statue, you will find a troll skull, blue and purple mountain flowers, a large coin purse, a potion of plentiful stamina, a snow bear pelt, a wolf pelt, and a broken iron sword handle and blade. This is where you will meet up with Vilkas, Aela, and Farkas during the quest Glory of the Dead. Vilkas will state that he is unworthy of going any further due to the revenge spree that you both have been on since the death of Kodlak Whitemane. To proceed further you need to return Wuuthrad to the statue by activating it.
Once this is done, the door to the north opens the way to a cobweb covered corridor. At the bottom, you will encounter two skeevers just beyond two upright sarcophagi. The corridor turns to the west and widens before reaching another short flight of stairs. When you get to the bottom, two Companion ghosts will leave their upright sarcophagi and attack you. On the right is a small sideboard with three burial urns and an ancient Nord bow. There is also a sideboard to the left which has an ancient Nord sword. The corridor ends with unlocked wooden double doors.
Through the doors, you descend another flight of stairs into a large room with a sarcophagus in the middle and two more at the far end. There are more sarcophagi lying to the sides of the room, some of which contain dead draugr. Companion ghosts will emerge from four of the sarcophagi. To the left of the stairs, there is a sideboard against the east wall that holds a dragon priest dagger, two burial urns, and an ancient Nord greatsword. To the left of the sarcophagus in the middle is a sideboard with a potion of healing on top. In the northwest corner of the room is a stone table with two large urns behind it. The path forward is through a doorway in the south wall.
Through this doorway are stairs leading down to another large room with several sarcophagi, from which five more Companion ghosts will appear. The center of the room is sunken and full of shallow water. Against the east wall are two large urns and a sideboard with three burial urns on top. To the right of this is an open sarcophagus with a healing potion inside. Opposite the stairs you enter, against the south wall, is an unlocked chest with a greatsword leaning against it. At the west end of the room is a row of upright sarcophagi, with an area behind. Once the ghosts are dealt with, entering this part will cause Farkas to tell you he can go no further, because he has a fear of large spiders, and there are cobwebs blocking the path onward. In this area is a bookcase against the north wall that contains a small coin purse and four burial urns on top. Just before the cobwebs to the south is a stamina potion on top of a sarcophagus.
Once you break through the cobwebs to the south, you enter a room that is obviously the home of frostbite spiders. There are four spiders in the first room. To the east, another doorway is blocked by cobwebs, and more frostbite spiders await you. In the second room are two more spiders, and as soon as you enter, a giant frostbite spider will descend. There are two egg sacs that can be harvested in this room and an adept-locked chest in the southwest corner on a raised section. In the middle of the south wall is the path, blocked by a lowered gate. The pull chain is just to the left of the door.
The path descends into a catacomb area, in which you are attacked by three Companion ghosts. There is an iron helmet and a battleaxe on top of a sarcophagus in the northeast corner. In the southwest corner is another sarcophagus with a leveled healing potion and an apothecary's satchel on top. Around the room, there are five white caps growing and six dead draugr that can be looted, two of which are partially buried under a cave-in. To the east are stairs leading down and hanging moss nearby to harvest.
At the bottom of the stairs, the corridor turns to the south. The room opens into another catacomb area and three more Companion ghosts attack. There are two more white caps growing here, as well as five more hanging moss plants on the ceiling above. Against the south wall are two stone tables with dead draugr laid out on them. The one on the right has a stamina potion, an iron helmet, an iron sword, and a banded iron shield around it. The one on the left is wrapped in linen and has a bow, arrows, and another stamina potion next to it. There is a doorway in the southeast corner heading east up some stairs to an unlocked iron door.
Through the door is a room with a low vaulted ceiling. At the far end, past three upright sarcophagi, is a plinth with a handle on top. Behind the plinth is a stone carving of a face. On the left, just after the sarcophagus, is a gated doorway. Pulling the handle on the plinth opens this gate into another large room. There is a stone table with a mammoth's skull on top in the middle of the room and two upright sarcophagi behind. As you enter, four Companion ghosts will appear. On the table are three burial urns, a leveled potion of magicka, and a copy of the Two-handed skill book The Legendary Sancre Tor. Around the room are a total of six troll skulls high up on carved ledges. At the northern end of the room are stairs leading up to double wooden doors.
Through these doors, you enter an antechamber with three openings leading into a huge room up some stairs. There are wooden walls on either side of you. When passing into this final room for the first time, you will be prompted to talk to Kodlak. The room consists of several sarcophagi on different levels and a brazier that has blue fire in the center of the room, with another hanging from the ceiling. At the far end, there is a raised section with a spiral wooden ramp leading up to it and a sarcophagus that is grated off from the rest of the room, presumably Ysgramor's resting place. To the left of this is a sideboard that holds an ancient Nord greatsword, an iron shield, and an ancient Nord helmet. Additional sideboards are on raised sections to the left and right. The second of the two on the left has two goblets, a plate and an apothecary's satchel, but the rest contain nothing of value. Kodlak awaits you by the blue fire in the middle, called the Flame of the Harbinger. Up the ramp at the far end is an unlocked boss chest containing the Shield of Ysgramor. To your right is a gated doorway with the pull chain to the right of it.
The path leads to a long spiral wooden staircase. At the top of the stairs is a room with two large urns against the north wall, and a bookcase to the left of them holding an armor cuirass, a helmet, two coin purses, and two burial urns. There is a doorway leading to a twisting pathway that ends with a pull chain. This opens the way back to the statue of Ysgramor.
The chain opens both of the remaining hidden doors in the first room. Taking the path to the west leads to an iron door out of the tomb. Once outside, there are steps leading off to the east and circling around above the tomb to a word wall for the Animal Allegiance shout. The remains of a fresh kill lie in front of the wall, but no predator can be found. A gold ore vein is to the right of the word wall, between the upright rocks and the cliff edge.
Notes[edit]
- You can reach the word wall even before starting the quest Glory of the Dead by climbing the mountain wall near the entrance to the tomb. A horse will make this easier.
- If you cheat and glitch yourself into the rest of the tomb when not on the quest Glory of the Dead, the Companion ghosts will still spawn, and all treasure will be found in the boss chest except the Shield of Ysgramor.
- A shrine of Talos is northeast of the tomb, with an iron ore vein southwest of the shrine and a corundum ore vein northeast of the shrine.


