Skyrim:Potema's Catacombs
|
||
|---|---|---|
| # of Zones | 3 | |
| Dungeon | Yes | |
| Respawn Time | Never (storage is safe) | |
| Level | Min: 6 | |
| Occupants | ||
| Vampires,Draugr | ||
| Important Treasure | ||
| Legend of Krately House Surfeit of Thieves |
||
| Console Location Code(s) | ||
| PotemasCatacombs01, PotemasCatacombs02, PotemasCatacombs03 | ||
| Region | ||
| Haafingar | ||
| Location | ||
| Beneath the Temple of the Divines | ||
| Special Features | ||
| # of Alchemy Labs | 1 | |
| # of Grindstones | 1 | |
| # of Cooking Pots/Spits | 1 | |

Potema's Catacombs is a series of catacombs designed to house the Wolf Queen of Solitude. The catacombs have three interior zones: Potema's Catacombs, Potema's Refuge, and Potema's Sanctum.
Aside from the spirit of Queen Potema, the caves contain a few powerful vampires and Potema's draugr minions.
Related Quests[edit]
- Culling the BeastDG: Kill the thin-blooded vampires. (radiant)
- The Wolf Queen Awakened: Potema must be stopped.
Walkthrough[edit]
Temple of the Divines[edit]
Enter the Temple of the Divines and proceed to the rear of the temple. At the end of the pews, on the left, is a stairway heading down. The key obtained from Styrr will open the barred gate. Continue through the corridor, finding a potion of minor healing on the right, and enter the opening in the wall.
Potema's Catacombs[edit]
Begin on a small landing. Ahead is a dead tree with harvestable hanging moss behind it. Before descending the stairs, to the right in an arched opening on the wall is another harvestable hanging moss and a random potion or poison. There are numerous bottles of alto wine, wine, empty wine bottles, and food barrels found throughout the catacombs. Follow the corridor as it continues back under the dead tree, heading south, and ends in a passage blocked by spears.
Queen Potema will now speak, offering thanks for halting her binding (see Wolfskull Cave). She then promises some unpleasant post-death opportunities, and the spears lower. In the next room, a draugr is waiting on the right behind a stack of crates. There is an oil slick in a planter, with an oil lantern hanging above. The corridor continues through light cobwebs and ends at a stairwell, with the stairs up blocked by a cave-in. The only option is to go down two flights. At the bottom are two unlocked chests, an iron warhammer, and a random battleaxe.

In the next room, two draugr wait on a lower level, while a leveled vampire waits to your right on the upper level. There is a convenient oil slick on the floor below, with oil lanterns above. In a cage hanging from the ceiling is a dead draugr, along with a philter of strength (although this may be knocked to the floor if you employ the oil slick or area effect magic). The lockpicking skill book Surfeit of Thieves can be found on one of the tables. There is another dead draugr partially buried beneath dirt before the next gate.

In the next room, a draugr is patrolling. Watch out for the flame spout trap directly in front of the dead draugr standing against the wall, holding a lootable random sword point down and a lootable ancient Nord helmet on its head. There is a set of shelves around to the left against the northwest wall holding two bottles of Nord mead and a pair of iron boots. There is another dead draugr lying on the floor by the opposite wall. Beyond this is a closed gate, with its lever on the right. Through the gate, you will find yourself at the top of a short flight of stairs, with another flight directly across leading up to a waiting draugr. The room continues along a wall to the right, where another slumbering draugr lies on a table, and a second patrols. On a ledge along the wall to the left is a philter of health and a conjurer's draught.

Continue down the stairs to a waiting leveled vampire. After dispatching the vampire, follow the corridor as it turns to the northeast into a flooded room. There are two draugr that rise from the flooded part of the room. A pressure plate that activates a spike wall trap is at the end of the walkway leading out. Before bypassing the pressure plate, step left off of the walkway to find a large urn under the water.

The next room opens into a naturally lit cavern with a large hole in the roof. Head down the stairs to meet two draugr, both slumbering against the southwest wall. Also in the cavern is a cage hanging from a large pillar containing a dead draugr with a random potion of magicka underneath. Opposite the cage is a grindstone and a novice-trapped chest, with a pair of random gauntlets on top. The trap triggers a poison dart trap from behind the chest unless disarmed. At the far end of the room are stairs down to a single lever at an apparent dead end. Activate the lever to rotate a stone blocking a doorway and align the gateway within, or simply dart through when the opening is clear.

The next room contains an alchemy lab, a random potion of healing, a random potion of health, a bottle of frostbite venom, a salt pile, a thistle branch, a bulb of garlic, a sprig of snowberries, and a loose sample of hanging moss all on the floor, in addition to several hanging moss growing down the walls. The large unlocked double doors at the southeast end of the room lead to Potema's Refuge.
Potema's Refuge[edit]

Through the doors is a typical Nordic crypt passage with hanging moss growing from the ceiling. The passage descends through open double doors before entering a partially darkened room, with a leveled draugr below a trapdoor in the room above. The passage continues to the north before climbing a flight of stairs to three more rotating doors with three corresponding levers. To the left of the levers is a potion of minor healing and a salt pile. A gated room to the right contains a leveled vampire. Once the vampire is dealt with, look behind an empty black sarcophagus in the same room for a lever. This opens a hidden door leading to a chamber containing a large urn, an unlocked chest, and four burial urns. Back in the tunnel, each of the levers operates a single door, in sequential order. Throwing each lever when the corresponding visible gate is open will allow passage through the three gates. However, the gates may continue to slowly rotate, effectively blocking access back once passed. Once through the doors, the room opens to the left where two spellcaster traps, both of which shoot Firebolts, are placed. To disarm the traps, an arrow or a ranged spell will knock the two soul gems out of place. Alternatively, making use of the pillars in the center of the room will allow you to sidle up to the traps and remove the soul gems manually. The passage continues, passing through a natural cave before climbing more stairs to a door.

Through the door is a room containing a leveled draugr reclining on one of two thrones, with a vampire in attendance. The vampire will address you as he approaches before attacking. Make sure to retrieve the key to Potema's Sanctum key from either the armrest of the draugr's throne or the vampire's corpse. The master-locked iron door on the south wall is unlocked with the key, and leads down to a door to Potema's Sanctum.
Potema's Sanctum[edit]
Beyond the door is a short passage to an iron door. Through the door is a semi-circular room guarded by a leveled vampire. The room contains three burial urns, a large urn, and a stone table with a dead draugr laid out on top along with two bowls of bone meal, a thistle branch, an iron helmet, and a dagger (see bugs). On the floor are the remains of a skeleton that can be looted. The next door leads to a passage with two thrones, one on either side of the doorway. A leveled draugr will be sitting in the left-hand throne, which has two resist element potions on top. However, the potions may become dislodged during the fight, to be found afterward on the floor. There is a skeleton and a magic-using draugr at the bottom of the stairs. Above the thrones are shield racks holding banded iron shields with crossed ancient Nord greatswords and war axes, respectively. At the bottom of the stairs is a broken sarcophagus with a shield and an ancient Nord battleaxe beside it, and an iron door to the left.

The next door opens to a room filled with dead draugr and a dead vampire. Upon entering, Potema will speak, urging you onward. She then raises two of the draugr and the vampire, and unlocks the gate at the far end of the room. The fight with the draugr and vampire is straightforward; however, damage can be reduced or avoided by reanimating the dead before Potema does, or simply by looting the enemies' bodies before fully entering the room so they are unarmed during the battle. After the fight, continue forward through a small crypt. Before exiting the crypt, there are two random potions of resist shock to the right of the door. These will be useful in the boss battle that awaits through the next door.

There is nothing of interest in the next room except what the draugr are carrying, so focus on the ensuing battle. Upon entering, Potema issues a challenge, then begins shooting revolving lightning bolts at regular intervals. Resist shock potions and/or equipment will be advantageous here. In this form, Potema is resistant to arrows, but not magic. Potema will also raise and reanimate draugr in waves to fight for her. There may also be level-appropriate beasts summoned to join the fight. Some schools of thought on ensuring survival in this battle include: reanimating corpses to fight for you before Potema is able, summoning storm atronachs to assist you as they are immune to electricity, or sniping at draugr with arrows from the hallway leading into the battle room. The defeat of each wave of draugr drives Potema farther across the battle zone and into the locked room at the far end. When the battle in the main room is over, the locked door will open. Potema's ghost will then rise from her throne, making the skull comprising Potema's Remains available. Depending upon your level, Potema may respawn and need to be put down multiple times. She may also resurrect the fallen from the battle behind you to assist her. Once defeated, retrieve Potema's skull from the throne. The chest to the left of the throne contains the Sneak skill book Legend of Krately House.

Continue through the iron door behind the throne to a snowy, naturally lit open-roofed stairway leading to a barred door. Through the door, in the middle of the room is a plinth supporting a low-level piece of armor. On either side of the plinth is a small alcove, each containing a seated draugr. Removing the loot will awaken the draugr, one higher level than the other. Rather, take out the draugr individually, and then, if desired, remove the loot. Exit through the iron door at the end of the room. You will emerge high on a mountainside looking down on the Dainty Sload, docked outside Solitude. Turn to face the door behind you, and find a chest, a helmet, a poison, and a random resist element potion on the right, and a random battleaxe on the left. This exit will not be marked on your map.
Notes[edit]
- When you use reanimation spells near where Potema speaks to you, you may hear her say "What is the meaning of this?", just like other NPCs commonly comment.
- All of the spinning gated doors have a small amount of "creep" to them after you have used the lever to stop them, which will eventually block the return passage. Consider these one-way doors.
Bugs[edit]
- The dagger is awkwardly placed in front of the altar. It floats above the floor, and may fall through it, unable to be picked up.
 The Unofficial Skyrim Patch, version 2.1.1, fixes this bug.
- Placing a Rune Spell and setting it off may dislodge it, making it available to collect.
Maps[edit]
-
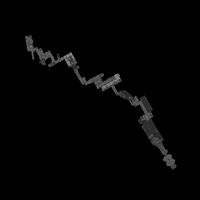
Potema's Catacombs or Seclude Chamber
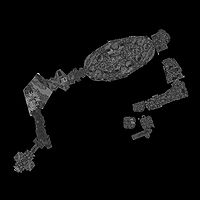
-

Potema's Refuge
-
Potema's Sanctum


