Oblivion:Fort Linchal
|
|||
|---|---|---|---|
| # of Zones | 3 | ||
| Occupants | |||
| Necromancers (1 boss-level Necromancer) |
|||
| Important Treasure | |||
| 1 boss-level Chest | |||
| Console Location Code(s) | |||
| FortLinchalExterior, FortLinchal, FortLinchal02, FortLinchal03 | |||
| Region | |||
| Colovian Highlands | |||
| Location | |||
| North-northeast of Kvatch | |||
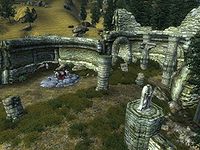
Fort Linchal is a medium-sized fort north of Kvatch containing necromancers. It contains three zones: Fort Linchal, Fort Linchal Temple of War, and Fort Linchal Hall of Knights.
Notes[edit]
- This is one of the four locations mentioned in the Hastily Scrawled Note found during the quest Necromancer's Moon that have altars that can be used for creating black soul gems.
- This location also appears in ESO as Linchal Grand Manor.
Exterior[edit]
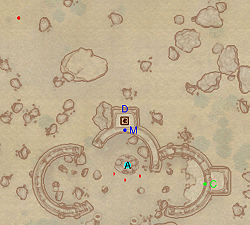
- The exterior is located at coordinates: Tamriel -32, 3
- This location's map marker (M on map) is named Fort Linchal (editor name FortLinchalMapMarker). The entrance door is N of the marker, 10 feet away.
- 0-3 Necromancer Enemies (each 50% probability Necromancer, 50% Undead) are near the entrance
- 1 Wilderness Creature (Highlands variety) is near the entrance
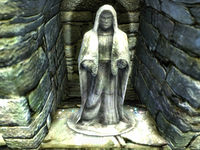
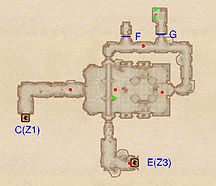
- If you stand facing the altar and the main door (looking north) and then turn to your right (facing nearly due east) you will see an alcove with a statue in it (C). If your Acrobatics skill is high enough, you can jump up into the alcove and grab the gems and jewelry laying on either of the Statue. Even with poor Acrobatics it is possible to get up to the statue: to the left is an archway, with a section of broken column just to its right. You can use that column to jump onto the thin ledge, and then side-step across that ledge to the alcove. Watch out - it's easy to get stuck behind the statue.
- By the statue you will find: 1 Flawed Diamond, 1 Flawed Emerald, 1 Flawed Ruby, 1 Flawed Sapphire, 2 Flawless Emeralds, 1 Flawless Ruby, 1 Flawless Sapphire, 2 Flawless Topazes, and 1 Silver Amulet (unenchanted)
- The following plants can be found near the entrance: 32 Motherwort plants and 10 Viper's Bugloss plants
- 1 Necromancer Altar is at location A on map
Zone 1: Fort Linchal[edit]
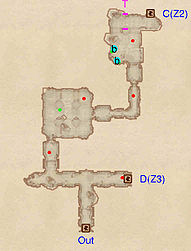
This is the smallest of the fort's three zones. The main decision here is whether to take a right at the first intersection and quickly use door D to enter the third zone and claim the boss chest, or go left and travel through the bulk of the zone and then enter the second zone, using door C.
Melee characters should be mindful of the dart traps present in the final chamber (at T) – the Necromancer residing here, in fleeing, may run through them. Pay attention and don't make the same mistake. This room also contains two bedrolls (b).
Occupants:
Treasure:
Traps:
- 2 Darts traps at location T on map
Doors and Gates:
- There are three doors in/out of this zone
- 1 door (at Out) leads outside
- 1 door (at C) leads to the zone Fort Linchal Temple of War
- 1 door (at D) leads to the zone Fort Linchal Hall of Knights
Other:
- 2 bedrolls at locations b on map
Zone 2: Fort Linchal Temple of War[edit]
You can enter this zone from either Fort Linchal (door C) or Fort Linchal Hall of Knights (door E).
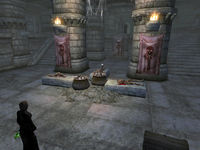
In the first room you enter you could end up fighting with up to three necromancers at the same time. To avoid this, try taking out the first enemy quickly. In this same room are three altars with Zombie corpses.
In the corridor linking the bridge and the main chamber are two small rooms. The first is locked by gate G and provides some loot. Be careful if you are using Target Open spells as these will simply pass through the gate. The second gate at F is open but still locked: if you try and activate it to close it you will first have to unlock it. As there is nothing of value behind this gate it is useful only for lockpicking practice.
Occupants:
Treasure:
Doors and Gates:
- There are two doors in/out of this zone
- 1 door (at C) leads to the zone Fort Linchal
- 1 door (at E) leads to the zone Fort Linchal Hall of Knights
- 2 Gates at F and G (both locked)
Zone 3: Fort Linchal Hall of Knights[edit]
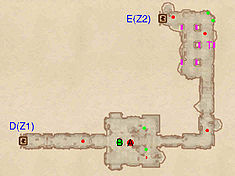
This is the third and final zone for the fort. It contains the most treasure and potentially the most enemies, including a boss-level chest (B) and a boss-level necromancer (A). As with the second level this one can be entered from either Fort Linchal (door D) or Fort Linchal Temple of War (door E).
The northern room contains three pairs of dart traps, six in total, (at location T on the map) between the pillars. Fighting the necromancers in here is risky, especially for melee characters. However, the necromancers may often run right through the traps, making your job easier. It is possible to avoid the dart traps completely if you snake through the room correctly.
In the final chamber you could end up fighting against up to three enemies, including the boss-level Necromancer. As with the other levels taking one out early can make a difference in the ensuing fight. This room also contains yet another Zombie corpse on an altar and a Headless Zombie one in a barrel.
Occupants:
- 1 boss-level Necromancer at location A on map
- 4-5 Necromancers
Treasure:
- 1 boss-level Chest (Necromancer variety; locked) at location B on map
- 1 Chest 02 (locked)
- 1 Chest 03
- 1 Chest 04
- 1 Chest 04
Traps:
- 6 Darts traps at location T on map
Doors and Gates:
- There are two doors in/out of this zone
- 1 door (at D) leads to the zone Fort Linchal
- 1 door (at E) leads to the zone Fort Linchal Temple of War
