User:SerCenKing/Sandbox/5
| This page is currently being redesigned for the Oblivion Places Redesign Project (OPRP). The page needs in-game walkthrough(s) to go along with the maps and content lists. If you make an addition to this page, please update this template accordingly, but make sure you have observed the project guidelines. Needs in-game verification. See the OPRP project page for explanation of what needs to be done to complete the verification process. |
|
|||
|---|---|---|---|
| # of Zones | 3 | ||
| Occupants | |||
| Umaril the Unfeathered, Aurorans | |||
| Important Treasure | |||
| 1 boss-level Ayleid Cask 01 1 boss-level Ayleid Cask 02 |
|||
| Console Location Code(s) | |||
| NDGarlasMalatarExterior, NDGarlasMalatar01, NDGarlasMalatar02a, NDGarlasMalatar03 | |||
| Region | |||
| Gold Coast | |||
| Location | |||
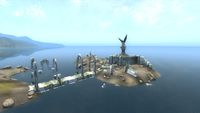
| On a small island in the Abecean Sea northwest of Anvil | |||
5 is a medium-sized Ayleid ruin northwest of Anvil containing Aurorans (download-specific). It contains three zones: Garlas Malatar, Garlas Malatar, Ceysel, and Garlas Malatar, Carac Abaran.
Before falling into ruin, Garlas Malatar was the westernmost outpost of the Ayleid Empire, and watched over the Abecean Sea. Upon his return, Umaril the Unfeathered takes it as his lair in the Knights of the Nine official download.
Related Quests[edit]
Notes[edit]
- This place only becomes available once you have installed the Knights of the Nine official download.
- The name translates as Cavern of the High Wood.
- Garlas Malatar also appears in ESO.
Exterior[edit]
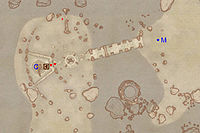
- The exterior is located at coordinates: Tamriel -54, -4
- This location's map marker (M on map) is named Garlas Malatar (editor name NDGarlasMalatarMapMarker). The entrance door is WSW of the marker, 240 feet away.
- 2 Aurorans (always best possible level) are near the entrance. These are disabled until stage 20 of the Umaril the Unfeathered quest.
- 0-1 Mud Crab is near the entrance
- 1 Ayleid Cask in the northern submerged tower
Zone 1: Garlas Malatar[edit]
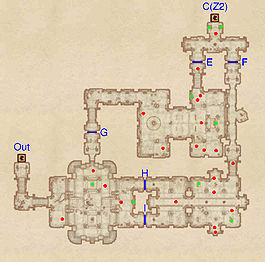
When entering during the related quest, you will be followed by your knights, who will rush in a help fight the enemies within. You will first find yourself on the upper level of a chamber: below are two Aurorans, three Welkynd stones, a minor loot chest and a button (cyan dot on map; not there) opening the gates at G, H and I. From here you have two options. Heading north through gate G will take you to another chamber with three Aurorans, two minor loot chests and two Welkynd stones. Making your way up the stairs to the east will give you access to another minor loot chest and, having passed through either gate H or I, to a chamber hosting four Aurorans and two minor loot chests. Throughout this time, you will also be ambushed by a further patrol of four Aurorans.
Either way, you will arrive in front of the gates at E and F, which will lower as you approach them. After looting two more minor chests, head through door C to the next zone, Ceysel.
Occupants:
- 10 Aurorans
- 3 Aurorans (always best possible level)
- 8 Aurorans (6 of these 8 must be killed to advance the quest; non-respawning)
Treasure:
Doors and Gates:
- There are two doors in/out of this zone
- 1 door (at Out) leads outside
- 1 door (at C) leads to the zone Garlas Malatar, Ceysel
- 2 Iron Gates (opened remotely) at H and I
- 3 Iron Gates (opened remotely) at E, F, and G
The gates at E, F, G, H and I cannot be opened until the quest Umaril the Unfeathered is started.
Zone 2: Garlas Malatar, Ceysel[edit]
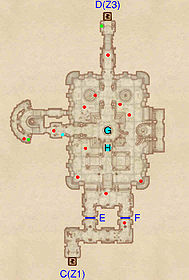
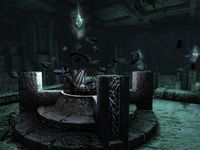
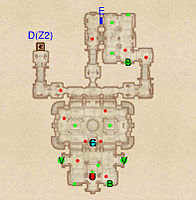
Make your way to the gates at E and F and lower them by using the nearby push block (cyan dot on map; not there). You will then find yourself in a large room with a Dark Orb shimmering on a raised platform in the middle of it. There are five Aurorans around the room which will constantly respawn as long as the Orb is active.
To destroy it, you'll need to get onto the platform, but the steps at H are currently lowered. Head north instead and then up the western tunnel, fighting your way past another Auroran and looting a chest along the way. Once you reach the Orb, activate it and you will notice all Aurorans will disappear, as will any surviving knights. Furthermore, the way back is now blocked by a magical wall blocking off the entrance. Your only option is instead to continue north along the bridge and use door D to enter the final zone, Carac Abaran. Before you do so, make sure to loot the seven Welkynd stones (five around the platform, two along the bridge) in the zone and the chest just by the door.
Occupants:
- 7 Aurorans
- 4 Aurorans (will resurrect after 8 seconds as long as the orb is active; non-respawning)
- 1 Auroran (will resurrect after 8 seconds as long as the orb is active; stays near orb; non-respawning)
Treasure:
Doors and Gates:
- There are two doors in/out of this zone
- 1 door (at C) leads to the zone Garlas Malatar
- 1 door (at D) leads out of dungeon to Garlas Malatar, Carac Abaran
- 2 Iron Gates (opened remotely) at E and F
Other:
- 1 activator to destroy the Dark Orb at location G on map
Zone 3: Garlas Malatar, Carac Abaran[edit]
You will arrive onto a corridor overlooking a large room and will probably be spotted by the enemies below. Press on into the next room, where the gate at E will open as you approach it. Here you will also find two Aurorans, a boss chest (B) and three minor loot chests. Make your way south and you will reach the final room. Initially dark, as you approach white flames will start appearing, the stone stairs at G will begin rising and a magical wall will prevent you from leaving from where you came in. Head up them to the throne area, which hosts Umaril the Unfeathered (U), two Varla stones (V), three Welkynd stones and two (?) chests.
After your battle with Umaril is over, cast the Blessing of Talos to teleport to the sky above the Imperial City and fight Umaril again.
Occupants:
- Umaril the Unfeathered (non-respawning) at location U on map
- 8 Aurorans
- 2 Aurorans (non-respawning)
Treasure:
- 1 boss-level Ayleid Cask 01 (Conjurer variety) at location B on map
- 1 boss-level Ayleid Cask 02 (Conjurer variety) at B
- 2 Varla Stones at V
- 4 Ayleid Reliquaries (1 locked)
- 4 Restoration Ayleid Chests
- 3 Welkynd Stones
Doors and Gates:
- There is one door (at D) in/out of this zone, leading to the zone Garlas Malatar, Ceysel
- 1 Hidden Door at E
Other:
- 1 Stone Steps (rise to form steps when activated) at location F on map
