Oblivion:Sandstone Cavern
|
|||
|---|---|---|---|
| # of Zones | 2 | ||
| Occupants | |||
| The Sunken One, Mixed Monster/Animal Enemies, Monster Enemies |
|||
| Important Treasure | |||
| The Offering | |||
| Console Location Code(s) | |||
| SandstoneCavernExterior, SandstoneCavern, SandstoneCavern02 | |||
| Region | |||
| West Weald | |||
| Location | |||
| Northeast of Kvatch, past Shetcombe Farm | |||
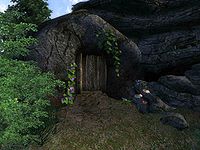
Sandstone Cavern is a medium-sized cave northeast of Kvatch containing monsters (quest-related). It contains two zones: Sandstone Cavern and Sandstone Big Rooms.
Related Quests[edit]
- The Sunken One: Find the owner of an abandoned farmhouse.
Exterior[edit]
- The exterior is located at coordinates: Tamriel -32, -1
- This location's map marker (M on map) is named Sandstone Cavern (editor name SandstoneCavernMapMarker). The entrance door is SE of the marker, 60 feet away.
- 0-3 Monsters are near the entrance
- 2 Wilderness Creatures (Forest variety) are near the entrance
- 1 Nirnroot is at location N on map
- The following plants can be found near the entrance: 6 Blackberry bushes, 66 Carrot plants, 10 Columbine plants, 102 Corn plants, 2 Dryad's Saddel Polypore plants, 1 Elf Cup plant, 10 Flax plants, 12 Lady's Smock plants, 27 Leek plants, 38 Milk Thistle plants, 5 Morning Glory plants, 8 Motherwort plants, 20 Nightshade plants, 2 Peony plants, 36 Potato plants, 5 Primrose plants, 14 Pumpkin vines, 8 Sacred Lotus plants, 2 Strawberry bushes, 10 Viper's Bugloss plants, and 7 Water Hyacinth plants
Zone 1: Sandstone Cavern[edit]
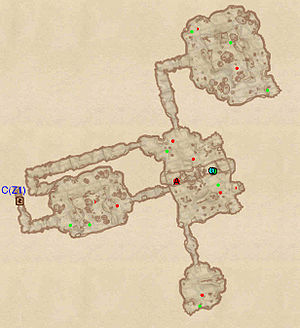
Upon entering Sandstone Cavern, you quickly find yourself facing an intersection. The western tunnel gives you quicker access to the next zone, but for the most effective exploration, choose the southern path. A chest with minor loot await in the first big room; proceed in a southern direction and emerge on the upper-level of another large room with an underground gap in the middle and a bridge giving access to the other side. Loot the chests and jump down into the gap. During the related quest, you will find Slythe's Journal, page 2 on top of the chest at D. Proceed in a southern direction, which will take you to door C, leading to Sandstone Big Rooms.
When you return later from door C, simply head north and loot the last chest in the northwestern room, then follow the tunnel heading east and exit the zone via door Out.
Occupants:
- 7-10 Mixed Monster/Animal Enemies (each 80% probability Monster/Animal, 20% Rat)
- 2-5 Monster Enemies (each 80% probability Monster, 20% Rat)
Treasure:
- Slythe's Journal, page 2 at location D on map
- 2 Chests 01 (1 locked)
- 2 Chests 02 (1 locked)
- 3 Chests 03
- The following plants will always be found: 3 Cairn Bolete plants and 4 Wisp Stalk plants
Doors and Gates:
- There are two doors in/out of this zone
- 1 door (at Out) leads outside
- 1 door (at C) leads out of dungeon to Sandstone Big Rooms
Zone 2: Sandstone Big Rooms[edit]
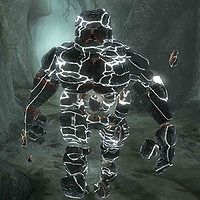
If you have initiated the related quest, your reward is within reach. You arrive in this zone from the only entrance at C and will soon find yourself in a larger room with a bonfire, a chest with valuables and two routes to choose from. For the most comprehensive search through this cave, choose the longer path and proceed through the northern tunnel. Dispose of the monsters in the next room and head north; eventually you will end up in a large dead-end room with three chests. Backtrack to the previous room, jump over the pit and investigate the southern tunnel for another dead-end room. Once again, backtrack and jump down into the pit where you will locate the lifeless body of Slythe Serengi and the Offering he brought to the cave. Searching his body will net you page 3 of his journal and an encounter with The Sunken One, a special leveled variety of Storm Atronach. After the battle in the pit, proceed west and emerge in the first larger room of the zone, and easy access to door C, leading you back to the first zone, Sandstone Cavern.
Occupants:
- The Sunken One (target of quest The Sunken One; will respawn) at location A on map
- 6-9 Monster Enemies (each 80% probability Monster, 20% Rat)
Treasure:
- The Offering (contains leveled gold and gems; non-respawning) at location D on map
- 1 Chest 01
- 4 Chests 02 (2 locked)
- 2 Chests 03
- 1 Chest 04
- The following plants will always be found: 3 Cairn Bolete plants and 8 Wisp Stalk plants
Doors and Gates:
- There is one door (at C) in/out of this zone, leading to the zone Sandstone Cavern
Other:
- Slythe Seringi's corpse (carries Slythe's Journal, page 3) at location Q on map
Notes[edit]
- This cave can be entered and fully explored without starting the related quest; if you do, everything related to the quest will be gone.
- The Sunken One will respawn and is therefore an unlimited source for Void Salts.
- This cave contains 6 Cairn Bolete plants and 12 Wisp Stalk plants.
- This cave is featured on the artwork for the Sunken One card in Legends.


