Oblivion:Bawn
|
|||
|---|---|---|---|
| # of Zones | 3 | ||
| # of Welkynd Stones | 17 | ||
| # of Varla Stones | 1 | ||
| Occupants | |||
| Undead (1 boss-level Undead) |
|||
| Important Treasure | |||
| 1 boss-level Ayleid Reliquary 1 boss-level Ayleid Coffer |
|||
| Console Location Code(s) | |||
| BawnExterior, Bawn, Bawn02, Bawn03 | |||
| Region | |||
| Nibenay Valley | |||
| Location | |||
| Southeast of Bravil and north of the Green Road, on the shore of Niben Bay | |||
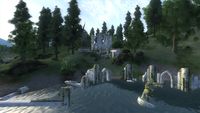
Bawn is a medium-sized Ayleid ruin southeast of Bravil containing undead. It contains three zones: Bawn, Bawn Loria, and Bawn Latta.
Notes[edit]
- Most of the Welkynd Stones in this ruin are mounted on pedestals and are out of reach. See the Welkynd Stone article for suggestions on how to reach them.
Exterior[edit]
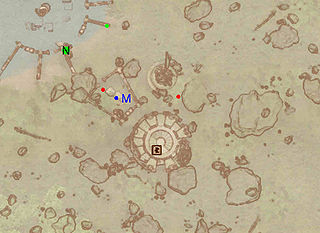
- The exterior is located at coordinates: Tamriel 20, -14
- This location's map marker (M on map) is named Bawn (editor name BawnMapMarker). The entrance door is SE of the marker, 80 feet away.
- 2 Wilderness Creatures (Valley variety) are near the entrance
- You may encounter The Forlorn Watchman in the area as he passes by Bawn on his nightly circuit.
- 1 Nirnroot is at location N on map
- 1 Restoration Ayleid Chest can be found outside.
- The following plants can be found near the entrance: 103 Bergamot plants, 2 Green Stain Cup plants, 22 Lavender plants, 8 Mandrake plants, 1 Monkshood plant, and 12 Nightshade plants
Zone 1: Bawn[edit]
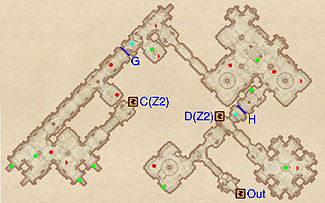
There are two doors connecting this zone to Bawn Loria. Door D (closest to the front door) is on an upper level and can only be used when returning from Bawn Loria. To get to door C you need to go through the rest of the dungeon. Immediately upon arriving, head into the room to the southwest, which hosts an enemy and a minor loot chest. Turn back and head towards the gate at H, which is opened when stepping on the pressure plate in front of it. After looting another nearby chest, you will reach a large room with two to three enemies, another minor loot chest and three Welkynd stones high up on pillars. Press on until you reach gate G, which is opened by the nearby pressure plate. Nearby is another minor loot chest possibly guarded by up to two enemies. After dispatching another two enemies, you will arrive in the final room, which hosts a whopping four minor loot chests guarded by one to two enemies.
When you return here from Bawn Loria through door D, be sure to explore the room at the south end of the bridge, which contains seven Welkynd Stones as well as one Ayleid Cask. You can then jump down and head back to the front door.
Occupants:
Treasure:
- 5 Ayleid Casks 01 (2 locked)
- 4 Ayleid Casks 02 (all locked)
- 10 Welkynd Stones. 7 are in the southeast room that can only be accessed after returning through door D; the other 3 are in the northeast room, after gate H.
Doors and Gates:
- There are three doors in/out of this zone
- 1 door (at Out) leads outside
- 2 doors (at C and D) lead to the zone Bawn Loria. D is on an upper level and can only be used when you return from Bawn Loria.
- 2 Iron Gates (opened remotely) at G and H, both of which are opened by standing on the activation panel in the floor in front of them (the cyan dots on the map).
Zone 2: Bawn Loria[edit]
This zone contains Bawn's only Varla Stone, and also has a boss-level Ayleid Reliquary (without any boss-level monsters). However, there are no Welkynd Stones.
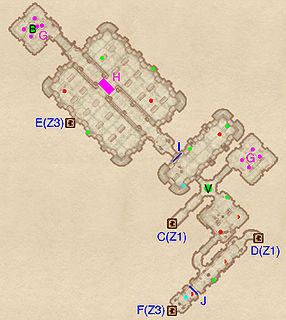
There are two doors from this zone to each of Bawn and Bawn Latta. You will enter from the first zone using door C. To get to Bawn Latta you will have to use the northern door E, as the southern door at F is blocked by a gate that can only be opened from the other side.
Right after entering the zone you will find the Varla Stone cage (V), which is activated using a press block (cyan dot on map) in the next room to the northwest. In this room you will also find two minor loot chests guarded by an enemy. Don't bother going down the hall northeast from the Varla Stone, since the room contains nothing but poison gas traps (G).
The locked door at I leads to a large room with a collapsing bridge at H. Be sure to jump across the collapsed span because on the far side of it is an otherwise inaccessible room with a boss-level Ayleid Reliquary (B) which is surrounded by poison gas traps (G). Once you jump down from the bridge, you will find three enemies and two minor loot chests. The only possible option now is to use door E to enter the third zone, Bawn Latta.
When you return from Bawn Latta via door F you will be able to open the gate at J and follow the corridor north to door D back to Bawn. Along the way are up to two enemies and a minor loot chest. Before heading back to the first zone, make sure to explore the chamber to the northwest, which hosts two minor loot chests guarded by an enemy.
Occupants:
Treasure:
- 1 boss-level Ayleid Reliquary (Undead variety) at location B on map
- 1 Varla Stone (in a Varla Stone Cage) at location V on map. The push block to open the cage is located at the cyan dot in the next room to the northwest.
- 2 Ayleid Casks 01 (1 locked)
- 2 Ayleid Casks 02
- 3 Restoration Ayleid Chests (1 locked)
Traps:
- 1 Crumbling Bridge trap at location H on map. You must jump across the collapsed section to access the boss-level chest at B.
- 9 Gas traps at locations G on map
Doors and Gates:
- There are four doors in/out of this zone
- 2 doors (at C and D) lead to the zone Bawn. You will enter through C; you can return through either door, but D is a shortcut that lets you get some extra treasure.
- 2 doors (at E and F) lead to the zone Bawn Latta. F can only be used to return from Bawn Latta because it is behind the locked gate J.
- 1 Gate at I (locked)
- The activation plate to open this gate is on the west side of the door (at the cyan dot) and therefore the gate can only be opened after you have gone through Bawn Latta.
Zone 3: Bawn Latta[edit]
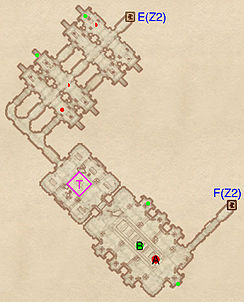
This zone contains a boss-level Ayleid Coffer (B) guarded by a boss-level Undead (A). The same room also contains all seven Welkynd Stones in the zone, as well as two minor loot chests, including one hidden behind the north-easternmost Welkynd pillar.
You enter this zone through the northern door at E, in a long hallway above the first couple rooms. If you choose to jump down, there are stairs back up to the west. In the lower level you will find two minor loot chests and up to three enemies, who will likely become alerted to your presence even if you remain on the elevated walkway. The main obstacle in the zone is the ceiling spikes trap at T (the blood stains on the floor provide a warning), which can be avoided by stepping to either side of it.
You must return using door F, which allows a previously unopenable gate in Bawn Loria to be opened, and provides fast access back to the first zone.
Occupants:
- 1 boss-level Undead at location A on map
- 1-3 Ethereal Undead
Treasure:
- 1 boss-level Ayleid Coffer (Undead variety, locked) at location B on map
- 1 Ayleid Cask 01
- 2 Ayleid Casks 02 (both locked)
- 1 Restoration Ayleid Chest
- 7 Welkynd Stones, all in the room with the boss chest.
Traps:
- 1 Ceiling Spikes trap at location T on map
Doors and Gates:
- There are two doors (at E and F) in/out of this zone, both leading to the zone Bawn Loria. You will enter through E, and will need to exit through F (returning through E just leaves you stranded at a lower level without any way to get up to the level with the other doors).
