Dawnstar:Getting Started
Dawnstar can be overwhelming at first, and while pushing 7 will take you to the Help Option, the help provided leaves the unseasoned Dawnstar-player with a lot of stuff to be discovered the hard way. It also requires quite a bit of background knowledge and generally expects players to be familiar with the many skills, races, classes known from previous Elder Scrolls games. As a result, inexperienced gamers can quickly drown in frustrating problems, making them throw an entertaining game away before it ever starts.
This Getting Started guide covers everything you need to know, including controls, basic gameplay information, additional tips and tricks and, especially, how to avoid making fatal mistakes. For a list of terms that come in handy, see Dictionary.
Controls[edit]
You move around by using the arrow keys or the 2, 4, 6 and 8 buttons. Both methods provides the same basic controls and while arrow keys makes it slightly easier to navigate and lessens the chance of hitting the wrong button, the number buttons acts exactly the same; 2 (up) will move you one dot forward; 4 (left) will make you turn west; 6 (right) will make you turn east and 8 (down) will move you one dot backwards. Since a single push will move you one dot backwards or forwards, you will be required to press the movement buttons a lot before you win the game.
All remaining controls will always be displayed on the action bar at the bottom of the screen. The bar contains a number of icons, with the corresponding number button below it. The appearance of the action bar will change in a given situation;
- When you are exploring dungeons, the action bar will look like this:
- When an enemy gets close enough to attack, the action bar changes to this:
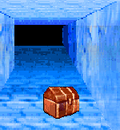
- When you are right next to NPCs or treasure chests, the action bar will look like this;
Basically, pushing the number buttons will make you:
- 1: Attack with an equipped weapon.
- 3: Cast a non-attack spell when exploring, or an attack-spell during combat.
- 5: Toggle Spells outside the Adventure Menu.
- 7: Access the Adventure Menu.
- 9: Examine a treasure chest or talk to an NPC.
- 0: Camp.
Map[edit]
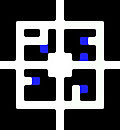
The small map in the upper-left corner can be enlarged by pushing the * button. It is highly recommended to follow the larger map most of the time as it details the many treasures and foes you may encounter.
- The green dot is you.
- The blue dots are points of interest, such as treasure and other NPCs.
- The pink dot is a warp note. They can only be discovered by looking at the map.
- The red dot is an enemy.
While the large map fills out most of the screen, in the process pushing the visual action into the background, you will find yourself using the larger map almost constantly. It provides a much more detailed look at the environment and shows you important locations in detail, such as treasure and enemy locations. While the small map may provide a more challenging in-game experience, it can be quite hard and confusing navigating through the relatively large dungeons and you will probably end up using the large map for guidance.
Exploring[edit]
Dungeon crawling can be both easy and tricky. Every time you turn around (using the left or right arrow keys or the 6 or 8 numeric buttons), the entire environment, including the map, will turn 90 degrees and, while it might be obvious that you are standing right next to a passage, you will find yourself facing a wall, so you will have to move back again and push the Up (Or 2 button) to get back on track and find the passage. The map is quite helpful here, as it will always show if you are facing north, south, east or west, making it easier to navigate around. The direction will always be shown on top of your map with as single letters; N=North; S=South; W=West and E=East.
Combat[edit]
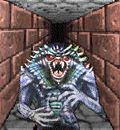
Combat occurs when a monster is adjacent to your character. When within three spaces of an enemy, it will show up as a red dot on your map and stay there until they are killed. Before getting close, however, no dot will appear on the map. When the monster is right next to your character, the action bar changes and the battle begins. If you are feeling weak, it is always possible to flee the battle; just find an available direction and run away. However some stronger enemies will be able to keep you from fleeing right away. When you are more than three dots away, the monster will stop following you, leaving the red dot on the map, giving you a convenient chance to avoid the monster until you reach a higher level. Keep an eye on the lower right part of the screen where useful information might pop up, even if you never even detected the monster. During a fight, it is possible to change to better and stronger equipment; (armor or weapons), or better spells; simply access the adventure menu by pressing 7 and choose "inventory" or "spells". It is also possible to browse through your available spells by pressing 5, but this will not stop the fight and the monster will keep attacking you while you decide which spell is useful. If you need to switch spells mid-combat without getting hit as you cycle through the list, you can equip them from the aforementioned spell list through the Adventure Menu.
When you can afford better equipment, you will probably find yourself killing monsters by tapping 1 repeatedly. Spells, however, can be quite useful and make the tougher fights much easier. When you successfully hit a monster with a weapon or cast a spell, an icon will show up on screen for a split second:
The icon indicating a successful hit with a weapon: ![]()
The icons indicating a successful hit with a spell: ![]()
![]()
Loot and Treasure[edit]
Treasure[edit]
In each of the dungeons, five treasure chests can be found, which basically means that there are a total amount of 180 treasure chests scattered around in the 36 dungeons. In each dungeon, one of the five available treasure chests contains the invaluable but extremely important Gift Items which can be used to befriend the four Champions and, in exchange for a Gift, can net you information or training sessions.
Treasure chests are always marked with a blue dot on your map and their contents are always fixed:
- If you are looking for a specific item, simply follow the walkthroughs for each of the dungeons for a complete list.
- If you are looking for a specific weapon or a more powerful piece of armor, follow the links for treasure chest locations.
- If you are looking for gift items follow the link for a complete listing of all Gift items and their treasure chest locations.
Note that the four Champions are marked with a blue dot as well, and so is the loot you either haven't picked up yet after killing a monster or dropped on the ground.
Loot[edit]
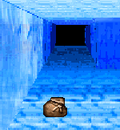
When a monster dies, it might drop a sack filled with loot, always visible on the ground in front of you, and immediately shown as a blue dot on your map. A small number of drops are fixed, while most of them are completely random. To pick it up, simply walk over it and the content will be added to your inventory, unless you are carrying more than 24 items (see the Inventory section). If you are unable to pick up your reward right away, the sack will be shown on your map as a blue dot making it easy to locate later on.
Camping[edit]
The option of Camping is available at all times, with the natural exception of Combat situations and when facing NPCs. Press the 0 button as described on the action bar and the screen will fade to black informing you that you are camping.
Camping will heal your health and fatigue and will, with a 25% chance, remove any status ailments inflicted on you. At lower levels, camping is the way to go if you are exhausted and generally provides the better solution if you need to heal. On the downside, camping can be interrupted by nearby monsters. When that happens, a small screen will show up, informing you that your rest was disturbed and you will find yourself facing an enemy, sometimes without having healed at all. Worst-case scenario, and quite common at higher levels, it will not be a random monster that disturbs your sleep; you will wake up facing the hardest monster in the game, the Gehenoth. If that happens, quickly flee from the scene and wait until the Gehenoth disappears. There is only one method to avoid any confrontations while camping, the Magic Item "Camp Ward".
Inventory[edit]
It is very important to note that you can ONLY carry a total of 24 items in your inventory, regardless of your strength and level. You can equip six items (they will always be marked with an (E) next to the item name) and equipped items will count towards the 24 items maximum. If your inventory is full, an "inventory full" message will be displayed when you try to open a treasure chest, while you will simply be unable to pick up any loot sacks.
As a result, revisit the merchants in Dawnstar often, sell your loot and use the gold for better equipment. Find a few spots in the camp where you drop off your Scrolls and Gift Items for later usage.
Dying[edit]
When your health bar is reduced to zero, the screen will turn black and a text will inform you that you're dead. You are not entirely dead, however; you will wake up in front of Dawnstar healer Eustacia who will give you the following message:
- "A scout found you, but not before someone picked over your corpse. At least you are healthy now."
This means that monsters and thieves have looted your dead body for every unequipped item in your inventory, Gift Items excluded. These items will be lost forever, no matter how unique and rare they were; all your scrolls, magic items, and rare weapons will be gone unless they were equipped when you died. A much safer strategy is to save often and reload your save-game if you lose your life.
Dawnstar[edit]
- Main Article: Dawnstar (place)
When you begin your adventure, you will be in the exact center of the Dawnstar camp, the last bastion not besieged by the Ice Tribes. Visit the camp often to heal, buy items from the peddlers, or drop your loot in a safe spot due to the 24-item inventory limit.
The helpful inhabitants of the Dawnstar camp can be identified by blue dots:
- Heavy Armor Peddler, the local merchant for everything heavy.
- Light Armor Peddler specializes in Light Armor.
- Weapon Peddler, the weaponry of Dawnstar.
- Jakar, who sells a wide variety of Magic Items.
- Eustacia, the resident healer and oracle. She will prove quite helpful for all your healing needs as well as providing clues as you go along.
Once you reveal the Traitor, the camp will be the location of the final showdown and be turned into a battlefield, as enemies will arrive from all four directions. During this final battle, the merchants and Eustacia will still help you.
The Adventure Menu[edit]
The Adventure Menu, sometimes referred to as the Options Menu by the game itself, provides in-game information about your progress, keeps track on the various rumors and other information you have received, lists your inventory and allows you to load and save your game. Additionally, it functions as the only way to pause the game and is the better option to change spells during combat. It is accessed by pressing 7 and is displayed as a question mark on your action bar.
It contains the following options:
| Option | Description |
|---|---|
| Stats | Displays your Name, Class and what remains of your Health, Magicka and Fatigue. It also displays your current level and how much experience you need before leveling up. Additionally, it lists all your status ailments, collected gift points, and the state of all your Primary Attributes. |
| Inventory | A list of all collected items, including equipped ones. Note that it is not possible to sort in this list and the newest item always finds a spot at the bottom of the list. Equipped items are conveniently marked with a (E). |
| Clue Log | This log records all rumors you hear from Eustacia, and all the information you gather from the four Champions. The log is divided into five categories, one for each of the Champions and one for rumors. |
| Skills | A listing of the skills you have learned or mastered from the beginning, including levels for each specific skill. |
| Spells | A listing of the Spells you have learned, with an option to change spells within the menu. This is highly recommended, as using the "5" button will allow monsters to attack you when you browse through available spells. |
| Save Game | The save option. Note that the game will save the moment you click the option and will overwrite the old save. There are no "are you sure" options, so think twice before saving. |
| Load Game | The load option. Note that the game will load your previous savegame the moment you click the option and will ignore any progress you have made. There are no "are you sure" options, so think twice before loading. |
| Help | The in-game Help Menu. |
| Reveal Traitor | You can reveal the Traitor at all times and you will be specifically asked several times if you are certain. Always save before using this option and always make sure you have revealed the true traitor's identity before you engage in the final battle. |
| Quit | Allows you to quit the game and provides an "are you sure?" option. |
