Skyrim:Riftweald Manor
| This article is being developed as part of the Skyrim Houses Redesign Project. If you see this tag it means the article can still be improved. Please see the project page for guidelines. |
|
||
|---|---|---|
| # of Zones | 1 | |
| Respawn Time | 10 days | |
| Occupants | ||
| Bandits | ||
| Important Treasure | ||
| Bust of the Gray Fox Chillrend The Red Kitchen Reader |
||
| Console Location Code(s) | ||
| RiftenMercerFreyHouse | ||
| Region | ||
| The Rift | ||
| Location | ||
| Eastern part of Riften | ||
| Special Features | ||
| Shadowmark | ||
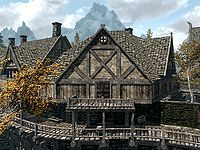
Riftweald Manor is a house in Riften owned by Mercer Frey.
You infiltrate this house when completing the Thieves Guild quest The Pursuit.
Related Quests[edit]
- The Litany of Larceny: Find items for Delvin Mallory throughout the questline.
- The Pursuit: Break into Mercer Frey's house and search for clues.
Walkthrough[edit]
Riftweald Manor is a relatively well-secured property that was given as a gift to Mercer Frey after the Black-Briars confiscated it from its previous owners. It is immediately next to the Temple of Mara and the Hall of the Dead, and conveniently near the Thieves Guild secret entrance.
Mercer commissioned the design and installation of a unique ramp system at the rear of the house, probably designed for quick escapes. The ramp provides you with a singular point of entry, as it can be lowered externally by firing an arrow, ranged magic, or the Unrelenting Force dragon shout at the operating mechanism under the balcony. The ramp leads to an expert-locked door which can be opened with the key found on Vald, an easily dispatched guard hired by Mercer to protect the property. Vald can be dealt with in a number of ways; see the related quest for details.
When you enter the manor via the ramp, you will be on the second floor of the home. The first room is full of crates, barrels, and sacks, most with items of clutter on them. There is a wall shelf holding a bottle of wine and a few goblets, and two of the barrels contain random meat. In the northwestern corner are double wooden doors. Through these doors you are likely to face at least one of the three leveled bandits employed to guard the house. The room has a locked barred pair of doors blocking access to a balcony, and contains an empty table and chair, an empty set of shelves, a wooden bench with a small table beside it holding a bottle of alto wine, and a pair of chairs with another small table between them. There are two doorways off of this room, and a flight of stairs leading down.
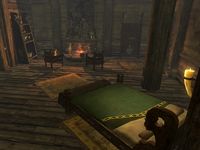
The first doorway is to the right of the barred doors, and leads into a small storeroom containing a tall wardrobe of random clothes, a long end table, several rolled up rugs, and some disused furniture. The second doorway leads into the master bedroom, which contains an owned double bed in the southeastern corner. There is an unlocked long chest at the foot of the bed, a wall shelf holding a bottle each of alto wine, wine, and Nord mead, two tall wardrobes containing a selection of fine clothes, and three sets of shelves holding a copy of The Amulet of Kings, a bottle of alto wine, a bottle of wine, two bottles of Nord mead, a selection of fine crockery, a medium coin purse, and three loose septims. There are also two chairs pulled up in front of a lit fireplace.
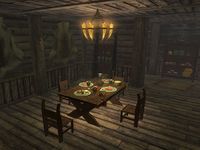
Down the stairs is another large room with a locked barred pair of doors preventing access from the street. To the right of the barred doors, opposite the bottom of the stairs, is a set of shelves holding a Dibella statue and three bottles of Black-Briar Mead. A food barrel is in the corner to the right. Under the stairs you've just descended are several crates and two food sacks. Beside these is a cupboard with a bunch of tundra cotton on the shelf. There is a wooden bench to the left of a pair of closed unlocked double doors, and opposite is a long end table holding a copy of Nords Arise! and flanked by two chairs. To the left of the end table is a disused cooking pot. Farther to the east, a table with four chairs arranged around it has been laid with four salmon steaks, a baked potato, a sweet roll, a loaf of bread, a bottle of alto wine, and an eidar cheese wheel. Against the wall behind the table is a set of shelves holding more fine crockery, a bottle of alto wine, and a bottle of Nord mead. Behind this wall is a flight of stairs leading down into the cellar. By the top of the stairs is a set of shelves holding a potion of minor healing, a potion of minor stamina, two cabbages, a sweet roll, four potatoes, three loaves of bread, and five wheels of cheese.
Descending the stairs to the cellar leads to a single room without any other exits. Under the stairs is a bale of straw, a cupboard holding a bottle of wine, and a food barrel. An L-shaped counter with two shelves underneath runs almost the entire length of the room, and holds a boiled creme treat, a sweet roll, an apple pie, a kettle containing two cabbages, three loaves of bread, two bulbs of garlic, a potion of regeneration, several pieces of cheese, a cast iron pot containing five potatoes, a loose cabbage, a gourd, another cast iron pot containing two raw rabbit legs, and a bottle of Nord mead. There is yet another cast iron pot on the floor in front of the counter containing a bottle of Nord mead. To the right of the counter is a pile of firewood, with a woodcutter's axe lying beside it. Hanging from the ceiling are three bunches of dried frost mirriam, two bunches of dried elves ear, and two garlic braids, with a third braid hanging from the corner of a wall shelf.
Returning upstairs to the previous room, the unlocked double doors lead into a room with a long wooden table holding a ruined book, an iron dagger, a bottle of wine, a food sack, a loaf of bread, a cheese wheel, and a note from the engineer, identified as Kiltinius Dandoril, who completed the balcony ramp and floor mechanism. Against the walls are a stack of crates with two food sacks on top, a set of shelves holding a medium coin purse and two bottles of wine, a food barrel, and a tall wardrobe containing fine clothes and boots. Another locked barred pair of doors is to the east. To the left of the barred doors is a suspicious cabinet, which contains a pair of fine boots and a false back panel. This panel may also be activated by a pull chain on the pillar to your left as you face the cabinet, or by a pull bar behind the panel on the right.
Beyond the panel is a food barrel at the top of a flight of stairs leading down into another part of the cellar. This part of the cellar is very dirty, with cobwebs everywhere. At the bottom of the stairs is a room with some crates, sacks, and unusable barrels. There is also a long wooden table holding a random potion. A hole in the west wall leads into the sewer network. As you enter the passage, there are metal bars in front of you, with a wooden chest behind the bars. In front of the bars is a pressure plate that triggers a spear trap from the floor behind the bars. The passage continues to the left and enters a room where most of the floor is rigged with flame spout traps. There is a safe path; however, if you decide to run straight through, the damage is quite minor if you are prepared properly. The safe route is to start at the far southern end, then move three squares west, turn north and walk to the end, turn west and walk to the end, and turn south and walk to the end, where the passage continues.
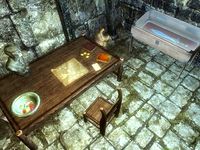
The next passage has another pressure plate that triggers a poison dart trap to fire from the ceiling. Continuing along the passage, on your right is a short passage that brings you to the unlocked wooden chest seen through the bars. The passage turns to the left after a short distance; as you proceed, swinging blades and a battering ram will start to swing across the passage ahead. Level with the ram are alcoves on both sides of the passage containing various crates, sacks, and barrels. Once past the blades, you come to a flight of stairs leading down to the south. At the bottom of the stairs are bars on your left, and an expert-trapped door ahead. If tripped, the trap will fire a massive amount of poisoned darts rapidly from the ceiling; jumping back is the easiest way to avoid the darts. Through the door is a room that contains a wooden table and chair with Mercer's Plans, the Bust of the Gray Fox (which you can sell to Delvin Mallory as part of the Thieves Guild quest The Litany of Larceny), a bowl containing various gems, a gold necklace, and a gold ring, a copy of the Sneak skill book The Red Kitchen Reader, a copy of The Lusty Argonian Maid, v1, four loose septims, and a note from R to M (presumably M for Mercer) discussing a successful theft. To the right of the table is a burial urn and an expert-locked display case containing Chillrend, a unique weapon. To the left of the table is an unlocked Dwemer chest and a set of shelves holding nine common books, a gourd, and a food sack.
An alternative passage leads out of this room on the other side of the bars seen before the door. The passage leads to the top of a flight of stairs, with a door at the bottom that leads into the Ratway Vaults. Beyond the door is a hole in the floor where you can drop down; inscribed on the edge of the hole is a ![]() Danger shadowmark. Dropping down the hole will deposit you in an alcove on the top level of the three-leveled room within the vaults. Following the path to the right leads back to the Ragged Flagon.
Danger shadowmark. Dropping down the hole will deposit you in an alcove on the top level of the three-leveled room within the vaults. Following the path to the right leads back to the Ragged Flagon.
Notes[edit]
- The house will remain open to access after completing the quest. The bandits will respawn, along with the food, coin purses, and potions within.
- There is a
 Danger shadowmark by the cellar entrance to the Ratway Vaults, and a
  Guild shadowmark by the front and back doors.
 - Three leveled generic bandits guard the inside of the manor. However, three unused unique NPCs may have once been intended for this task. Three Nord bandits named Hrolmir, Reves, and Skeggr exist in the game files, but they are very unfinished. All of their editor IDs are prefixed with
TG07, the editor ID of the quest The Pursuit. - It is possible to access the building without joining the Thieves Guild. To do so, jump up onto the brazier outside the Temple of Mara closest to the house, then hop up onto the temple's roof. Scale the roof until you can jump down onto the locked gate, then balance yourself over the gate and leap onto the manor's roof; alternatively, you can reach the manor's roof from the temple's roof by using Whirlwind Sprint. From there, scale the roof, hop down onto the tiny balcony, and pick the lock on the door. All items will be present inside the house if it is entered in this way, with the notable exceptions of Mercer's Plans and the Bust of the Gray Fox.


