Shivering:Knotbone Chamber
|
|||
|---|---|---|---|
| # of Zones | 6 | ||
| Occupants | |||
| Grummites, Monsters (1 boss-level Elytra) |
|||
| Important Treasure | |||
| 1 Blind Watcher's Eye plant 5 Hollowed Amber Limbs 2 Hollowed Amber Stumps 3 Madness Ore Deposits |
|||
| Console Location Code(s) | |||
| XPKnotboneChamberExterior, XPKnotboneChamber01, XPKnotboneChamber02, XPKnotboneChamber03, XPKnotboneChamber04, XPKnotboneChamber04b, XPKnotboneChamber05 | |||
| Region | |||
| Mania | |||
| Location | |||
| Northeast of The Fringe, just off Overlook Road | |||
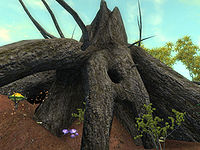
Knotbone Chamber is a very large cave northeast of The Fringe containing a wide variety of monsters (quest-related). It contains six zones: Knotbone Chamber, Knotbone Cavities, Knotbone Juncture, Knotbone Pipes, Knotbone Ruins, and Knotbone Cellar.
Related Quests[edit]
- The Museum of Oddities: Una Armina wants you to find "Oddities" for her museum.
Notes[edit]
- This cave contains 1 Black Tar plant, 40 Flame Stalk plants, 5 Rot Scale plants, 12 Screaming Maw plants, 2 Thorn Hook plants, 9 Watcher's Eye plants, 10 Root Stalk plants, 19 Withering Moon plants, and 1 Blind Watcher's Eye plant.
- A second entrance, to Knotbone Cellar, is unmarked and found just northeast of the main entrance.
Exterior[edit]
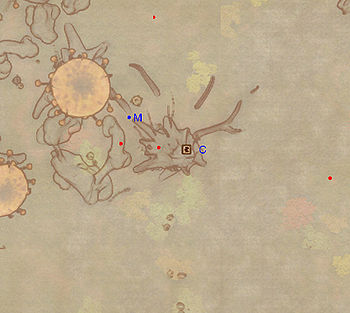
- The exterior is located at coordinates: SEWorld -7, 4
- This location's map marker (M on map) is named Knotbone Chamber. The entrance door is ESE of the marker, 80 feet away.
- 0-1 Monster (Mania) is near the entrance
- 2 Monsters (Elytra or Gnarl; Mania; non-respawning) are near the entrance
- 1 Wilderness Creature (Mania) is near the entrance
- The following plants can be found near the entrance: 3 Hydnum Azure plants, 3 Mushroom Tree Sapling plants, 1 Root Stalk plant, and 1 Worm's Head plant
Zone 1: Knotbone Chamber[edit]
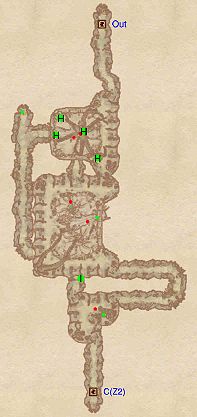
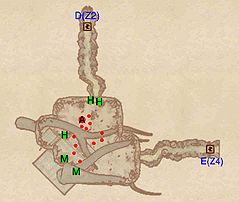
In the first room, you will be on a higher level than the center of the room; use this advantage to snipe at the enemy below. Loot the amber limb at H and then jump down and loot the remaining two limbs and a stump at H. In the next room, once again use your elevated position to snipe at an enemy below and cross the bridge to loot a hollowed stump near the wall. Jump down again and don't miss the Blind Watcher's Eye at I needed for the quest The Museum of Oddities. Head for door C and enter Knotbone Cavities.
Occupants:
- 5 Monsters (Mania)
Treasure:
- 1 Blind Watcher's Eye plant at location I on map
- 3 Hollowed Amber Limbs (1-4 Amber; non-respawning) at H
- 1 Hollowed Amber Stump (1-4 Amber; non-respawning) at H
- 2 Hollowed Stumps
- 1 Hollowed Stump (Healing)
- The following plants will always be found: 31 Flame Stalk plants, 4 Screaming Maw plants, 5 Mushroom Tree Sapling plants, 2 Watcher's Eye plants, and 2 Root Stalk plants
Doors and Gates:
- There are two doors in/out of this zone
- 1 door (at Out) leads outside
- 1 door (at C) leads to the zone Knotbone Cavities
Zone 2: Knotbone Cavities[edit]
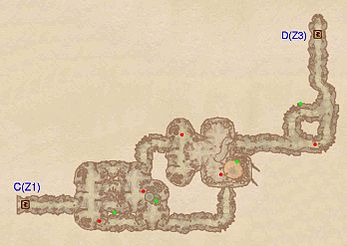
This zone is quite easy to navigate: in the first room, you'll have to jump to loot the hollowed stump stuck quite high up on the wall in the central part. At the next intersection, head left, as this will lead you to the upper level of the next room, allowing you to snipe at an enemy below. Reach door D and access Knotbone Juncture.
Occupants:
- 5 Monsters (Mania)
Treasure:
- 2 Hollowed Stumps
- 2 Hollowed Stumps (Healing)
- The following plants will always be found: 9 Flame Stalk plants, 3 Screaming Maw plants, 2 Mushroom Tree Sapling plants, 7 Watcher's Eye plants, and 6 Root Stalk plants
Doors and Gates:
- There are two doors in/out of this zone
- 1 door (at C) leads to the zone Knotbone Chamber
- 1 door (at D) leads to the zone Knotbone Juncture
Zone 3: Knotbone Juncture[edit]
As soon as you enter this zone, you will be faced with an uncommon sight: a battle between 5 Elytras (including a boss-level one at A) and 7 Grummites. The best option here is to hide and wait out the winners. Typically, the Grummites will manage to slay all of the monsters and you should have no trouble disposing of the remaining three or so of them. Before leaving, loot the three amber veins at H and the two madness ore deposits at M. Head to the palisade to the east and enter the Grummite-controlled Knotbone Pipes through door E.
Occupants:
- 1 boss-level Elytra (Mania; location-specific variety) at location A on map
- 3 Grummites (Dementia; location-specific variety)
- 4 Grummite Maguss (Dementia; location-specific variety)
- 4 Elytras (Mania; location-specific variety)
Treasure:
- 2 Hollowed Amber Limbs (1-4 Amber; non-respawning) at locations H on map
- 1 Hollowed Amber Stump (1-4 Amber; non-respawning) at H
- 2 Madness Ore Deposits (1-4 Madness Ore; non-respawning) at M
- The following plants will always be found: 1 Black Tar plant, 5 Screaming Maw plants, and 3 Mushroom Tree Sapling plants
Doors and Gates:
- There are two doors in/out of this zone
- 1 door (at D) leads to the zone Knotbone Cavities
- 1 door (at E) leads to the zone Knotbone Pipes
Zone 4: Knotbone Pipes[edit]
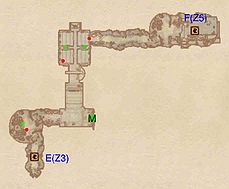
Like the second zone, this one is extremely linear and simple to navigate: simply make your way from door E to door F, following the part root tunnel, part ruin corridor. Don't forget to loot the madness ore deposit at M and pick up the two nearby repair hammers at the first turn. In the final ruin room, a flawed ruby sits at the foot of the Grummite statue. Finally, enter the Knotbone Ruins through the overturned entrance at F.
Occupants:
- 3 Grummite Enemies (40% chance melee Grummite; 20% archer Grummite; 20% Magus Grummite; 20% Baliwog)
Treasure:
- 1 Madness Ore Deposit (1-4 Madness Ore; non-respawning) at location M on map
- 1 Chest (locked)
- 1 Chest (Healing)
- 1 Hollowed Stump
- The other following items will always be found: 2 Repair Hammers, 1 Flawed Ruby, 3 Grummite Eggs, and 1 Crude Grummite Cudgel
- The following plants will always be found: 5 Rot Scale plants, 2 Thorn Hook plants, 2 Root Stalk plants, and 3 Withering Moon plants
Doors and Gates:
- There are two doors in/out of this zone
- 1 door (at E) leads to the zone Knotbone Juncture
- 1 door (at F) leads to the zone Knotbone Ruins
Zone 5: Knotbone Ruins[edit]
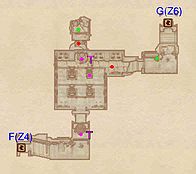
While on paper this zone shouldn't be particularly challenging, it is extremely uncommon in that it is tilted at an angle, making any movement very awkward. Avoid the three cave-in traps at T and locate two potions and a poison in the rubble. Head to door G to enter the next zone, Knotbone Cellar, which is mercifully straight.
Occupants:
- 2 Grummite Enemies (40% chance melee Grummite; 20% archer Grummite; 20% Magus Grummite; 20% Baliwog)
Treasure:
- 1 Chest (locked)
- 1 Urn
- The following potions will always be found: 1 Weak Poison of Misfortune, 1 Weak Potion of Chameleon, and 1 Weak Potion of Healing
- The other following items will always be found: 1 Madness Ore and 1 Crude Grummite Cudgel
Traps:
- 3 Cave In traps at locations T on map
Doors and Gates:
- There are two doors in/out of this zone
- 1 door (at F) leads to the zone Knotbone Pipes
- 1 door (at G) leads to the zone Knotbone Cellar
Zone 6: Knotbone Cellar[edit]
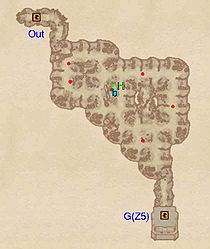
This zone is basically one large Grummite encampment with 6 enemies guarding it. Try to avoid fighting all at once by using sneak, as taking all six down at the same time can be quite challenging. Before you leave, pick up the gems and repair hammer at H; and if you're tired from the long crawl, a bedroll (b) is handily nearby.
Occupants:
- 5 Grummites (Dementia; group list)
- 1 Grummite Enemy (40% chance melee Grummite; 20% archer Grummite; 20% Magus Grummite; 20% Baliwog)
Treasure:
- 1 Chest 03 (locked)
- The other following items will always be found: 1 Flawed Sapphire, 1 Flawed Topaz, and 1 Repair Hammer
- The following plants will always be found: 1 Mushroom Tree Sapling plant, 6 Water Root Pod plants, and 16 Withering Moon plants
- Some of the above items are clustered at location H: 1 Chest 03 (locked), 1 Flawed Sapphire, 1 Flawed Topaz, and 1 Repair Hammer
Doors and Gates:
- There are two doors in/out of this zone
- 1 door (at Out) leads outside
- 1 door (at G) leads to the zone Knotbone Ruins
Other:
- 1 bedroll at location b on map
