Oblivion:Vanua
|
|||
|---|---|---|---|
| # of Zones | 3 | ||
| # of Welkynd Stones | 9 | ||
| # of Varla Stones | 0 | ||
| Occupants | |||
| Undead (2 boss-level Undead) |
|||
| Important Treasure | |||
| Helm of the Crusader 1 boss-level Ayleid Reliquary |
|||
| Console Location Code(s) | |||
| NDVanuaExterior, NDVanua, NDVanua02, NDVanua01 | |||
| Region | |||
| Heartlands | |||
| Location | |||
| Underwater where the Upper Niben and Lake Rumare meet, just north of the Red Ring Road bridge | |||
Vanua is a medium-sized Ayleid ruin southeast of the Imperial City containing undead (download-specific). It contains three zones: Vanua, The Shrine of the Crusader, and The Lost Catacombs.
Related Quests[edit]
- Priory of the Nine: Retrieve the Cuirass of the Crusader from the Priory of the Nine.
- The Shrine of the Crusader: Retrieve the Helm of the Crusader from Pelinal's lost shrine.
Notes[edit]
- This ruin only appears after you have installed the Knights of the Nine official download. While you can access it immediately, a gate halfway through the first zone will halt your progress.
Bugs[edit]
- Vanua does not appear on your map and will only be marked when the quest is active. If you wish to re-enter it after the quest, you will have to do so without the map marker.
The Unofficial Oblivion DLC Patches, version 9, fixes this bug.
Exterior[edit]
- The exterior is located at coordinates: Tamriel 13, 7
Zone 1: Vanua[edit]
Initial Foray[edit]
This ruin is largely linear, and navigating your way from the entrance (Out) to door D shouldn't be a problem, except for the occasional undead enemy.
Upon entering, swim through the underwater tunnel and take care as you will almost surely be confronted with three undead at once. The two alcoves to the left and two alcoves to the right contain one Welkynd stone each and three skeletons in all while the first actual chamber holds four stones, all on low pedestals, for a total of eight. Also in this chamber, the secret wall at J is opened by activating the push-block (cyan dot on map) found on the western wall. If you are not on the related quest, you won't be able to open gate I, otherwise, continue into the final room and retrieve a ninth Welkynd stone. Although you will notice an upper level, this cannot be immediately accessed without a very high Acrobatics skill. Proceed through the destroyed wall and enter a cave-like structure that will lead you to door D, the entrance to The Shrine of the Crusader.
Exiting the Ruins (Second Foray)[edit]
When you re-enter this zone from The Shrine via door C, be ready for a tough fight, as you will be up against two standard enemies and a boss-level undead (A), who are guarding the boss chest at B. If you have not picked up the Helm of the Crusader, the gate at H will prevent you from backtracking further in this direction. If you have picked it up, go on through and be sure to loot the chest on the southern extension of this upper mezzanine level before jumping down to make your way back to the entrance.
Occupants:
- 1 boss-level Undead at location A on map
- 10 Undead
Treasure:
- 1 boss-level Ayleid Reliquary (Undead variety) at location B on map
- 2 Ayleid Casks 01
- 1 Ayleid Cask 02
- 9 Welkynd Stones
- The following ingredients will always be found: 2 Bonemeal
Doors and Gates:
- There are three doors in/out of this zone
- 1 door (at Out) leads outside
- 2 doors (at C and D) lead to the zone The Shrine of the Crusader
- 1 Gate at I (locked, says 'key required' but there is no key)
- 1 Hidden Door at J
- 1 Iron Gate (opened remotely) at H
Zone 2: The Shrine of the Crusader[edit]
Getting to the Catacombs[edit]
Unlike the first zone, this one is quite complex and, as you investigate the ruin, a few gates will shut behind you, impeding you from retracing your steps until you have received the necessary quest updates.
Upon entering from door D, head north and jump through the broken wall at J to emerge in a cave, and jump down another hole to enter the central room. The remains of Sir Amiel are found nearby at S, along with his shield and a fine steel longsword. The hole at J will now be shut, so you will have to find another way out. Loot the corpse and pick up Sir Amiel's ring, his key and his journal.
You may catch a glimpse of the Helm of the Crusader on a platform to the north, and while it is possible to jump over the railing from one of the ledges, doing so will cause you to miss out on a good deal of loot. Open gate H with the key and enter a room with a door and two holes, one near the door and one high up on the western wall. Use the broken pillar to jump through the latter and find yourself in a small room. Be prepared for close-range combat with two enemies guarding two chests. Jump back down and enter the other hole to proceed in a loop and gather some treasure. The door in the northern room (E) leads to the third zone, The Lost Catacombs.
Coming through Again after the Catacombs[edit]
After having made it through the catacombs, you will re-access to this zone from either door F or G. Pick up the Helm at Q and loot the nearby jewelry box. Jump over the railing and unlock the door at I for an encounter with a boss-level undead (A). The wall blocking the entrance you originally came from (J) will disappear once you pick up the Helm, but if you head back that way you will miss the boss-level chest of the ruin; so use door C to re-enter the first zone.
Occupants:
- 1 boss-level Undead at location A on map
- 9 Undead
Treasure:
- Helm of the Crusader at location Q on map
- 2 Chests 02
- 1 Chest 03
- 2 Chests 04
- 1 Jewelry Box (contains 50% chance jewelry, 50% silver nugget, gold change; non-respawning)
- The other following items will always be found: 1 Knights of the Nine Shield and 1 Fine Steel Longsword
Doors and Gates:
- There are five doors in/out of this zone
- 2 doors (at C and D) lead to the zone Vanua
- 3 doors (at E, F, and G) lead out of dungeon to The Lost Catacombs, The Lost Catacombs, and The Lost Catacombs
- 2 Iron Gates at H and I (both locked, key required, opened by Sir Amiel's Key)
- 1 Rock Wall (initially open; controlled remotely) at J
Other:
- Sir Amiel's skeleton (carries Sir Amiel's Journal, Sir Amiel's Key, and Sir Amiel's Ring) at location S on map
Zone 3: The Lost Catacombs[edit]
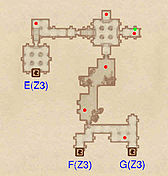
This zone merely serves to connect the lower level of the previous zone and the Helm of the Crusader, located on a higher level. Simply make your way to either door F or G to get back to the shrine (if it matters, door F will have a chest with a potion on the other side). Make sure to also check out the small northeastern room to find a minor loot chest guarded by an undead enemy.
Occupants:
- 6 Undead
Treasure:
- 1 Chest 03
Doors and Gates:
- There are three doors (at E, F, and G) in/out of this zone, all leading to the zone The Shrine of the Crusader


