Oblivion:Ondo
|
|||
|---|---|---|---|
| # of Zones | 2 | ||
| # of Welkynd Stones | 22 | ||
| # of Varla Stones | 1 | ||
| Occupants | |||
| Zombie Undead, Monsters (1 boss-level Monster) |
|||
| Important Treasure | |||
| 1 boss-level Ayleid Coffer 1 boss-level Ayleid Reliquary |
|||
| Console Location Code(s) | |||
| OndoExterior, Ondo, Ondo02 | |||
| Region | |||
| Nibenay Basin | |||
| Location | |||
| On the east bank of Silverfish River, north of Peryite's Shrine | |||
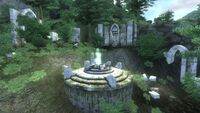
Ondo is a medium-sized Ayleid ruin far east of Bravil containing monsters and undead. It contains two zones: Ondo and Ondo Canohaelia.
Bugs[edit]
- The three Iron Gates in the first zone may not open when their remote triggers are activated. ?
- Exiting and re-entering the ruin should fix this issue.
Exterior[edit]
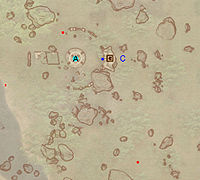
- The exterior is located at coordinates: Tamriel 39, -2
- This location's map marker (M on map) is named Ondo (editor name OndoMapMarker). The entrance door is E of the marker, 10 feet away.
- 0-1 Mud Crab is near the entrance
- 1 Wilderness Creature (Hills variety) is near the entrance
- 1 Wilderness Creature (Valley variety) is near the entrance
- The following plants can be found near the entrance: 1 Alkanet plant, 11 Foxglove plants, 2 Ginseng plants, 10 Green Stain Cup plants, 5 Monkshood plants, and 11 Summer Bolete plants
- 1 Ayleid Well is at location A on map
- 1 nirnroot can be found just west of the borders of this map, west of the Ayleid well.
Zone 1: Ondo[edit]
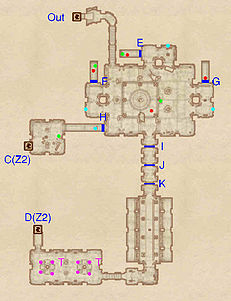
This zone has surprisingly few enemies guarding it: only one monster and some zombies are here to stop you, all inhabiting the first room. After dispatching one enemy and looting the Ayleid Cask and the six Welkynd stones (five on easily-reachable pedestals; one on the ground) in the first room, you will notice that three iron gates (I, J, and K) block your path. Each is opened by one of three press blocks (cyan dots on map) you can find nearby. Gate I is lowered by the block in the southeastern corner of the room, which also opens the hidden door at F, releasing one zombie and providing you access to another Ayleid Cask. Gate J is lowered by the block in the southwestern corner, which also opens the hidden door at G, behind which is another zombie. Finally, gate K is lowered by the block in the northern corner, which also opens the nearby hidden door (E). Behind this one is the third zombie and a third Ayleid Cask.
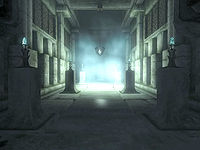
Once all are open, head south through the Hall of Stones, which hosts eight more Welkynd stones, and into the final room, where you will find two easily avoided gas traps (T). Use door D to enter the next zone: Ondo Canohaelia.
When returning from the second zone via door C, you will emerge into a small room with an Ayleid chest and a press block that opens the hidden door at H. This allows for a quick access back outside.
Occupants:
- 3 Zombie Undead
- 1 Monster
Treasure:
- 1 Ayleid Cask 01 (locked)
- 2 Ayleid Casks 02
- 1 Restoration Ayleid Chest
- 14 Welkynd Stones
Traps:
- 8 Gas traps at locations T on map
Doors and Gates:
- There are three doors in/out of this zone
- 1 door (at Out) leads outside
- 2 doors (at C and D) lead to the zone Ondo Canohaelia
- 4 Hidden Doors at E, F, G, and H
- 3 Iron Gates (opened remotely) at I, J, and K
Zone 2: Ondo Canohaelia[edit]
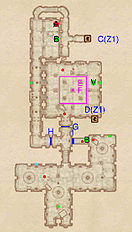
This zone is somewhat less linear the first zone, but it is still relatively straightforward. You'll enter from door D and emerge into a large room dominated by a Gas Room trap (E/F) in its center. Navigating around it while dealing with the two nearby enemies may prove difficult, but you can also use it to your advantage to weaken them. A Varla stone can be found on an open pedestal at V, while an Ayleid Cask is also nearby.
Make your way south and you will notice there is a gate (H) blocking access to this zone's boss area. To open it, you will need to head into the large chamber south of here and activate the press block in the northwestern corner (cyan dot on map). Note that activating this press block also closes gate G and unleashes a zombie hidden behind secret door I on map. Behind this door you will also find a boss-level Ayleid Coffer (B), while in the previous room you will find two enemies, two more minor loot chests and four Welkynd stones high up on pedestals. Use arrows or spells to knock them off.
Cross through the now-open gate at H and following the long corridor to the boss chamber, looting the Ayleid Chest along the way. The final room hosts a boss-level Monster (A) and boss chest (B). Once you're done, exit this zone by using the door at C.
Occupants:
- 1 boss-level Monster at location A on map
- 1 Zombie Undead
- 4 Monsters
Treasure:
- 1 boss-level Ayleid Coffer (Undead variety; locked) at location B on map
- 1 boss-level Ayleid Reliquary (Monster variety; locked) at B
- 1 Varla Stone at V
- 2 Ayleid Casks 01 (both locked)
- 1 Ayleid Cask 02
- 1 Restoration Ayleid Chest
- 8 Welkynd Stones
Traps:
Doors and Gates:
- There are two doors (at C and D) in/out of this zone, both leading to the zone Ondo
- 1 Hidden Door at I
- 1 Iron Gate (opened remotely) at H
- 1 Iron Gate (initially open) at G
