Oblivion:Fort Sejanus
|
|||
|---|---|---|---|
| # of Zones | 2 | ||
| Occupants | |||
| Conjurers, Conjurer Enemies, Undead | |||
| Console Location Code(s) | |||
| FortSejanusExterior, FortSejanus01, FortSejanus02 | |||
| Region | |||
| Nibenay Basin | |||
| Location | |||
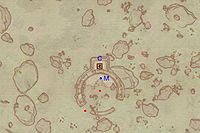
| Northeast of the intersection of the Red Ring Road and the Yellow Road | |||
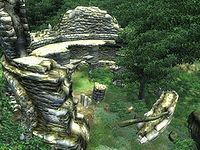
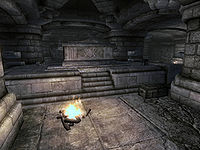
Fort Sejanus is a medium-sized fort southeast of the Imperial City containing conjurers. It contains two zones: Fort Sejanus and Fort Sejanus Catacombs.
Exterior[edit]
- The exterior is located at coordinates: Tamriel 20, 9
- This location's map marker (M on map) is named Fort Sejanus (editor name FortSejanusMapMarker). The entrance door is N of the marker, 20 feet away.
- 2 Wilderness Creatures (Forest variety) are near the entrance
- The following plants can be found near the entrance: 17 Bergamot plants, 21 Lavender plants, and 15 Monkshood plants
Zone 1: Fort Sejanus[edit]
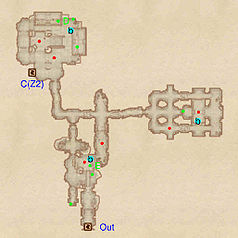
Fort Sejanus is a relatively unremarkable fort containing plenty of conjurer opposition but the chests inside make it worth exploring. Upon entry, proceed through a short passageway to reach the upper level of a room guarded by an enemy. After defeating this foe, loot the assortment of potions and ingredients near the bedroll (b) at E. Head down the steps and proceed to the southern part of this room to unlock two chests that both contain some minor loot. Continue onward heading north through the hallway and past a gate to reach an intersection; turn right and continue straight ahead ignoring the paths to your left and right that lead to dead ends. Open the old wooden door to find yourself in a large chamber with one foe patrolling the narrow halls in the west part of the room and another foe guarding the chest by the bedroll at b. After taking care of the opposition and obtaining the minor loot from the chest, backtrack to the initial intersection and head west. You will eventually reach a large room guarded by two foes. After defeating the opposition, loot the potions from the chest in the southeastern corner of the room and the minor loot from the chest north of the bedroll at b. You can also find an assortment of alchemy equipment at D. Once you have finished looting this room, locate door C and enter it to reach the next zone, Fort Sejanus Catacombs.
Occupants:
Treasure:
- 1 Chest 01 (locked)
- 2 Chests 02 (1 locked)
- 1 Chest 03
- 1 Chest 04
- The following alchemy equipment will always be found: 1 Apprentice Mortar & Pestle, 1 Novice Alembic, 3 Novice Calcinators, 1 Novice Mortar & Pestle, and 1 Novice Retort
- The following ingredients will always be found: 1 Bonemeal, 1 Nightshade, 1 Peony Seeds, 1 Primrose Leaves, and 1 Pumpkin
- The following potions will always be found: 1 Weak Poison of Burden, 1 Potion of Cure Disease, and 1 Weak Potion of Feather
- The following weapons will always be found: 1 Steel Dagger
- Some of the above items are clustered at the following locations:
- At D: 1 Novice Alembic, 1 Novice Calcinator, 1 Novice Mortar & Pestle, and 1 Novice Retort
- At E: 1 Apprentice Mortar & Pestle, 1 Nightshade, 1 Novice Calcinator, 1 Peony Seeds, 1 Primrose Leaves, 1 Pumpkin, 1 Weak Poison of Burden, 1 Potion of Cure Disease, and 1 Weak Potion of Feather
Doors and Gates:
- There are two doors in/out of this zone
- 1 door (at Out) leads outside
- 1 door (at C) leads to the zone Fort Sejanus Catacombs
Other:
- 3 bedrolls at locations b on map
Zone 2: Fort Sejanus Catacombs[edit]
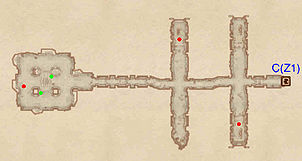
This zone contains a mix of conjurer and undead opposition. It is advisable to proceed straight ahead through the long hallway, ignoring the paths to your left and right that lead to dead ends and no treasure. Using some stealth you can easily avoid fighting the foes that patrol these dead ends to the left and right. Once you climb up the series of steps and reach the end of the hallway, you will find yourself in a fairly large tomb guarded by one last foe. After taking care of this opponent, loot the two chests in the room; both contain minor loot but one is locked. Once you have finished exploring this zone, you will have to backtrack to door C and enter it to head back into Fort Sejanus.
Occupants:
Treasure:
- 1 Chest 01 (locked)
- 1 Chest 03
- The following alchemy equipment will always be found: 1 Novice Calcinator, 1 Novice Mortar & Pestle, and 1 Novice Retort
Doors and Gates:
- There is one door (at C) in/out of this zone, leading to the zone Fort Sejanus
Notes[edit]
- Fort Sejanus appears in ESO as Sejanus Outpost.
