General:Battlegrounds Feature: 1 – Ald Carac
Originally published March 15, 2017. The original article can be found here.
Battlegrounds are coming to The Elder Scrolls Online: Morrowind, including three unique maps at launch. To help you prepare for the battles to come, we are featuring Vvardenfell's battlefields all month. The first map to be covered? The mysterious Dwarven ruins of Ald Carac.
Watch Every Corner[edit]
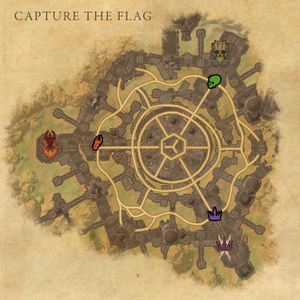
Ald Carac is designed to encourage players to engage in tight close combat, and the stone walls and buildings of the long-absent Dwarven race block line of sight and provide a lot of cover for surprise attacks or quick getaways.
The deeper you travel into the Dwarven ruins, the more cramped and claustrophobic the space becomes. As a result, the center of the Battleground is a hotspot for group fights. Circled by an elevated walkway, the center is vulnerable to players above, meaning those trying to control this space need to keep an eye above for attackers at all times. This elevated threat makes the center very hard to capture and hold.
The center of the map is not completely without advantage, however, as it is the only location that allows an unobstructed view into each team's base. In Ald Carac, visibility is at a premium, making controlling the center an important, but dangerous, strategic option. All Battlegrounds are 4v4v4 matches, so knowing exactly where your opponent is located is vital, regardless of the game type.
Ald Carac slowly opens up the further out from the center you go. The middle ring has more space, but it still features a fair amount of cover, including stairs up to the center overlook that grants vision into two bases. The outer ring finally provides mostly unobstructed views, so you can always travel around the outside of the map if your team wants to avoid surprises.
Path To Victory[edit]
In Team Deathmatch, there are no objectives to focus everyone's attention, and because the map is so enclosed, the first thing you and your squad will need to do is try to locate both of the enemy teams. You might think it best to avoid the map's deadly center; however, if your team manages to control that space and the visibility it provides, it will give you a clear advantage.
Domination is a different matter. While three of the capture points are on the outer ring between each team's base, the fourth one is right in the center. If you do manage to take the center capture point, retreating out and defending it from the elevated walkway above might be the best option. Constantly moving from point to point will also help to avoid being caught between the other two teams.
In Capture the Flag, Ald Carac's tight spaces and cover can certainly benefit a flag carrier, but it also makes it hard to avoid ambushes or clever defenders. Because each team's flag is located right at their base, the clear sightlines available in the center will help you identify the best time to attack and defend, but it might not be as safe as navigating around the sides.
[edit]
Ald Carac, with its high walls and tight spaces, represents a unique challenge to its competitors. Do you take the open paths around the edges? Or are you willing to dive right into the center and control the map's heart? How your team decides to navigate the ruins could be the difference between victory and defeat. We have a lot more information coming, so keep an eye out for more details on the individual Battlegrounds this month, and please feel free to share your thoughts with us on the official forums or on Twitter @TESOnline.


