Beyond Skyrim:Cyrodiil/Sedor
|
|||
|---|---|---|---|
| # of Zones | 3 | ||
| Clearable | Yes | ||
| Dungeon | Yes | ||
| Respawn Time | 10 days or 30 days | ||
| Occupants | |||
| Bandits, Undead Ayleids | |||
| Important Treasure | |||
| 4 Welkynd Stones | |||
| Console Location Code(s) | |||
| CYRSedorExterior01 CYRSedorExterior02 CYRSedor CYRSedorV201 CYRSedorV202 CYRSedorV203 |
|||
| Region | |||
| County Bruma | |||
| Location | |||
| Northeast of Silver Tooth Cave | |||

Sedor is a large Ayleid ruin containing bandits and undead Ayleids, located northeast of Silver Tooth Cave.
It contains three zones: Sedor, Maw of Sedor and Depths of Sedor.
Related Quests[edit]
- The Courier: Help a son of Skyrim rescue his friend and his important documents.
Notes[edit]
- This ruin contains 3 blue mountain flower plants, 3 purple mountain flower plants and 2 red mountain flower plants.
- Sedor also appeared in Oblivion.
Walkthrough[edit]
Exterior[edit]
Near the entrance you will find three wilderness animals or ogres, as well as one snowberry plant, one clouded funnel plant and two tinder polypore plants.
Sedor[edit]
The entire ruin is slowly being overrun by snow and ice, and the very dark first zone is no exception, with ice seeping from cracks in the Ayleid masonry. Immediately you will face one bandit near the entrance and another three in a room with some ale and gold. During the related quest, you will find Caius's The Skyrim Report, Part I. Press on until you reach an intersection: the room to the left contains two bandits, three bedrolls, a potion of healing and, during the related quest, parts III and IV of the Skyrim report. Heading straight ahead leads you to a balcony guarded by a bandit and overlooking a large room. From here you can snipe the three bandits below; alternatively, head east down the stairs and then head south to reach them. During the related quest, you will find part II of the Skyrim report. Note that fighting most of the bandits without sneaking is likely to alert the others nearby.
Track back and just to the north is a master-locked gate - beyond it is a room with a chest, an Ayleid coffer in an alcove above (which can be reached by jumping up from the nearby barrels), a gold ingot, two copper ingots, two coin purses and two crates holding 40 bottles of Greenwood mead. Head up the eastern stairs to reach the balcony on the opposite side of the large room. From here you can access a small room where you'll find the bandit ringleader, a boss chest and a haypile. During the related quest, you will also find the naked body of Caius and his list of Stormcloak sympathizers. Head back down to the large room, which has a ruined open ceiling giving you a glimpse of the sky. There are two welkynd stones on pedestals and a third on the ground. Head south, dispatching a final bandit guarding the door to the Maw.
When returning from the second door in the Maw, you will find yourself in a room with three rats. Dispatch them and head up the stairs to a balcony overlooking the first room. Jump down and head back outside.
Maw of Sedor[edit]

The scenery changes suddenly once you enter the Maw: a huge icy cavern opens up in front of you, with a canyon splitting it in half and a series of Ayleid ruins beyond it. More immediately, two bandits patrol the entrance near the remains of two Ayleid Pelinaga and an Ayleid skeleton. Ignore the path leading north and downwards, instead heading east towards the edge of the canyon. After defeating another bandit, head further east along the ledge to a wooded rocky outcrop with an Ayleid coffer. From here you will overlook another ledge with a boss-level adonai-Pelinaga, so snipe it or jump down to engage. To the west is a small circular ruin with a coffer, which you'll need to jump down to.
From the ruin, carefully jump down into the canyon itself. The rocky terrain can make it hard to navigate, but head west while hugging the northern face until you find an adept-locked coffer. Head back east, past an overturned tree and into some ruins: two undead Ayleids await. To the south of the ruins is a Welkynd Stone and a door to Sedor, which you will use on the way back. Press north into the ruins proper, battling past two Pelinaga and looting a coffer in a nearby circular ruin before heading across the broken stone bridge to the north. Across the bridge are two more Pelinaga and the door to the Depths. If you continue a bit further south and west, you will find a final undead enemy, a coffer and a Welkynd stone.
When arriving back from the Depths, you will emerge on a ledge in the eastern side of the cavern, near the Ayleid bridge. From here, jump down and make your way to the southern door for a quick exit back to the first zone.
Depths of Sedor[edit]

You are now back in a standard Ayleid ruin which is very dark. The first room holds one undead Ayleid, while in the lower level of the next one is another undead and a Welkynd Stone. Two pelinaga and a skeleton patrol the upper level of the same room. The third room is guarded by two undead enemies and has three passages leading out north, east and south. The first two are barred so head south, battling past another two undead enemies. You will then arrive on ledge with a welkynd stone, separated by icy water from a corridor with three undead, including one boss-level adonai-Pelinaga guarding a boss chest casket. Rush across the ice blocks to fight them and when you're done, plunge into the icy waters to loot a chest. The western end of the corridor is collapsed but can just about jump through to access a coin purse of Ayleid mala beyond.
Head back east, battle your way past two undead, loot an adept-locked casket and you'll arrive at the other side of the northern passage of the third room. Press the button on the wall to open the northern and eastern gates. Head through the latter and dispatch two more undead before looting the boss chest reliquary and a leveled Ayleid staff in the room to the north. Head south, through a corridor being flooded by water from grates on all sides. Two undead enemies guard it and you can loot three Ayleid coffins set in alcoves along the walls. You will then arrive on the upper level of a large room, where a further two undead can be found patrolling.
From here, you can observe the room below, dominated by a throne with a dead Ayleid sat on it. As you make your way down and walk around, two waves of two undead each will emerge from alcoves on either side. Once they are all defeated, the boss-level adonai-Pelinaga rises from his throne for one last battle. Loot from his body the key to the nearby boss chest reliquary and head for the door back to the Maw.
Maps[edit]
-
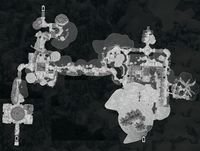
Map of Sedor
-
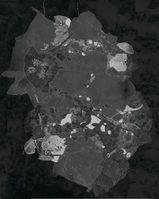
Map of Maw of Sedor
-

Map of Depths of Sedor


