Skyrim:Avanchnzel
|
|||
|---|---|---|---|
| # of Zones | 3 | ||
| Clearable | Yes (bugged) | ||
| Dungeon | Yes | ||
| Respawn Time | Never (storage is safe) | ||
| Level | Min: 16 | ||
| Occupants | |||
| Dwarven Spiders, Dwarven Spheres, Dwarven Centurion | |||
| Important Treasure | |||
| Racial Phylogeny | |||
| Console Location Code(s) | |||
| AvanchnzelExterior, AvanchnzelExterior02, AvanchnzelExterior03, Avanchnzel01, Avanchnzel02, Avanchnzel03 | |||
| Region | |||
| The Rift | |||
| Special Features | |||
| # of Alchemy Labs | 1 | ||
| Ore Veins | |||
| # of Iron | 2 | ||

Avanchnzel is a large Dwarven ruin filled with Dwarven automatons of all types.
Avanchnzel is located south-southwest of Lake Honrich and northwest of the Orc stronghold of Largashbur in The Rift. Once you obtain the Unfathomable Depths quest, the cave entrance will be revealed on your map.
Related Quests[edit]
- Unfathomable Depths: Uncover the memories of the Dwemer.
Walkthrough[edit]
Avanchnzel[edit]
As you enter the first room in the cave, you will overhear a conversation among a group of ghosts. This group, consisting of Breya, From-Deepest-Fathoms, Drennen, and Watches-The-Roots, will then move further into the cave and disappear. There is an iron ore vein to the left of the entrance to the room, on the ledge.
The next room contains a couple Dwarven spiders, one a worker, the other a leveled non-worker variant. Under the light on the right-hand side, a few steps before a steam pipe, is an iron ore vein. Beyond, you will enter a corridor, transitioning you to the proper Dwemer ruins. Beyond the first door, you will enter a large multi-level room with moving gears and other mechanical elements. You will see another short flashback of the previous party of adventurers as they gawk at the location before moving forward. While you are walking on a suspended bridge, you can spot at the bottom of this room a number of Dwarven spiders. The bridge forks midway.
To your left, the passage rises up to a closed door, beyond which lies a room with a Dwarven sphere. The room leads to a T-junction, with paths descending ahead and ascending to the left. One Dwarven spider should be waiting for you at this point, using a table as cover.

Following the left-hand corridor up, you will reach the topmost level in the structure. To the left, the path ends at a ledge overlooking the large room from which you came, with a lootable skeleton lying on the edge. To the right, you will find a door blocked by a wooden beam. Remove the beam and open the door to reach the exterior area Avanchnzel Balcony. Outside, there is an apprentice-locked chest down the ramp to the right.
Returning inside to the T-junction and following the corridor downward, you will reach a door barred from the other side, which will serve as the shortcut back to the entrance after clearing the ruins. You must therefore return to the large multi-level room and proceed in the direction opposite the initial entrance. A chest is mounted on the wall to the left of the entrance to the next corridor.
As the corridor you enter snakes around and above some active machinery, watch for surprise attacks from a couple Dwarven spheres. Next, the corridor descends to where you will find a Dwarven spider patrolling in front of an apprentice-locked gate, beyond which you will find a chest. The corridor will descend some more and twist back towards the main room. You will face more Dwarven spiders in this section as well as when you return to the main room, this time at the bottom level.
At the bottom of the main room, you will see two doors: one to the south, the other to the east. The south door has a master-level trap, and leads to a room with two chests and a few random items, including Dwarven Armor or weapons and a potion. The east door opens on a downward slope, where you will see another flashback from the previous party of adventurers. You can find a chest and the remains of a couple Dwarven spheres before reaching the next door, leading to Avanchnzel Animoncultory.
Avanchnzel Animoncultory[edit]
The entry corridor leads down to a room with more Dwarven machinery, a Dwarven sphere, and a Dwarven spider. A brief appearance of the previous adventurers (complaining about their lack of lockpicking skills) will point to an adept-locked side gate. Behind the gate you will find a chest, a few iron ingots, and two garnets.
Beyond this gate, you will climb some stairs and continue down a wide corridor, where an apprentice-locked chest can be found in a side alcove to the right. Shortly thereafter, you will descend a set of stairs and find the remnants of an encampment, with a bow and a set of eleven arrows on a stone table to the right of the chamber's entrance. You will be greeted by a flashback of the previous party deciding to camp here due to the unexpected size of the place. All four bed rolls will be marked as owned.
Shortly beyond this point, you will find an apprentice-level trapped door to your right, which leads to a side room with a chest, a stone bed, various Dwarven artifacts, and the remains of two Dwarven spiders, as well as the Restoration skill book Racial Phylogeny. Past this side room, you will enter a larger room with two sets of shelves holding the remains of three Dwarven spiders (though one is on a higher shelf and is difficult to reach) and a Dwarven sphere. On your left, you will find an alchemy lab and one active Dwarven spider. There is a potion and several gems both on and under the table with the alchemy lab.
On the other side of the room, a corridor dives deeper underground, and leads to a door opening to another room with a shelving unit holding more Dwarven items. This room is patrolled by a Dwarven sphere and a couple Dwarven spiders. As you enter the room, you will see an adept-locked door to your right, leading to a side room with more Dwarven clutter, a novice-locked chest, a weapon on a rack, a helmet, and a soul gem. Opposite this side room, an apprentice-locked gate leads to a stone table holding two potions and an unlocked chest.
The next room holds another set of shelves with Dwarven clutter on it. At the bottom of the next corridor, you enter a room with yet another set of shelves, triggering another flashback hinting that not all the sleeping guardians are inactive. Another downward slope and another door lead to a raised balcony running around a large room. The room's lower section features several tables and shelving units holding two inert Dwarven centurions containing centurion dynamo cores, several inactive Dwarven spheres and spiders, and more Dwarven clutter, as well as an unlocked chest. Several active spiders also roam the room.
The exit from this room is up a set of stairs in the northwestern corner, leading to a passage where you will find Drennen's body. Traveling a few steps beyond will trigger a new flashback from the previous party of adventurers, explaining how Drennen decided to leave the others. There is also an unlocked chest under a shelving unit, with more Dwarven items on the shelves and an adjacent table. The door ahead leads to Avanchnzel Boilery.
Avanchnzel Boilery[edit]
The Boilery zone starts with a downward passage, and a flashback from the remaining three adventurers. In the corridor beyond, you will walk on a floor grate under which is a Dwarven spider that can detect you but won't be able to hit you. On the other hand, a Dwarven sphere around the corner can certainly attack you. There are two chests and several inert Dwarven spiders on the four sets of shelves nearby. Next, you will reach a room where another flashback takes place, during which Breya says "Something doesn't feel right about this". Several Dwarven metal ingots lie between a table and a set of shelves, while two potions are on the shelves.
The door beyond opens onto a downward corridor with a spinning blades trap, triggered by stepping on the pressure plates at the top of the corridor, even if you have the Light Foot perk. A series of pipes make passage to the sides of the blade difficult, but it is possible to carefully sidestep or run ahead of the blade until you reach the bottom of the corridor, where a lever can be used to deactivate the trap. The body of Watches-The-Roots can be found next to the disarming lever.
The next room contains the Lexicon's receptacle, your goal for the Unfathomable Depths quest. However, you will first have to deal with one leveled Dwarven centurion that will activate as soon as you are close enough. Another inert centurion can be found lying to the right of the raised center platform. On the steps of the platform, you will find Breya's corpse.
At the top of the stairs is a locked door which requires a key, but which will be automatically unlocked once you place the Lexicon on its receptacle. When you do so, you will also receive the Ancient Knowledge ability.
The door at the top of the stairs leads to a room that contains a chest and a lever-activated elevator that will take you to the barred door in the first zone that could not be opened from the other side. Remove the blocking beam, and exit the ruin through the nearby Balcony door.
Notes[edit]
- You do not need the quest to be active to gain entry to Avanchnzel. The door is glitched, allowing you to slowly pan across the door until a small gap appears, through which you can activate the bar and raise it, allowing you to open the door.
- You can use the Unrelenting Force shout to push the Dwarven spiders off the upper shelves for easier looting.
- The Dwarven spider under the grate in the last zone can be killed using the spell Chain Lightning or a damage-dealing shout such as Fire Breath. It is also possible to summon an atronach beneath the grate to deal with the spider.
- Avanchnzel also appears in ESO.
Bugs[edit]
- There is an unmineable gold ore vein just off the path leading to the ruin.
 The Unofficial Skyrim Patch, version 1.0, fixes this bug.
- Just after the unreachable Dwarven spider and before the flashback scene, there is what appears to be a spike-style entry into the pipe section where the spider is. This entry is non-functional and cannot be opened. Holding a plate or platter against the gate and using the Whirlwind Sprint shout will get you through. On the other side are several pipes and possibly two dead automatons depending on the player's level, but no treasure.
- Having a follower wait on the grating with the unreachable spider still alive may cause the follower to somehow drop beneath the grating to attack it. If they do, they will be irretrievable.
- The Unofficial Skyrim Patch, version 2.0.7, fixes this bug.
- This can be fixed by opening the console, selecting the follower (either by clicking on them or using the
pridcommand with the follower's RefID), then enteringmoveto player.
- None of the creatures here are tagged as a boss, which prevents the location from being marked as cleared.
- The Unofficial Skyrim Patch, version 2.0.3, fixes this bug.
- To set Avanchnzel as cleared via console, enter
SetLocationCleared 18ee5 1.
Maps[edit]
-
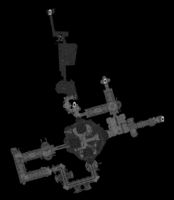
Avanchnzel
-
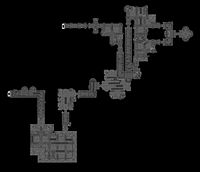
Avanchnzel Animoncultory
-
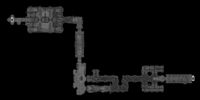
Avanchnzel Boilery


- Skyrim-Places-Dwarven Ruins
- Skyrim-Places
- Skyrim-Places-Level 16
- Skyrim-Places-The Rift
- Skyrim-Places-Iron Veins
- Skyrim-Places-Alchemy Labs
- Skyrim-Places-Clearable
- Skyrim-Places-Safe
- Skyrim-Places-Discoverable
- Skyrim-Places-Dwarven Automaton Sites
- Skyrim-Bugs Fixed by the Unofficial Skyrim Patch
- Skyrim-Confirmed Bugs