Morrowind Mod:Bump and Reflection Mapping
Morrowind Bump and Reflection Mapping Tips and Tricks, a tutorial by AnOldFriend, originally posted in a forum thread, supplemented with comments and 11-steps guide by Biont describing the process of applying bump- and gloss- maps on a model.
AnOldFriend's tutorial[edit]
Foreword[edit]
This is not meant to be a tutorial for adding bump and reflection maps to models for Morrowind. This is intended to be a repository for tips and tricks for using this method, and how to tweak the different aspects to get the results you are trying to achieve. Please forgive me for my lack of techinical [sic] knowledge. I will try to explain things as best I can. Before we start I would like to give credit to Painkiller_Rider and Phijama who taught me some of these tricks.
Required tools:
1) Nifskope
2) An Image editing program that has a DDS plugin with a normal map filter, or any other program that is capable of creating normal maps. Photoshop, The Gimp, Paintshop, Crazybump, or the like.
Suggested tools:
1) Sceneimmerse
2) MCP 1.7 and above
Filter mode[edit]
First I will start out with "Bump Map Texture"> "TexFilterMode." This can be found in your "NiTexturingPropery"> "Block Details."
By default the filter mode is set to "FILTER_NEAREST_MIPNEAREST" which is apparently not a very good filter mode to use. Your normal map and reflection map will come out pixalated and just look bad in general
Instead the suggested filter mode would be "FILTER_TRILERP." Over all, this will give a better result.
Controlling reflection intensity and final appearance with the reflection map alone[edit]
Knowing how to create a reflection map and having a basic idea of how it might look on the object before applied can save you a lot of time tweaking.
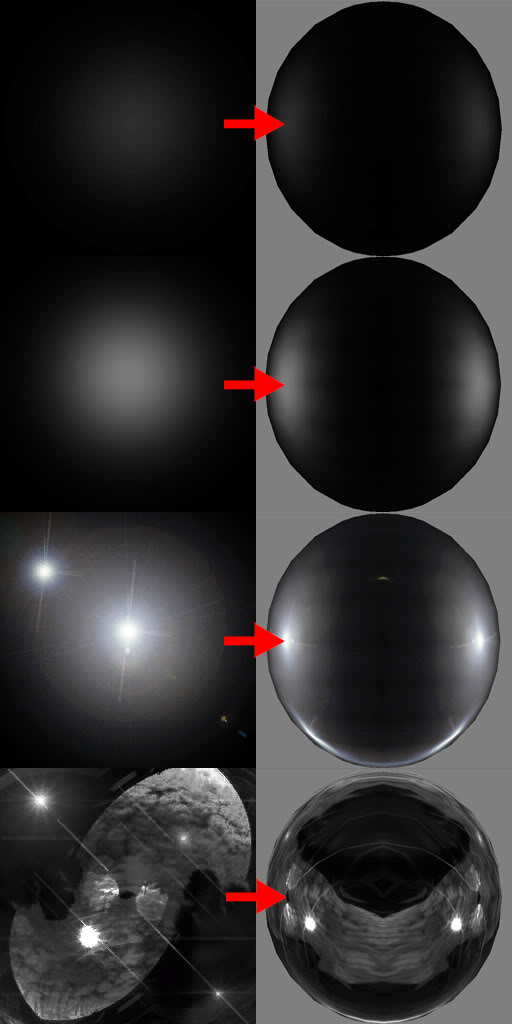
Below are some examples of different reflection maps, how they look applied to a sphere, and rendered in sceneimmerse.
Reflection maps like any other texture is applied and tiled accross [sic] your object based on the UV mapping. Hot spots on your reflection map (bright spots on the reflection map) will vary depending on your UV map, the model's geometry, and the normal map especially.
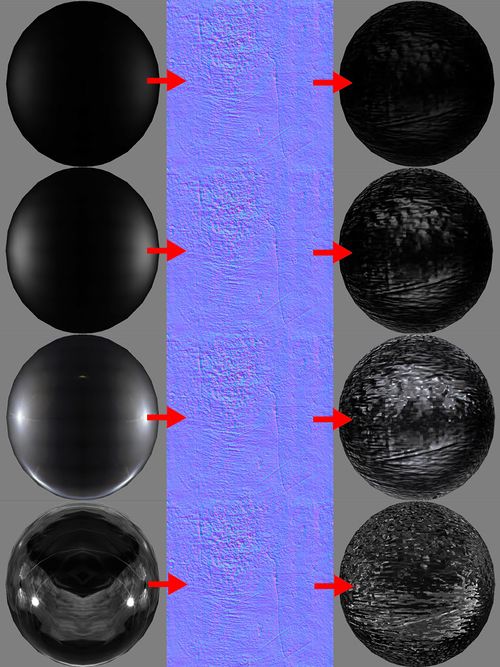
Below are some examples of the same reflection maps applied to the shpere [sic] but with a rather gritty normal map.
As you can see the reflection maps look a bit different when applied over this rough normal map. The hot spots defined in the reflection map are less apparent and the reflection effect conforms more to the contours of the normal map.
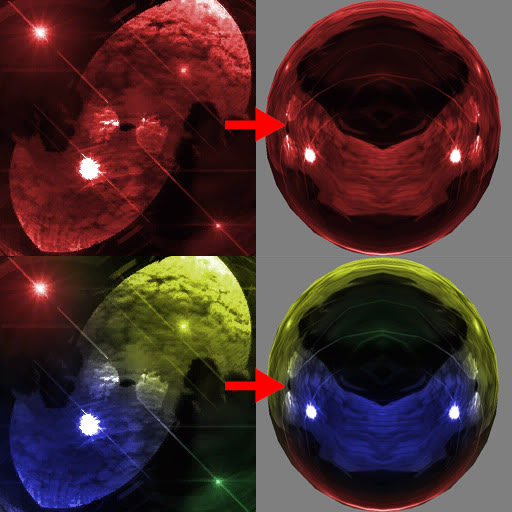
Next up is adding colors to your reflection map to portray a different type of material; gold, silver, bronze, and so on.
The examples below may be a bit extraordinary but they are this way only to better illustrate the idea.
Using black and shades of grey on normal maps to control reflective intensity[edit]
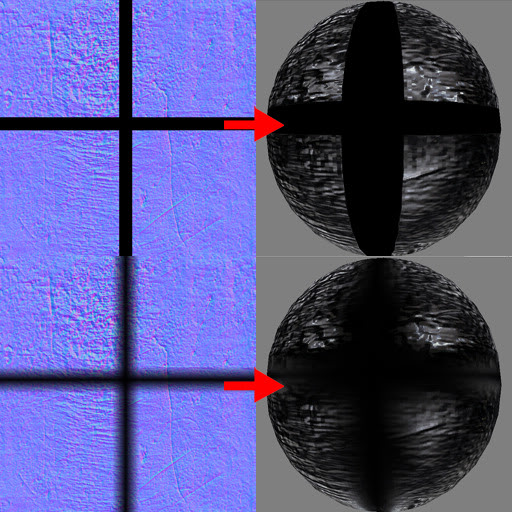
When you apply a solid black color over a particular area of your normal map it will exclude that area from the reflection map's effect. You can also use gradients to control the intesity [sic].
Below are a couple examples showing the basic idea.
This can be put to some clever uses. You can select certain areas of your object to have a shiny look while the area around it is matte. Or you can define areas that will have full reflective intensity while cracks and crevices are excluded and the reflection intensity has a controlled falloff towards these areas.
Controling reflection intensity in Nifskope[edit]
Aside from all that there is one other way that I am aware of to control the intensity of the reflection map. In Nifskope "NiTexturingProperty"> "Block Details"> "Bump Map Luma Scale" is set by default to 1.0000. Raising this number will make the reflective material more bright and lowering it will do the opposite.
Comments Section[edit]
Contains additional information submitted by other users in forum posts. Note that some posts were omitted, edited or merged for the sake of legibility.
General discussion[edit]
Draigr
I find that using airbrushing with a scattered application of colour on the reflection map really helps control the light intensity, without having to detail the bump map.
The image below, for example, illustrates what I'm currently using for buildings. That's also a comparatively high intensity reflection map.
Using gloss maps does work if you put the specular map you would have made otherwise in the blue channel of the normal map, and specify the source texture for the gloss map as the bump map. But it's got a funny green tinge to the specular highlights right now, so I'm trying to work out what might be causing it.
Also, note that you need to have a texture effect with the reflection map as the source, and a parent node for the whole system to work.
Yar-Yulme
quoted AnOldFriend:
Filter Mode

First I will start out with "Bump Map Texture"> "TexFilterMode." This can be found in your "NiTexturingPropery"> "Block Details."
By default the filter mode is set to "FILTER_NEAREST_MIPNEAREST" which is apparently not a very good filter mode to use.
Your normal map and reflection map will come out pixalated and just look bad in general.
Instead the suggested filter mode would be "FILTER_TRILERP." Over all, this will give a better result.
I'd like to notice that it is true for Glow Maps and Detail Maps as well. Many modders use default filter mode for them, which results to somewhat weird look.
Peachykeen
A little tip I learned from a texture artist: While using sphere mapping (make sure your NIF isn't set to cubic or another form), if you take your environment map and paint 3 of the edges (left/right and top, IIRC) with a color, you'll get a fresnel-like effect using that color. This is useful for things like water and other liquids, pearlescent surfaces, and polished metal and stone. If you just want fresnel highlights, leave the middle black or very dark. You can make things that glow green around the edges with that technique.
quoted AnOldFriend
When you apply a solid black color over a particular area of your normal map it will exclude that area from the reflection map's effect.
You can also use gradients to control the {{Sic|intesity|intensity}}.
This can be put to some clever uses. You can select certain areas of your object to have a shiny look while the area around it is matte.
Or you can define areas that will have full reflective intensity while cracks and crevices are excluded and the reflection intensity has a controlled
falloff towards these areas.
I'm not sure why that works here, but I think it may be due to the length of the stored normal becoming negative. Normal maps, assuming MW loads them as usual (and from the colors you're using, I think it may) are loaded and expanded with the formula ( ( n - 1 ) * 2 ). The rgb components become offsets for the xyz components of the normal. Depending on how your model is set up (you may need to view the surface normals to check), by nulling the Y or Z component, you can effectively turn off lighting. A negative Z (or in some engines Y) will reverse lighting to the opposite side of the surface. Might take some playing with to make it work with Morrowind, though, but white, black and gray will usually have special properties, and any component set to one of those extremes (-1 at black, 0 at gray, and 1 at white) will behave unusually.
Yar-Yulme
Bump and reflect mapping work slightly different on different hardware; it affects mostly the transparency.
For example, on PC I have Radeon X800 GT, on laptop some Intel adapter; as far as I know, at least some nVidia videocards works with Morowind's bump and reflection exactly the same way as this Intel.
I used model of woden [sic] crate and modified texture to make hole in it, then I created bump map and applied a shiny reflection to the crate. With ATI card it worked normally: there was a shine crate with a hole in it. However, on Intel there was a plane shine surface instead a hole.
This could be fixed if fill normal map with black on transperent [sic] parts and add alpha channel to it.
Next, if we've got a semi-transparent texture, Intel tends to kill the transparency. Or, to be more exact, it seems not to completly [sic] disable the transparency, but to strongly reduce the opacity level.
And next one. On some ATI cards reflection does not work when mesh don't have a base texture (many Phijama's mods affected to this).
Hrnchamd
Just dropping in, to correct some misunderstandings. The bump-mapping in Morrowind is not normal mapping at all, but DirectX 7 EMBM (dUdV) mapping with a gloss control in the blue channel. Do not expect it to behave like normal maps that much.
 quoted Draigr
Using gloss maps does work if you put the specular map you would have made otherwise in the blue channel of the normal map,
and specify the source texture for the gloss map as the bump map. But it's got a funny green tinge to the specular highlights right now,
so I'm trying to work out what might be causing it.
You don't need to specify a gloss map, the bump map should handle it by itself. If you remove the gloss entry it may remove the colour tinge.
 quoted Peachykeen
Normal maps, assuming MW loads them as usual (and from the colors you're using, I think it may) are loaded and expanded with the formula ( ( n - 1 ) * 2 ).
The rgb components become offsets for the xyz components of the normal. Depending on how your model is set up (you may need to view the surface normals to check),
by nulling the Y or Z component, you can effectively turn of lighting. A negative Z (or in some engines Y) will reverse lighting to the opposite side of hte surface.
Might take some playing with to make it work with Morrowind, though, but white, black and gray will usually have special properties,
and any component set to one of those extremes (-1 at black, 0 at gray, and 1 at white) will behave unusually.
EMBM existed when normal expansion was a separate signed byte texture format, and it's only by a lucky series of coincidences normal maps give similar results. You can research it yourself, but there is a best case approximation to normal mapping that involves some simple pre-processing steps.
 quoted Yar-Yulme
Bump and reflect mapping work slightly different on different hardware; it affects mostly the transparency.
For example, on PC I have Radeon X800 GT, on laptop some Intel adapter; as far as I know,
at least some nVidia videocards works with Morowind's bump and reflection exactly the same way as this Intel
Bump mapping wasn't completely specified with regards to alpha channels. Some drivers take alpha from the base texture, some from the bump map. You should put the alpha channel in both to be sure. If you're not alpha testing the texture, the transparent parts will still have a reflection map drawn on top, as the Z-buffer matches. You must set the bump map to black in those areas to turn off the reflection there.
Merunnin
So obviously bump mapping anything not supposed to be shiny won't work, but how about something intermediate like the skin of a reptile? Anyone experimented with bump mapping argonians?
Vurt
It works, i've [sic] done rocks and tree bark for my ascadian isles mod, it looks bumpy but not shiny. i'm [sic] not sure i think it looks better in for example FO3.
Westly
quoted Merunnin
So obviously bump mapping anything not supposed to be shiny won't work, but how about something intermediate like the skin of a reptile?
Anyone experimented with bump mapping argonians?
I have some dragon races that I have been working on for a while to which I want to add such an effect (but had no real plans to do the Argonians). Although, I am just using a basic bump map (not a normal map), the effect should be the same. I thought about doing an Argonian replacer once I finalised these other races (using them as my experiments to get the effects just right), but one thing at a time (gotta be happy with the from scratch textures for the first race first). By having a from scratch texture, it is easier to develop a specific and detailed bump effect (whereas working from a texture that is made before the bump/normal can often lead to odd results without careful knowledge of what parts of the already made texture should actually be "bumpy".
Draigr
Gloss mapping works. Bahamut tipped me off to it with his Sontorian armour set, which has gloss mapping, that works as well. I'm not entirely sure what I was doing wrong, but after running a few questions by him, he managed to solve my problem, and I've also decided to stay solidly in Crazybump from now on when dealing with that.
Gloss maps work!
Which means that we can bump map houses now, and bonemold without them looking like plastic!
AnOldFriend
Looks and sounds interesting. I would be curious to see what you come up with for some architecture.
quoted Merunnin
So obviously bump mapping anything not supposed to be shiny won't work, but how about something intermediate like the skin of a reptile?
Anyone experimented with bump mapping argonians?
Part of the reason I started this thread was to dispel this idea to some degree. By using different types of reflection maps, normal maps, diffuse, and other sorts of maps in collusion with MCP you can achieve different sorts of materials. I think Draigr's most recent example shows a better example if how to create a reflection map that isn't overly shiny.
Aside from that there is another method that produces practically no shine, yet still renders the hight [sic] information. The only downfall with that, at least before MCP and local lighting, it would produce a rather horrible glowing effect in dark areas. I haven't tried the method I am talking about here yet, which is why I haven't included it.
Draigr
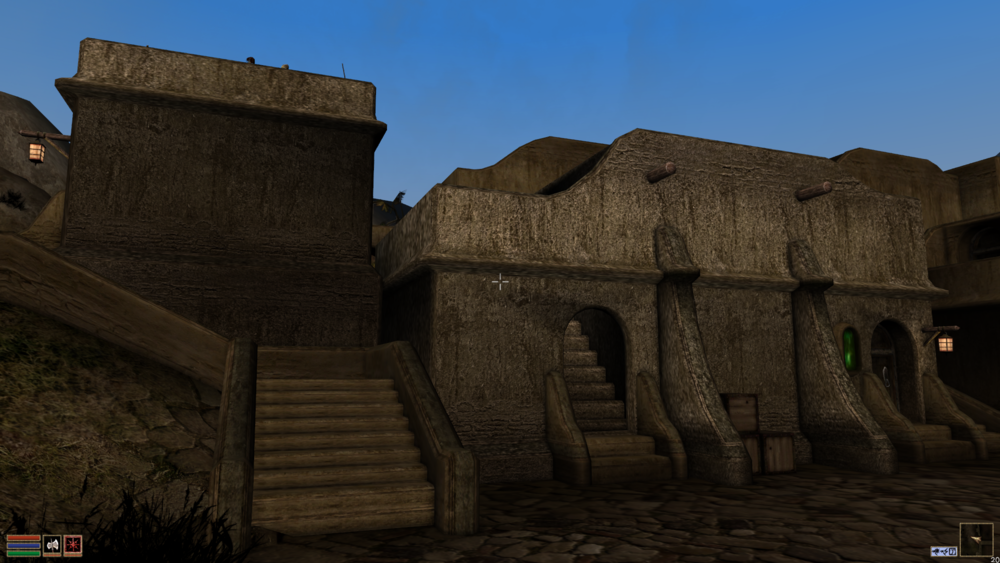
I had a go at Balmora, thinking it would be easy. It was... The designers only used five or six textures for the entire town... Like literally every building there has the exact same textures. The variation is the buildings. Which is ridiculously boring, since adding bump and spec maps means I have to open up every unique model, apply three separate textures to the six odd parts of the model, then ensure it's all working. And rinse and repeat.
Wow. When they say cheat, They really mean it. But then, you really don't notice it.
Anyways, here's some shots of what I've done so far.
The bump mapping is quite strongly affected by lighting, so I took those shots when the sun was about right.
I think I'll take a break and try Ald-Ruhn. At least you can get good sunset shots there.
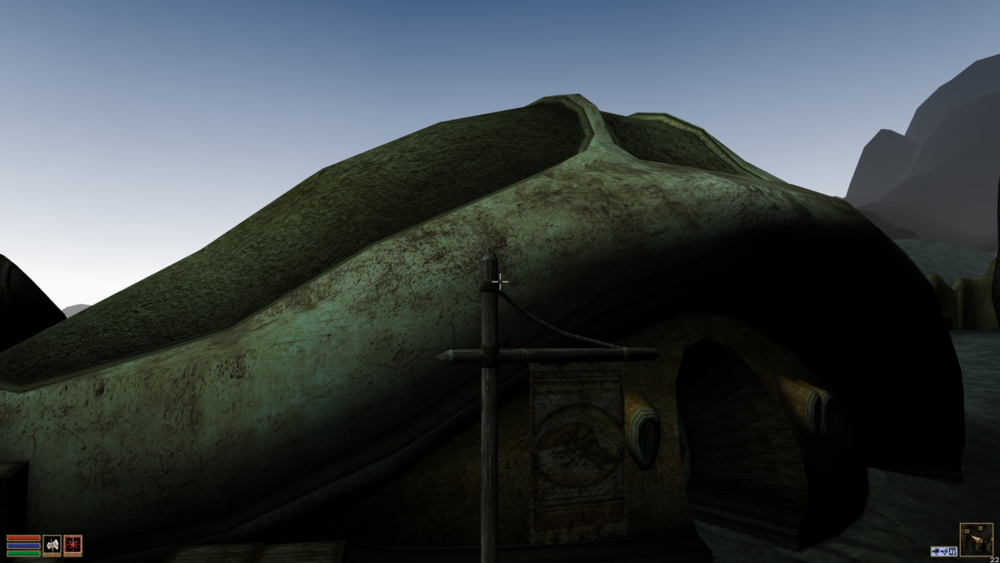
While the specular (I know it isn't specular, but I find it easier to call it that) highlights are looking as good as Oblivion and Fallout - intentionally bright though, something tells me Ald-Ruhn was not meant to be normal mapped. Might be the textures not tiling against each other:
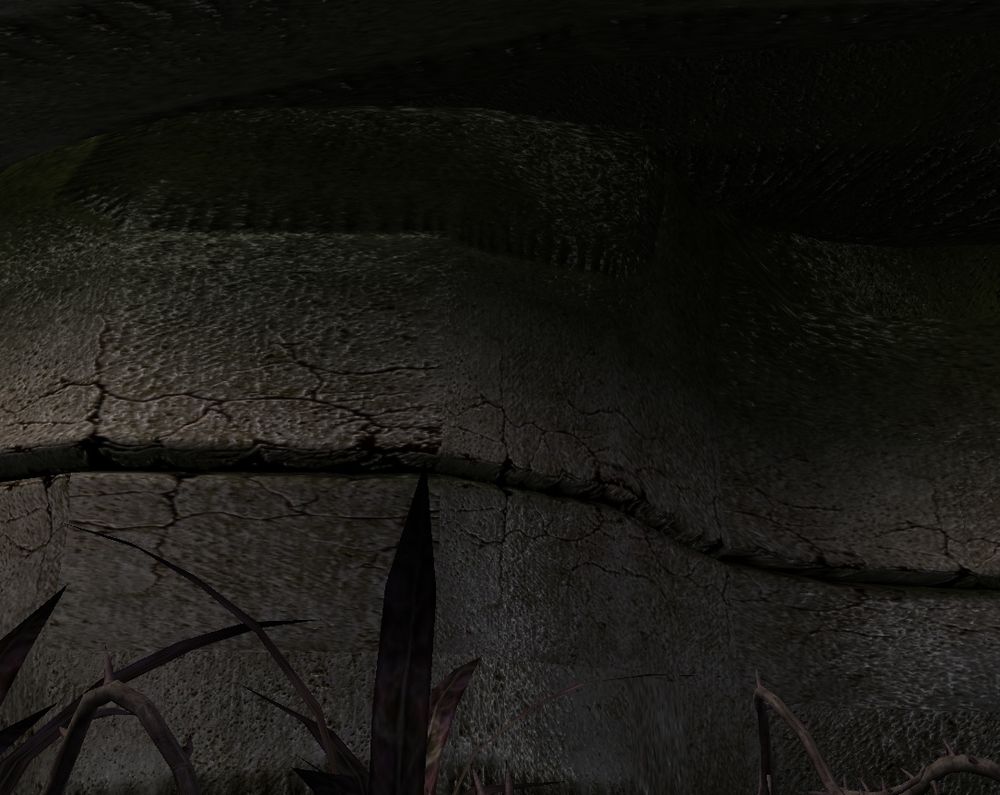
With a bit more work on the reflection maps, the bump mapping is going quite well for buildings. The specular map makes life a lot easier then using just a normal map, both in controlling where the light hits and how bright it is. It also allows for tonal control of the overall texture. Some more shots:
I am, however, encountering an annoying lighting issue. Namely the fact that shadows appear to be in a perpetually utterly black state. I've tried playing around with the lighting settings and using a few lighting mods to brighten things up, but it's not working. It's even worse at night and in the afternoon:
AnOldFriend
A lot of Bethesdas models are mapped terribly. If you want to get a good result you will just have to re-map them unfortunately.
quoted Merunnin
...I don't think anyone gone into how to create the lightmap node, so I'll just have to steal someone else',
it's just the texture which makes the difference yeah? Or will using say bahamut's nitexture effect give the object a metallic look,
even with a different texture?

So if I want height without much shininess I should make the blue channel of the bump map really dark? Is that even possible?
I had the impression that bump maps are entirely dependent on the glossiness to create the illusion.
Nitextureeffect node as far as I am aware is really limited as to what can be modified. Pretty much any texture effect from another model should work the same. Put simply, yes, the map is the key.
Putting black in the blue channel of the normal will probably just make the texture appear flat. Not so sure though, I havent [sic] messed around with gloss in the normals blue channel or gloss maps in general. There are quite a few ways to control intensity. Read the OP and or have a look at Draigr's posts.
Draigr
quoted Merunnin
Draigr I just saw {{Sic|you aldruhn|your Ald'ruhn}} shot. I think that looks great actually, much better than {{Sic|balmora|Balmora|description=lowercase letter}} if you'll forgive the UV mapping.
How did you reach that effect? I'd like to achieve a similar level of shine.
I used a point based reflection map. I can't remember which version, but it would have been a version of this one <image was lost>. That's a particularly bright map, so use this <image was lost> as a base and tweak until you get an effect you like.
That's basically a tweaked version of one of Painkillers reflection maps I believe.
I also used a gloss map. Otherwise everything would have been reflecting.
Merunnin
quoted Vurt
which resolution should be used for the bump map? Have anyone done a comparison between the resolutions to see if it really matters much?
Maybe 512x512 is good enough for a 1024x1024 {{Sic|texure|texture}}? Bump maps are often much larger than the actual textures for some reason.
I don't have much experience with bump maps, but yes normal maps are usually half the size of the diffuse. Bethesda did that for fallout 3.
[on bumpmapping of characters' heads] Turns out you can't have bump-mapped objects in the outermost node(scene). Which is odd since gloss works. To make it work, you need to insert another ninode into your scene, and the nitrishape and textureeffect there. Normally this wouldn't be a problem, but the head needs to be in the scene node to morph correctly! So you can either have the rubbish flat head or a shiny new one which keeps blinking and won't shut its mouth. It ignores the note tracks basically. I think I'm just gonna space out the animations so it's doesn't get too incessant. After all there are no PCs with this yet uncreated "race" and the PC never talks does she/he? What about when you're hurt and you groan, does the player's mouth even move?
Bahamut
 quoted Merunnin
Is the head bump mapped, did you find way around the problem with the note tracks?
Also I notice you always have a separate gloss map, instead of using the blue channel. Is there any difference?
I do not tried with bumps for character yet, thus i dont [sic] use animation for custom head meshes (because then i can't rig them) i dont realy [sic] miss the blink and talking animation I think there's no diffrence [sic] if gloss map is separate or in bumps blue chanell [sic] I use them because its [sic] more comfortable for me to have things separate.
Bahamut
I made fast trough making additional bump textures and gloss and here what i've [sic] got:
Hrnchamd
quoted Merunnin
Still a little too glossy. Do you have to go in-game to check every little change?
I don't know which texture to tweak- darkening the blue channel quells this but the bump goes with it. I'm fairly certain the glossiness is necessary for the height.
Something more desirable might be able to be reached for a scaly surface, but I doubt it will ever work for something like human skin.
Light maps seem pretty easy on the other hand, since it's faking the "reflection" you're supposed to see in a surface,
a desaturated macro of the surface you're trying to achieve should do.
For example the eye reflection used for a gloss mapped eye worked really well,
but the clouds and skies commonly used for light maps will look ridiculous indoors imho.
The reflection map is supposed to be an image of the environment, modified by the surface material. If your material is plastic, it's reflecting everything, however there is a lot of loss compared to an ideal reflector so you mostly see reflections of light sources, i.e. the specular highlights. Other surfaces are microscopically rougher and scatter light in all directions, in the extreme this is like the smooth lighting in Morrowind where there is no change as you change viewing angle. The part in-between contains interesting things though, not too shiny, not too flat. You get there by blurring the hell out of the reflection map, a blur about 1/8-1/2 the size of the image. Because the texture wraps you have to tile the image 3x3 times so the edges blur correctly, then cut the centre tile out.
quoted Plankgye
Wait, GIMP has a normal map filter? Why did I not know this? That's brilliant!
I've been going crazy for lack of one ever since my 64-bit OS forced me to upgrade to Photoshop CS5!
I would use the one in the nVidia DDS plugin. GIMP isn't as accurate at generation.
Bump-mapping enchanted items[edit]
Hrnchamd
quoted Merunnin
Has anyone found a way around bump mapping enchanted items yet?
Any enchanted bump mapped weapon will start to glow a ridiculous/nasty/horrible coloured sheen,
yet any of the "no glow" mods will get rid of the bump mapping. This is really making me livid.
I don't know. I coded MCP so enchantments shouldn't replace the bump mapping. Maybe it's the enchant colouring, you'll have to give more details on how to reproduce it.
Merunnin
Actually maybe I'll try one of the no-glow plugins again, my report of those is based on a pre-1.8 mcp maybe you've made some changes since. Even back then though, it's not that the bump map didn't work, it was bumpy while giving off the enchant glow, but maybe you're right that it's just the colour, since: a.- I couldn't tweak the specularity with it in the way, and b.- I'm not sure what version it was but I think it was before you implemented the 'local lighting' so that might explain the "glow". A coincidence? Anyway thanks I hope there's a way to stop the colour without ridding the bump.
quoted AnOldFriend
Have you tried your own suggestions? Upgrade to latest MCP, no glow, and so on?
I think your question is something about how the enchant effect is messing up the bump effect? What exactly is the problem?
Well any bump-mapped enchanted items(weapons at least) will have the magic plastic wrap glow along with the bump mapping. You know, Paralyze items glow green, fire red, etc. Don't you have the same situation?
quoted AnOldFriend
So the bump map works?
If you don't like how the enchant effect looks then either try one that fits your fancy or get rid of it all together.
Ah but you see, therein lies the dilema [sic]- the enchant effect is a gloss map, so to disable enchant effect is also to disable gloss and therefore bump. That is with traditional methods at least, but there must be a way to stop the game from applying the effect without affecting the gloss map.
AnOldFriend
I am pretty sure that the enchant effect is just that, an effect, that is applied to the model. Any mod that disables the effect is only disabling it on the given model(s), not the ability of the engine to render the effect all together. When you apply a reflection or gloss map to a model you are enabling it on that model not in the engine itself.
Merunnin
I just tested it out with "improved no-glow". Like I said, no-glow and bump maps are mutually exclusive at this stage.
AnOldFriend, that is not how they work. If I remember correctly, one of the methods, done through the cs, was to set the enchant glow to black, which eliminates sepcularity. The other method, used by "pluginless no glows" was to modify the nif that is applied to enchanted items. I think it removes the glossmap or gives it one that doesn't work. Currently none of them actually stop the enchant effect FROM being applied, they are all tricky ways to cheat the effect that it's not there, while it is, albeit invisible.
Plangkye
quoted Saint-Juib
I was under the impression that Pluginless NoGlow (by Plangkye) edited the textures used by the enchantment effect rather than the model,
so is there any reason why that wouldn't solve your problem? Alternately,
I know there's a mod on PES that changes the enchantment effect to more of a lightning/static effect,
so it's like the enchanted item is crackling with energy. For now, that might be a good compromise.
Hit the nail on the head. It ought to work just fine to solve this problem - indeed, every bump mapped enchanted item in my game looks just fine. The sheen on the items is the color of whatever school of magic the item's enchantment is, but there's no horrid plastic wrap!
Just to clarify, the sheen I refer to is the glossiness that would have to be on the weapon anyway in order for the bump mapping to show. It's not overpowering at all, and in fact I quite like it as a flavor enhancer for enchanted weapons - it kind of winds up being like how it works in Oblivion, only even less obvious.
Wait, hold on a second - is this a gloss map we're talking about, or an environment map? Because enchant glow is an animated environment map, not a gloss map. The "default gloss map" (read: none) is equivalent to a blank white texture, that is, no dimming, removal, or color alteration of whatever environment map creates an item's shine.
Merunnin
Opps my bad, yes I meant the environment/light/reflection map(bah so many names). I'm not actually using a seperate [sic] gloss map as I'm manipulating the blue channel of the bump to control the specularity. Sorry everyone it was late, no wonder y'all seem a bit confused. You somehow seemed to have understood me before this though Plangkye.
Anyway yea like you said the colour is still there, and there seems to be no way to get rid of it outside of the cs and without ruining the bump map.
Plankgye
You may be able to go into the Construction Set and make a supplemental .esp for my enchant glow textures, then: in the Gameplay menu, go to Magic Effects and change the color in the box labeled "Lighting Effects" to white for all spell effects. The original NoGlow used this to get rid of the glow entirely (by choosing black instead of white) and you can use it to simply remove the color.
Merunnin
I'm happy to report that I'm happy with it. I'm quite sure if the effect looks exactly the same but I can definitely live/work with it. Thanks Plankgye.
Bump effect without shine[edit]
Biont
Vurt said previously that there is a way to get a bump effect without the "shiny" and Draigr's pictures also looked better in that department.
Any tips?
Hrnchamd
Experiment with the reflect map. The smaller the light sources, the sharper the reflection turns out. Blur the reflect map heavily for a more matte material.
AnOldFriend
Honestly the best way is to just tinker around. It is sort of hard to explain, or illustrate as I have in the OP, any easier way to understand how a reflection map should look to attain a particular type of material or level of specularity/glossiness or lack thereof. Perhaps try thinking of the map as the destination of your light source, with a smother and or less noticeable falloff you will get a map that will render out with less specularity/glossiness.
Setting bump-maps to FILTER_TRILERP[edit]
Chainy
Aside from setting the filter mode in Nifskope to "FILTER_TRILERP", which other ways are there to troubleshoot pixellated environment maps? And what are the causes? On some meshes I am getting rather poor results even with env maps half, equal and twice the size of the texture map while others turn out just fine.
AnOldFriend
You could try saving as 32 bit DDS, if you are using DDS that is.
Pherim
Because I just spent half an hour setting the bump maps to FILTER_TRILERP in all meshes of Bump-mapped AOFs Imperial Housing and it made such a big difference (looks a lot better now), I wondered whether it would be possible somehow to create a small program that could do this for an entire nif file at once or even for a number of files. That would save a lot of time and people could update mods such as Lougian's bump mapped retextures quickly by themselves. It does improve the look of the bump maps greatly, but since it has to be set for every single texture it takes a lot of time for bigger mods.
Alpha flags on objects[edit]
Starwarsgal
It would be really great if the alpha flags on objects were set to 4845 by default too.
Abot
I would recommend using a NiTexturingProperty Bump Map Luma Scale <= 1 else it may be overbright
Starwarsgal
quoted Aoimevelho
Never heard about this one. Could you please tell what this parameters does or where can I find more info?
Alpha doesn't usually overlap well when there's a lot of faces with alpha, such as trees. The default flags will cause the alpha to sort of cancel out on itself and look generally terrible. Setting the flags to 4845 fixes this problem as much as possible.
Pherim
See this comparison screen shot from my Hackle-lo fixed mod, which shows the difference:
It's also the setting Bethesda used in later games.
Abot
best way to understand alpha flags IMO is from the dedicated panel in NIFSkope, where you can set/review the various bits of the flag. Look for (or add one) a NiAlphaProperty under the NiTriShape. The NiAlphaProperty has a Flag field showing the decimal value. If you click the flag icon a panel will open where you can control/understand the meaning of the flag bits
Panel controls: Enable Blending (usually ON) Source Blend Mode (usually Src Alpha) Destination Blend Mode (usually Inv Src Alpha) Enable Testing: this is important flag if your texture is going to overlap other alphas (e.g. foliage, hairs,water flora...) better enable it Alpha Test Function (depending what you want to test, usually >= ) Alpha Test Threshold (this is the more critical/needing experimenting part, depending on this value one of the overlapping alphas will win, best setting varies depending on condition, e.g. what's best for tree foliage may not be best for things to be seen underwater e.g. hair, shell borders... No Sorter usually on.
Biont's bump-mapping guide[edit]
Basically, it's just a few steps for a basic mesh:
(0.: You should have your bump map (and gloss map if you want one) ready)
1.: Right-click on the NiTexturíngProperty in the Block list -> Texture -> Add Bump map, then choose your bump map texture
2.: In the NiTexturingProperty's Block details window, open "Bump map texture" and set the filter type to "FILTER_TRILERP"
3.: If you don't want a separate gloss map, skip this step: Add another map the same way as in step 1 and choose your gloss map. The gloss map can't be added directly, so I always select "add glow map". In the TexturingProperty, double-click on "Has Glow map" to deactivate it again. Then double-click on "Has gloss map" and open the list that turns active now. Insert the number of your gloss map as "Source"
4.: Repeat 1-3 for all the textures you want to have bump maps on. (Note that this guide will enable the environment effect for all parts of the model, so there will still be a shiny gloss effect if you don't assign bump/gloss maps. There should be ways to exclude parts of the mesh, but I didn't need that so far so I haven't tried it yet :) )
5.: Right-click on the NiNode in the Block list -> Block -> Insert -> NiT... -> NiTextureEffect. It should appear with a 1 in front of it
6.: Repeat, just add a NiS... -> NiSourceTexture this time. This one should be number 2 now
7.: Click on the flower icon in the NiSourceTexture item that appears -> Choose your environment map
8.: In the NiTextureEffect's details, add your env-map by entering 2 in the "Source Texture" field.
9.: Go to the NiNode's details, increase the "Num Children" by 1 and add the NiTextureEffect (by entering 1 in an unused Children slot)
10.: Do the same with "Num Effects" and "Effects"
11.: Save
