Oblivion:Belda
|
|||
|---|---|---|---|
| # of Zones | 2 | ||
| # of Welkynd Stones | 26 | ||
| # of Varla Stones | 1 | ||
| Occupants | |||
| Conjurers, Daedra (1 boss-level Conjurer) |
|||
| Important Treasure | |||
| 1 boss-level Ayleid Cask 02 | |||
| Console Location Code(s) | |||
| BeldaExterior, Belda, Belda02 | |||
| Region | |||
| Heartlands | |||
| Location | |||
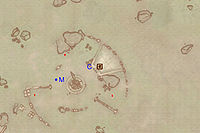
| Northeast of the intersection of the Red Ring Road and the Blue Road (west of Cheydinhal) | |||
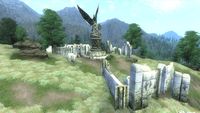
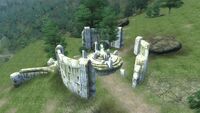
Belda is a medium-sized Ayleid ruin between the Imperial City and Cheydinhal containing conjurers. It contains two zones: Belda and Belda Lor.
Notes[edit]
Exterior[edit]
- The exterior is located at coordinates: Tamriel 19, 23
- This location's map marker (M on map) is named Belda (editor name BeldaMapMarker). The entrance door is ENE of the marker, 90 feet away.
- 0-3 Conjurer Enemies (each 33% probability Conjurer, 67% Daedra) are near the entrance
- The following plants can be found near the entrance: 1 Flax plant, 2 Foxglove plants, 1 Lady's Smock plant, 3 Monkshood plants, 2 Motherwort plants, 1 Nightshade plant, 3 Peony plants, and 1 Summer Bolete plant
Zone 1: Belda[edit]
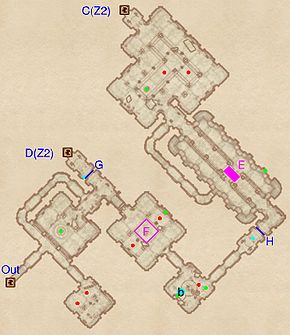
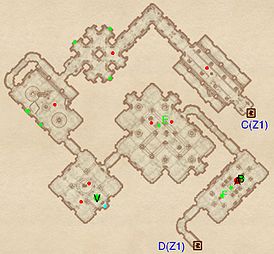
Belda is a fairly generic conjurer ruin. There are three doors, one of which leads to the outside (Out) and two lead to the next zone (C and D). However, the door at D is blocked by an iron gate which is opened remotely from the other side, so it is not accessible yet. It will serve as a shortcut exit once you get through the second zone. Watch out for the ceiling spike trap at F and the crumbling bridge at E. It might be worth falling down with the bridge for there is an Ayleid Reliquary on the bottom level. The passage to the left of the bridge leads up to the last room. The last room contains several Welkynd Stones and leveled daedra.
Occupants:
Treasure:
- 3 Ayleid Coffers (2 locked)
- 1 Ayleid Reliquary
- 1 Chest 02 (locked)
- 1 Chest 03
- 6 Welkynd Stones
- The following ingredients will always be found: 1 Bonemeal and 1 Bread Loaf
Traps:
- 1 Ceiling Spikes trap at location F on map
- 1 Crumbling Bridge trap at E
Doors and Gates:
- There are three doors in/out of this zone
- 2 Iron Gates (opened remotely) at G and H
Other:
- 1 bedroll at location b on map
Zone 2: Belda Lor[edit]
This is a straightforward zone and contains a huge amount of treasure and Welkynd Stones; just walk forward killing daedra/conjurers and picking up loot. There is a Varla Stone Cage (at V), and it is opened by an activation block right behind it on the floor (cyan dot on map). The boss of this ruin, a conjurer adept, is in the last room (A), as well as a boss chest at B, a set of novice alchemy equipment, 2 empty soul gems (1 petty and 1 lesser), and a locked reliquary and another chest. You can quickly exit to through door D; it leads back to Belda, near the exit in front of the iron gate that was inaccessible from the other side earlier.
Occupants:
Treasure:
- 1 boss-level Ayleid Cask 02 (Conjurer variety; locked) at location B on map
- 1 Varla Stone (in a Varla Stone Cage) at V. The cage is opened by activating the Push Block on the floor behind the cage (cyan dot on map).
- 1 Ayleid Coffer
- 3 Ayleid Reliquaries (2 locked)
- 1 Chest 02 (locked)
- 1 Chest 03
- 2 Restoration Ayleid Chests
- 20 Welkynd Stones
- The following alchemy equipment will always be found: 2 Novice Alembics, 2 Novice Calcinators, 2 Novice Mortar & Pestles, and 2 Novice Retorts
- The other following items will always be found: 2 empty lesser soul gems and 2 empty petty soul gems
- Some of the above items are clustered at the following locations:
- At E: 1 Chest 02 (locked), 1 Novice Alembic, 1 Novice Calcinator, 1 Novice Mortar & Pestle, 1 Novice Retort, and 1 Welkynd Stone
- At F: 1 Novice Alembic, 1 Novice Calcinator, 1 Novice Mortar & Pestle, 1 Novice Retort, 1 empty lesser soul gem, and 1 empty petty soul gem
Doors and Gates:
- There are two doors (at C and D) in/out of this zone, both leading to the zone Belda
