Lore:Stros M'Kai
This article is about the island. For the city, see Port Hunding.
| Stros M'Kai | |
|---|---|
| Type | Island |
| Continent | Tamriel |
| Province | Hammerfell |
| Region | Abecean Sea |
| Appears in | Redguard, ESO |

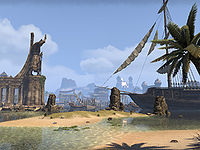
Stros M'Kai, named Sanloa M'Kai (Sister of Thought) in Yoku,[1][UOL 1] is a strategically located tropical island off the southern coast of Hammerfell near the Cape of the Blue Divide. It is renowned for the completely steam-powered Dwemer ruins of Bthzark and the observatory of similar design containing a telescope and orrery.[2]
Its main two settlements are the city of Port Hunding, which has also been called Stros M'Kai at times, and the small settlement of Saintsport that is found at the southern tip of the island.
Geography[edit]

Stros M'Kai itself is separated into north and south by a river which flows through Port Hunding. Hallin Falls, a waterfall named for the Redguard hero Derik Hallin, is found at the river's midpoint and conceals an entrance to Stros M'Kai's natural caverns.[3][4] Port Hunding is built around the Hunding Bay, in which lies the "Island of Iron Faces".[5] A coral reef is located off the southern shore.[6]
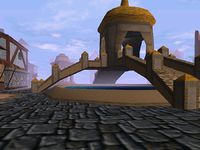
Roughly a third of the island is taken up by the Ogres Tooth Mountains in the west, containing the ruins of Bthzark. Its mines and other facilities delve into the southern half of the range, while the steam and gas harvesting system that powers the mechanisms inside lie above ground in the northern mountains.[7] Two large bridges cross a pass that cuts the range in two, and the steam pipes cross with them.
Beneath the island are the Goblin Caverns, so named for the goblins who live with trolls within. The goblins are able to cultivate mushrooms and have created floodgates for the subterranean acid rivers which flow through the caverns.
Isle of N'Gasta[edit]

The Isle of N'Gasta is a small island west of Stros M'Kai, named after its infamous resident, the Sload necromancer N'Gasta. The isle suffers from frequent storms and is always a gloomy place, inhabited by bats and mysterious creatures with tentacles.
A chain of islands called The Spine extends from Stros M'Kai's northern shore, and at its end a mysterious skeletal boatman once ferried travelers to and from the Necromancer's Isle. A large graveyard covers most of the isle, and it was likely once used by the first Redguard settlers to bury criminals. This was a tradition brought over from Yokuda, to prevent the criminal's evil spirit from tormenting the living. The Necropolis, the largest structure in the graveyard, spans the width of the island, barring those who seek the old wizard's tower. This tower, sometimes called N'Gasta's Tower, is situated on an islet at the isle's southern tip.
During the reign of Thassad II, N'Gasta came to the isle and made it his. After the Battle of Hunding Bay in 2E 864, he began raising skeletons and zombies, including those who died in the battle. Later that year, Cyrus came to the isle and accepted a delivery job from N'Gasta. He came back after he learned that his sister, Iszara, was last seen on her way to N'Gasta to ask for assistance. He discovered N'Gasta's treachery and after killing the necromancer, entered the realm of Clavicus Vile to bargain for her soul. With Iszara saved, they headed back to Stros M'Kai together.


Flora and Fauna[edit]
Palm trees, large leafed plants and cacti are a common sight on Stros M'Kai. Jarrin root, an extremely toxic plant which kills almost instantly when ingested, is native to the island.[8]
A variety of creatures live in the waters around Stros M'Kai, such as dolphins, sharks, eltheric groupers, dreugh and sea serpents.[9][10] Melusanae, said to lure ships to wreck on jagged shoals to consume the souls of those aboard, are also rumored to inhabit the waters of Stros M'Kai.[11]
Animals such as bulls, snakes, bats, rats, seagulls, giant snakes, wolves, lizards, mudcrabs, and assassin beetles can be found across the island. The caverns underneath the island contain a variety of unpleasant creatures, such as goblins, gremlins,[12] trolls and the occasional ogre, as well as caverns fish, strange slug-like creatures that have adapted to the acid rivers of the caverns.[10][13]


Locations[edit]


Much of Stros M'Kai is taken up by the city of Port Hunding, which has at times also been called Stros M'Kai. Port Hunding is divided into four districts: the harbor, market, town square, and old quarter. Ships entering the harbor are greeted by a large metal statue of Frandar Hunding with his sword extending out to sea. The town square is called the Plaza of the Three Princes and features the Monument of the Three Princes, standing over the Regent's Pool.[3] The Draggin' Tale Inn was established here in 2E 284 and was still in existence 580 years later.[14] It derives its name from the head of a dragon, which was brought from Noota Nara in Black Marsh and mounted on a wall within the establishment.[15] A temple dedicated to Arkay was constructed sometime after 2E 582 and a Mages Guild guildhall in 2E 638.[16] The old quarter lies northeast of the town square. On a small island southeast of the city lies Hunding's Palatial Hall, a mansion whose grandeur rivals the palace and which was once the home of the legendary Captain Izad.[17] Both of these structures are accessible by bridges.
The Palace of Port Hunding is north of the Plaza of the Three Princes on a section of land separated by a river. The palace itself has an armory, ballroom, audience chamber, throne room, and a lift to the roof of the palace. Beneath the palace is a series of catacombs, known as The Grave, where the worst criminals are kept. The palace's treasure vaults are also contained within.
The small settlement of Saintsport is found at the southern tip of the island, it contains a port, a lighthouse, and the Square of Leki, a large shrine dedicated to Makela Leki. The town was named in honor of Leki, Saint of the Spirit Sword. There are very few other settlements, apart from the nomadic Yokudan campsites.
West of the Ogres Tooth Mountains is the Pillar of the Singing Sun, a cenotaph to Hunding.[18]
Many of the sailors of Stros M'Kai worship Kynareth and pray to her for strong winds and true lines, so naturally the island has numerous shrines to her. These shrines form a travel network for those that offer a Canah feather to a shrine.
The Dwemer ruin of Bthzark is located in the Ogres Tooth Mountains, Bthzark was built by the Rourken clan, who left Morrowind to settle the wastes of Hammerfell after refusing to join the First Council.[19] The complex was built with a distinct architectural style, and its many machines are powered entirely by a system of steam pipes. Bthzark also contained a large mine, which became partially flooded with lava at some point. The complex was left abandoned after the Dwemer's disappearance in 1E 700 and fell into ruins, although one of the entrances was sealed shut and prevented looting.[20] The Imperial Archaeological Society took possession of Bthzark in 2E 864.[21] The Dwemer presence on the island left a long-standing influence, inspiring the use of Dwemer pipes in Port Hunding[22] and allowing the island's future inhabitants to study the stars using the Dwemer observatory near Saintsport.[23] Typically initiates of the Order of the Scarab must go to Bthzark and "wrestle its mechanical men back into shape".[24]


History[edit]
First Era[edit]

At some point after 1E 420 the Rourken clan of Dwemer had expanded into Stros M'Kai, building Bthzark, the observatory, and numerous other structures across the island.
Goblins were likely the only inhabitants of Stros M'Kai between the Dwemer's disappearance and the Redguard colonization, perhaps allowing them to develop more than goblins typically do. They developed tiny waterwheels made from iron and the flexible bark of tropical trees, which were then attached to Dwemer steam pipes to power tools.[25]
Stros M'Kai was one of the first landfalls made by the Ra Gada warrior wave when they sailed east from their homeland of Yokuda circa 1E 808.[26]
Second Era[edit]
In 2E 582, Port Hunding was ruled by Headman Bhosek, a universally disliked and severe ruler who kept order through his enforcers, the Bloody Fists.[27] Captain Kaleen of The Spearhead organized a heist to steal shipping logs from Bhosek, which she sold to King Fahara'jad for gold and as evidence that Bhosek was still raiding Breton ships, despite being part of the Daggerfall Covenant.[28]
Tiber War[edit]


After the unusually peaceful passing of the High King Thassad in 2E 862,[24][29] a civil war was finally sparked when Baron Volag, leader of the Forebears, led an uprising and took the capital of Sentinel by force, purging it of all Crowns.[30] For two bloody years, the war continued in all its brutality. After the Crown Prince A'tor regrouped his forces at his temporary seat of power on Stros M'Kai, the tide turned in the Crowns' favor. Soon, the Crowns planned to retake the capital.[30] Faced with the prospect of losing the war, the Forebears, who had a long history of cooperation with the Imperials to the point of partial Imperialization, turned to Tiber Septim for aid.[24][30] This act was regarded as treason by the Crowns, who denounced the Forebears as "throne-defilers", "hosts to the invader" and "Hunding's shame".[31] The already weakened Crowns were no match for the Empire,[29] but still managed to inflict heavy losses on the Imperials.[32] Ultimately, they decided to make a stand at the isle of Stros M'Kai.
The Crowns were led by A'tor, whose lead supporters were Voa, the Arch-Mage of Stros M'Kai and the Prince's chief advisor,[33] and Iszara, his consort and liaison with the Restless League, a Redguard nationalist pirate syndicate based in the Iliac Bay.[30][32] The Imperials were led by Tiber Septim's finest naval commander, Admiral Amiel Richton[29] with the Imperial Emissary Dram acting as his advisor and battlefield assassin.[34] Septim's army also included the dragon Nafaalilargus, Richton's secret weapon.[29] The Forebears were not present at the battle, and neither was the Restless League, who laid low out of concern that they might hurt A'tor's reputation.[32]
The outcome slowly shifted in favor of the Crowns until Richton reluctantly called in Nafaalilargus.[32] Considering the dragon could burn down the entire fleet, A'tor commanded his ranged troops to dispose of him. It was in that exact moment that Dram, allegedly using the Bow of Shadows, fired a poisonous arrow and mortally wounded the Prince.[29] Voa tried to save him, but the poison was too strong and the dragon was closing in. He could only place the Prince's soul in a gem and his body under a stasis field before being killed by the dragon.[29][35] The dragon used the chaos spurred by Prince A'tor's death to its advantage and attacked the fleet relentlessly, forcing them to make a hasty retreat to Port Hunding. While there were no survivors from the flagship, both Voa and A'tor's bodies were somehow recovered.[36]
Most of the troops disembarked at the Old Quarter, while a smaller group consisting of wounded soldiers made their way to the local chapter of the Temple of Arkay, hoping the priests there would heal the wounded and give last rites to the dying. Prince A'tor's body was hidden within this temple.[35] The Imperials followed the larger group, and instead of attempting to rout them, Richton simply ordered Nafaalilargus to burn down the entire section of the city with all the Crowns inside, leaving no survivors.[30] According to the Forebears, the remaining Crown fanatics opted to burn the Old Quarter to the ground along with themselves rather than surrender.[37] The Imperials took the city with no resistance and demanded the priests of Arkay to turn over the remaining Crown forces. Richton allowed the wounded to be treated, only to execute them all after they were healed.[35]
The First Edition of the Pocket Guide to the Empire was published in honor of the victory.[38] While it celebrated the Imperials as liberators of Redguards from the "mad Prince",[24] the reality was much different. Lord Richton was appointed Provisional Governor of Stros M'Kai, and he disposed of all Crowns and Crown sympathizers, whom he labelled rebels and thus traitors to the Empire.[30][36] Disgruntled with the Mages Guild, whose former leader assisted the Crowns, he allowed a local necromancer, the notorious Sload N'Gasta, to conduct his experiments openly, freely gathering souls of those not interred in hallowed grounds.[39] Nafaalilargus was given the entire treasury of the Stros M'Kai's palace to watch over for his service to the Emperor.[40]
In the meantime, the Restless League, led by Capitan Basil, obtained the Prince's soul gem. They sought to revive him so he could lead them into war with the Imperials. Until then, the League resorted to conducting terrorist attacks across Hammerfell's shore, the most notorious being the burning of Richton's flagship in the harbor of Stros M'Kai. The Imperials only intensified their repression, forcing the League to go into hiding.[37] Unable to bear the League's inaction for long, Iszara stole the gem on the 26th of First Seed, 2E 864[41] and sought the help of N'Gasta. She asked him to revive her late lover in exchange for her own soul. However, he betrayed her, having the gem fashioned into the shape of a dragon and delivered to Richton.[39] The gem was given to Nafaalilargus for safekeeping.[40]
Three months after the battle, Iszara's brother Cyrus went to Stros M'Kai in search of his missing sister.
Stros M'Kai Uprising[edit]
Familiarizing himself with the issues of the war and the city, Cyrus quickly made contact with the Restless League, reluctantly agreeing to assist them in the rebellion to come in exchange for information regarding his sister. Cyrus killed N'Gasta, saving Iszara, and recovered Voa's Ring, which was used to put the Prince's body in stasis. Finding out where the Prince's soul was kept, he made his way to the royal palace and slew Nafaalilargus, obtaining the soulgem he was guarding, and the Restless League attempted to resurrect the Prince. The end result, however, was that A'tor's sword was unintentionally enchanted with his soul, with free will of its own. Cyrus managed to rally the League's members, whose morale had been devastated by this turn of events, with a speech—possibly inspired by A'tor. While the league, led by Basil and Iszara, covertly killed the Imperial guards and burned their ships in the harbor, Cyrus stormed the palace which was devoid of guards, who had all been sent on a raid against the League's base. He cornered Richton atop a Dwemer airship, and after besting him in swordfight, was ambushed by Dram. However, A'tor's sword took them all by surprise, stabbing Richton and cutting Dram in half, which gave Cyrus the opportunity to escape.[42]
First Treaty of Stros M'Kai[edit]
Following the double rebellion of both most prominent Redguard factions, the Empire was forced to draw up a treaty with the rebels, finally legitimizing their rule. It was signed by Tiber Septim, Iszara, and Baron Volag on Stros M'Kai, representing the Empire, the Crowns, and the Forebears respectively.
The Old Quarter of Port Hunding was also rebuilt and restored following the treaty.[42]
Fourth Era[edit]
The Second Treaty of Stros M'Kai was a treaty signed in 4E 180 between the Aldmeri Dominion and the Redguards of Hammerfell. It marked the end of a decade-long attempt by the Dominion to conquer the region after both sides had reached a stalemate. The conditions of the treaty compelled the Dominion to withdraw all of its military forces from Hammerfell.
Critics of Emperor Titus Mede II's acquiescence to the White-Gold Concordat that ended the Great War five years earlier took the Redguards' successful resistance as proof that the Aldmeri Dominion and the Thalmor could have been defeated. Hammerfell's relations with the Empire remained strained after the treaty despite their mutual opposition to the Aldmeri Dominion. The Redguards believed that they had been betrayed when Titus II first agreed to the White-Gold Concordat, which stipulated that a significant portion of Hammerfell be ceded to the Dominion, then renounced Hammerfell as an Imperial province when it protested the Concordat's terms. Following the Second Treaty of Stros M'Kai, Hammerfell was left an independent yet severely diminished nation.
Notable Places[edit]
- Bthzark - A Dwemer ruin
- Dwemer Observatory
- The Grave
- Hunding's Palatial Hall
- Isle of N'Gasta
- Ogres Tooth Mountains
- Pillar of the Singing Sun – A cenotaph for Frandar Hunding, found on a small island in western Stros M'Kai.[43]
- Port Hunding
- Saintsport
- The Spine
Gallery[edit]
-
Port Hunding circa 2E 582
-
Town square circa 2E 864
-
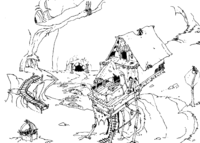
Goblin Caverns concept art
-
Harbor
-
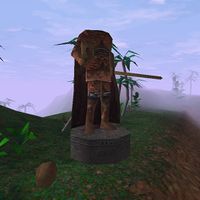
Beheaded statue of Thassad II
-

Siege of Stros M'Kai (Legends)
-
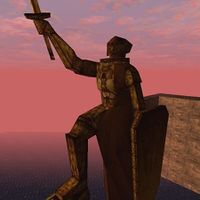
The statue of Frandar Hunding overlooking Hunding Bay (Redguard)
-
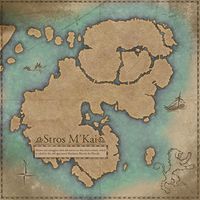
Map of Stros M'Kai (ESO)
-
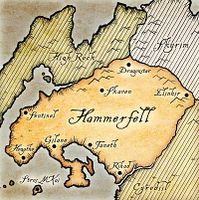
Hammerfell
-
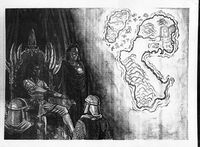
Map of Stros M'Kai in the intro of Redguard


.jpg)

References[edit]
- ^ Saban's dialogue in Redguard
- ^ Bothiel's dialogue in Oblivion
- ^ a b The Redguard Companion
- ^ The Archmage's Ring quest in Redguard
- ^ Captain Izad's Letter
- ^ Elven Artifacts vIII — Ith-Mok
- ^ Dwarven Ruins in Redguard
- ^ Astrid's dialogue in Skyrim
- ^ Eltheric Grouper in ESO
- ^ a b Creatures in Redguard
- ^ The Wispmother — Mathias Etienne
- ^ Brennan, Coyle, and Mariah's dialogue in Redguard
- ^ Deathfang in ESO
- ^ Sign outside the Draggin Tale in Redguard
- ^ Dreekius's dialogue in Redguard
- ^ Falicia's dialogue in Redguard
- ^ Hunding's Palatial Hall loading screen in ESO
- ^ A Fortune Behind Those Walls
- ^ Drivas' Journal (Partial) — Drivas
- ^ Dwarven Ruins in Redguard
- ^ No Trespassing
- ^ Port Hunding in ESO
- ^ Observatory in Redguard
- ^ a b c d Pocket Guide to the Empire, 1st Edition: Hammerfell — Imperial Geographical Society, 2E 864
- ^ Goblin Steam Mill in ESO
- ^ Stros M'Kai loading screen in ESO
- ^ Bhosek's Punishments
- ^ Tip of the Spearhead quest in ESO
- ^ a b c d e f Introductory cinematic of Redguard
- ^ a b c d e f Tobias's dialogue in Redguard
- ^ Trithik's dialogue in Redguard
- ^ a b c d Basil's dialogue in Redguard
- ^ Avik's dialogue in Redguard
- ^ Dram's biography on Redguard's official website
- ^ a b c Nidal's dialogue in Redguard
- ^ a b Favis's dialogue in Redguard
- ^ a b Krisandra's dialogue in Redguard
- ^ Pocket Guide to the Empire, 1st Edition: Prologue — Imperial Geographical Society, 2E 864
- ^ a b N'Gasta's dialogue in Redguard
- ^ a b Cyrus' battle with Nafaalilargus in the treasury
- ^ Iszara's Journal — Iszara
- ^ a b Raze the Palace quest in Redguard
- ^ A Fortune Behind Those Walls
Note: The following references are considered to be unofficial sources. They are included to round off this article and may not be authoritative or conclusive.
|
||||||||||||||||||||