Skyrim:Redwater Den
|
|||
|---|---|---|---|
| Added by | Dawnguard | ||
| # of Zones | 2 | ||
| Clearable | Yes | ||
| Dungeon | Yes | ||
| Respawn Time | 10 days or 30 days | ||
| Occupants | |||
| Redwater Lookouts, Doorman, Dealer, Attendant, Addict, Bandit, Nobleman, Imperial Deserter, Vampires, Vampire's Thralls, Death Hounds, Venarus Vulpin | |||
| Important Treasure | |||
| Telekinesis | |||
| Console Location Code(s) | |||
| DLC1RedwaterDen01, DLC1RedwaterDen02 | |||
| Region | |||
| The Rift | |||
| Location | |||
| West of Autumnshade Clearing | |||
| Special Features | |||
| # of Alchemy Labs | 2 | ||
| # of Arcane Enchanters | 3 | ||
| # of Forges/Anvils | 1 | ||
| # of Grindstones | 1 | ||
| # of Workbenches | 1 | ||
| # of Cooking Pots/Spits | 2 | ||
| Ore Veins | |||
| # of Iron | 2 | ||
| # of Gold | 2 | ||

Redwater Den is a drug den supplying Redwater skooma hidden beneath a dilapidated shack west of Autumnshade Clearing. It has two interior zones: Redwater Den and Redwater Spring.
You will discover the drug den is actually a front for a group of vampires, who use a particularly nasty and addictive brew of skooma to ensure a constant supply of blood from helpless addicts.
Related Quests[edit]
- The Bloodstone Chalice: Fill the Bloodstone Chalice from the Bloodspring at Redwater Den.
- Culling the Beast: Kill the thin-blooded vampires. (radiant)
- Onmund's Request: Help Onmund negotiate the return of a family amulet from Enthir. (radiant)
Walkthrough[edit]
Exterior[edit]
At first sight, this appears to be only a dilapidated shack, guarded by a lookout out front. So long as you do not attack or approach as a full-fledged vampire, he will direct you into the den, assuming you are after a skooma fix. If you enter through a hole in the side wall of the shack, you will find another lookout seated in front of a fireplace. A copy of the Block skill book Battle of Red Mountain and an iron war axe can be found on the nearby table. There is a charred skeever cooking on a spit in front of the fireplace. Somewhat hidden behind low walls in the corner is a trapdoor which leads into the interior of the den below.
Redwater Den[edit]
The trap door leads to a short passage and stairs down to an empty room, except for a doorman, who warns you to keep your weapons sheathed before opening the door and letting you in. There is a small room to the right of the guarded door, containing an unlocked chest and two rows of weapon racks holding a couple of iron swords. The room through the guarded door and down more stairs features a dealer behind an expert-locked, caged counter. She will sell you Redwater skooma and can even be persuaded to give you a free sample. Behind her is a door, which appears to lead to a basic storeroom. Past the counter is an alcove containing a well, two sets of shelves holding clutter, several crates, a food sack, and a whole salmon hanging above the well. To the right is a corridor with a slight red mist pervading it, and four rug-covered booths, with two on either side. An attendant walks the corridor, while in each booth you'll find a skooma addict, including a Bandit, a Nobleman, a dead Addict, and an Imperial Deserter. They have all been drinking Redwater skooma, with many empty skooma bottles scattered over the floor of each booth. In the back right corner of the booth with the deserter are an iron shield and a knapsack that are free to loot. At the end of the corridor is an adept-locked gate, which the attendant warns you not to tamper with.
Attacking either the dealer or attendant, regardless of whether or not you are seen, will cause the other to become hostile. Both carry a bottle of Redwater skooma and a copy of a key, which opens most of the doors and gates in this zone. Inside the caged counter area is a steel war axe, a low-quality bow, a quiver of arrows, a bottle of Redwater skooma, two honey nut treats, a sweet roll, three loaves of bread, three loose septims, a large coin purse, four bottles of ale, three bottles of Nord mead, two bottles of alto wine, and two bottles of wine. All items apart from a bottle of ale are marked as owned, and taking them is considered stealing. The storeroom behind the dealer contains four food sacks and a set of shelves holding a potion of minor healing, a lockpick, a bottle of alto wine, and four bottles of Nord mead. There is also a doorway through to an area with a couple of large vats and a dead draugr lying in front of a sarcophagus with a concealed door behind, but no obvious way of opening it from this side.
From here, there are two options to continue forward: If you drink the Redwater skooma you got from the dealer, your vision will blur and fade to black, and you will wake up in a large dim room filled with vampires, discussing the potency of the water and its effects on creating thralls. Unlocking the gate nearby will alert the vampires and put you back on the same path as above, allowing you to continue forward from the same point.
Alternatively, you can pick the lock on the gate, either before or after dealing with the dealer and attendant. If they observe you doing so, they will instantly turn hostile. After dealing with them, you will be able to proceed through the gate. The room beyond contains a set of shelves holding a cure poison potion, two random potions of magicka, an unlocked chest, and several sacks of food. Beside the shelves is a wooden table with a medium coin purse on top. A tunnel heads south, opening into a large multi-leveled room, with a vampire's thrall on a raised section opposite, and the same red mist rising above large boiling vats. A pair of wooden ramps on the left lead down to the cavern floor, and hanging moss grows from the walls around the cavern. At the bottom, on the right is a table with two open crates on top; one contains three bottles of skooma, and the other several empty skooma bottles. Under the wooden ramps are several sacks, crates, and barrels, as well as a random potion and an adept-locked chest. To the west is an adept-locked cell containing a dead novice conjurer, with a copy of the spell tome: Telekinesis beside them. This is where you will awaken if you choose to drink the Redwater skooma. Outside the cell is a cart containing a dead wood elf. Paths lead towards the rear of the room along either side of a central raised section. At the front of the raised section, on the left is an alchemy lab built into a wooden table, which holds a bottle of Sleeping Tree sap, a random poison, and a total of four bowls of moon sugar, three of which are in an open crate. At the rear of the raised section is a set of shelves holding a beehive husk, a bee, a sample of hanging moss, a swamp fungal pod, a bowl of frost salts, a bowl of moon sugar, a bunch of lavender, a skeever tail, a piece of canis root, a bowl of ectoplasm, a silverside perch, a bowl of spriggan sap, and a sample of hawk feathers.
At the rear of the room is an alcove featuring two unowned single beds separated by a dresser. There is a cooking pot and a barrel of food at the foot of the right-hand bed. On the right is a ramp leading up, passing an empty set of shelves. At the top, you will find a vampire and a thrall near a forge, complete with a workbench and a grindstone. The passage leading to the forge is filled with crates and an unowned bed roll, with a copy of The Aetherium WarsDG on one of the crates. Beside the workbench is a pair of iron boots, while to the left of the forge is a square wooden table holding a bottle of Black-Briar mead, a knife, and a fork. Around to the east is a raised bridge that crosses over the previous multi-leveled room. On your right is a pickaxe and some cheese, with a bunch of dried frost mirriam hanging above. The lever to lower the bridge is in another alcove to the north. At the entrance to the alcove is a crate holding a potion of minor magicka and a potion of minor stamina opposite a long wooden table holding a woodcutter's axe, a helmet, a joint of cooked beef, and two lockpicks.
On the far side of the bridge, the passage turns north and descends, passing a wooden table with two more pickaxes on top. Beyond this the chamber widens, with an iron ore vein and a gold ore vein in the southeast corner. Ahead the architecture changes, and begins to resemble that of an ancient Nord barrow. A doorway to the north gives access to a small area containing two large urns and one burial urn among the rubble from a cave-in, with a pressure plate in front that triggers poison darts to shoot from either side. The passage continues to the south, where you will find a thrall and a skeleton on guard, and a couple of oil lanterns hanging above them. The passage ends with a crate holding two random potions of healing and a satchel beside a concealed door, which is opened using a pull chain.
The tunnel beyond twists and turns before opening into a room with an open coffin in the center, which if you are a vampire, you are free to sleep in. There are two death hounds and a leveled vampire guarding the room. To the west is a fireplace, with an arcane enchanter built into a sideboard to the right of it. On the sideboard are a random filled soul gem and a ruined book. Opposite this, to the east is another concealed door, with the chain in a recess on the right. Behind the door is a small alcove with a plinth holding a random enchanted weapon, and a sideboard behind it with a potion of cure disease and a random potion of magicka on top. Back in the first room, to the south is a set of shelves holding a burial urn. A passage heads north, past two open sarcophagi with dead draugr lying in front of them. A flight of stairs climbs to a pair of double iron doors with a puddle of red water seeping underneath it. The doors lead to Redwater Spring.
Redwater Spring[edit]

Through the doors, the puddle continues off to the left before disappearing under some rubble. Ahead at a T-junction is a long sideboard filled with candles and in the middle a lit brazier, with a banner hanging above it. To the right of the brazier is a medium coin purse, Venarus Vulpin's journal, and three loose septims. The journal, written by the vampire who rediscovered the Bloodspring, explains his reasoning behind setting up the skooma racket. To the west is a lowered gate blocking the only doorway, with no visible means to open it. To the east is a window, with another lowered gate to the right. As you approach the window, you will overhear someone asking why they don't just drink directly from the spring, rather than using the skooma addicts. There are two sideboards, one on either side of the window. The right-hand sideboard has three more loose septims on top. To the north is a balcony with a wooden paneling surround, and a passage leading down to the room below. There is a large cage to the south containing death hounds, with a leveled vampire and a thrall wandering the room. Hanging from the ceiling above them are several oil lanterns, with an oil slick underfoot. There are two stone pillars in the room, with a wooden ramp spiraling around the left-hand pillar leading up to a stone bridge crossing to the right-hand pillar. By the start of the wooden ramp is a candle holder with a random potion of healing and a small coin purse on top, and under the ramp are an urn and two food sacks.
Take care, as there is a trap door in the floor a couple of paces into the room. It opens and drops you into a spike pit. There is a passage leading away from the stakes, but swinging blades start slicing across the passage as soon as you drop into the pit. At the far end of the passage is an unlocked chest with a tension cable attached, which triggers poison darts from behind unless disarmed before opening. The passage turns to the right to end at the bottom of a wooden spiral staircase, with a large urn, a barrel of ingredients, and three food sacks underneath. The stairs lead back up to the room containing the caged death hounds. Beside the stairwell, against the east wall is a narrow table holding a copy of Fall from Glory and a potion of resist fire. In the northeastern corner is a fire pit with a cooking pot in front, which is flanked by a food barrel with a salt pile on top and a wrapped draugr corpse. There are several empty sets of shelves, sideboards, and a long blood-soaked stone table around the room.
Climbing the ramp and crossing to the top of the right-hand pillar, you will see to the north a balcony with an unlocked chest on it. A single word of Whirlwind Sprint or the Vampire Lord "Bats" ability will allow you to reach it. Alternatively, you can reach the chest by jumping up the slightly inclined slope of the ruined wall, then jumping onto the wooden beam sticking out of the wall, then onto the platform where the chest is. Crossing from the first pillar over the bridge to the east will bring you to a balcony with several open upright sarcophagi, thrones, and sets of shelves holding clutter as well as two burial urns. At the western end of the balcony is the window seen from the other side; a chain to the left opens both lowered gates seen at either end of the previous room. There are two sideboards nearby to the south, by the now open gate at this end. On one is a small coin purse, while the other holds an unlocked chest.
Through the other open gate at the far end to the west, you enter brightly lit catacombs, where the passage turns north and starts to climb. At the top you will find yourself in a large, two-level chamber containing several upright coffins, guarded by two death hounds, two leveled vampires, and three infected bones traps. The stairs to the upper level are on your left after you turn left past the first infected bones trap. In the southern corner on one of the upper sections is an alchemy lab, while in the northwestern corner is a lowered gate blocking access to a smaller room. The chain to open it is on the right.
The room beyond is in a half circle with three closed doors: one is across the room, and the remaining two are on either side of a central raised section. The raised section features a lit brazier, a human heart, a piece of human flesh, a bowl of frost salts, a potion of regeneration, two bowls of bone meal, and a random empty soul gem, with yet another alchemy lab at the front, and an urn nearby. The wooden door to the right of the raised section has a tension cable that will trigger a spear trap from the wall in front of you, and opens into a small alcove containing an unlocked chest. The wooden door to the west opens into another alcove containing the bones of a skeleton and a sideboard holding a potion of cure disease and a burial urn. The iron door to the left of the raised section opens into more brightly lit catacombs. Take care, as the floor of this section holds pressure plates that trigger three spike walls, with two that swing down from the ceiling, and one that swings horizontally across the passageway. Around the corner are two more pressure plates, these triggering multiple flamethrowers from the walls, in front of another iron door.
This door opens into a huge chamber containing two leveled vampires including the boss vampire, Venarus Vulpin (or a generic boss-leveled vampire if you haven't started the related quest), as well as their thralls and skeletons. Venarus Vulpin will be carrying the key to the iron door at the end of this chamber, which leads to a large grotto containing the Bloodspring, required for the related quest. There are several upright coffins around the room and on either side of a throne against the western wall. Opposite the throne is an arcane enchanter, with an altar behind it holding a random light armor cuirass, Venarus Vulpin's research regarding the Bloodspring, and a bowl containing a random filled soul gem, an amethyst, a garnet, an emerald, and sixteen loose septims. To the right of the altar is an unlocked boss-level chest, and along the rear of the room is a long stone table with two bottles of Redwater skooma on top. Beyond the table is a passage leading to a master-locked iron door, which opens with the key carried by Venarus Vulpin into the cavern containing the Bloodspring.
Drinking directly from the spring as a vampire gives you the effect Tainted Blood of the Ancients, while as a non-vampire it will infect you with Sanguinare Vampiris and another disease. Repeated drinking will eventually infect you with every disease in the game (which can all be cured simultaneously with a single Cure Disease potion). At the rear of the cavern is a door back into Redwater Den.
This door opens into a room with a row of open upright sarcophagi along each side and two sideboards flanking a concealed door at the end. There are four dead draugr that can be looted on the floor, and an empty random soul gem on the sideboard to the right. A pull chain next to the concealed door opens it to the Redwater skooma dealer's storeroom, behind the caged counter; from there, you can retrace your steps to the ladder and trap door you entered through. If you have not already killed them, the doorman near the den exit and the two lookouts outside will become hostile to you.
Notes[edit]
- All key-locked gates in this location can be unlocked with the Redwater Den Backrooms Key, which can be found on the dealer, the attendant, and some of the vampires and thralls within. An additional copy can be found on a table next to the prisoner cell in the first cave-like chamber.
- After completing The Bloodstone Chalice, every remaining living inhabitant except the dealer will turn into a vampire's thrall, though they won't be hostile to you.
- This area exists and can be cleared no matter which side you align with for the Dawnguard main questline. Venarus Vulpin will still be here if you side with the Dawnguard and never come here for the Volkihar quest, but Stalf and Salonia Caelia will not, as they only appear here during the related quest.
- After you clear the dungeon, the vampires, thralls, death hounds, and Venarus Vulpin will all respawn, though the other occupants (such as the addicts and attendant) won't, even if you didn't kill them earlier. If you are unaffiliated with either main faction in the Dawnguard main questline, Vulpin will instead respawn as a Master Vampire.
Bugs[edit]
- If you side with the Dawnguard, after clearing Redwater Den, the doorman and the two lookouts outside become marked as vampire's thralls, but will not be hostile to you.
Maps[edit]
-
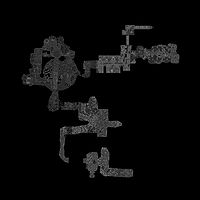
Redwater Den
-
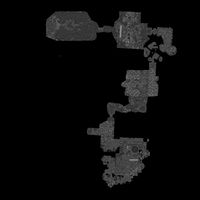
Redwater Spring


- Skyrim-Places-Caves
- Skyrim-Places
- Skyrim-Places-The Rift
- Skyrim-Places-Iron Veins
- Skyrim-Places-Gold Veins
- Skyrim-Places-Alchemy Labs
- Skyrim-Places-Arcane Enchanters
- Skyrim-Places-Forges
- Skyrim-Places-Grindstones
- Skyrim-Places-Workbenches
- Skyrim-Places-Cooking Pots
- Skyrim-Places-Clearable
- Skyrim-Places-Discoverable
- Skyrim-Dawnguard
- Skyrim-Dawnguard-Places
- Skyrim-Places-Vampire Lairs
- Skyrim-Confirmed Bugs