Oblivion:Fort Istirus
|
|||
|---|---|---|---|
| # of Zones | 3 | ||
| Occupants | |||
| Necromancers (1 boss-level Necromancer) |
|||
| Important Treasure | |||
| 1 boss-level Chest | |||
| Console Location Code(s) | |||
| FortIstirusExterior, FortIstirus, FortIstirus02, FortIstirus03 | |||
| Region | |||
| West Weald | |||
| Location | |||
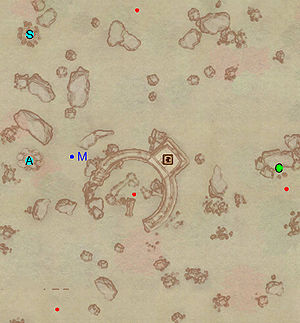
| East of Kvatch, just southeast of Ra'sava Camp | |||
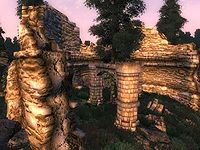
Fort Istirus is a medium-sized fort between Skingrad and Kvatch containing necromancers. It contains three zones: Fort Istirus, Fort Istirus Sanctuaries, and Fort Istirus Barracks.
Notes[edit]
- This is one of the four locations mentioned in the Hastily Scrawled Note found during the quest Necromancer's Moon that have altars that can be used for the creation of Black Soul Gems.
- A guaranteed magic item, a Dagger of Depletion, can be found nearby (map).
- Right near the edge of the map between Skingrad and Kvatch, head east from the fort. Keep looking to your left, and after a few minutes you should see skeletal remains. The dagger is right next to the skeleton (location C on the map).
- An outpost named Istirus also appears in ESO.
Exterior[edit]
- The exterior is located at coordinates: Tamriel -26, -4
- This location's map marker (M on map) is named Fort Istirus (editor name FortIstirusMapMarker). The entrance door is E of the marker, 110 feet away.
- 3 Wilderness Creatures (Forest variety) are near the entrance
- 1 Wilderness Creature (Hills variety) is near the entrance
- 1 Dagger of Depletion is at location C on map
- The following potions can be found near the entrance: 1 Potion of Resistance
- The following plants can be found near the entrance: 30 Alkanet plants, 1 Blackberry bush, 2 Cinnabar Polypore plants, 9 Columbine plants, 2 Dryad's Saddel Polypore plants, 1 Elf Cup plant, 31 Flax plants, 5 Lady's Smock plants, 16 Morning Glory plants, 5 Motherwort plants, 2 Nightshade plants, 4 Peony plants, and 2 Viper's Bugloss plants
- 1 Necromancer Altar is at location A on map
- 1 Reman Rune Stone is at S
Zone 1: Fort Istirus[edit]
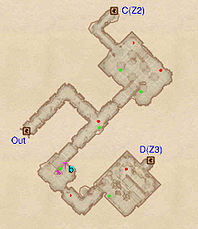
You start in this zone at an intersection. If you head left, you will only find one or two enemies and will end up at door C; heading right leads you to most of the current level and to door D. In the next small room there is a Darts trap (T) which protects a minor loot chest; it can easily be dealt with by entering sneak mode and then activating the chest. Nearby you will also find a bedroll (b).
Occupants:
- 3-5 Necromancers
Treasure:
Traps:
- 1 Darts trap at location T on map
Doors and Gates:
- There are three doors in/out of this zone
- 1 door (at Out) leads outside
- 1 door (at C) leads to the zone Fort Istirus Sanctuaries
- 1 door (at D) leads to the zone Fort Istirus Barracks
Other:
- 1 bedroll at location b on map
Zone 2: Fort Istirus Sanctuaries[edit]
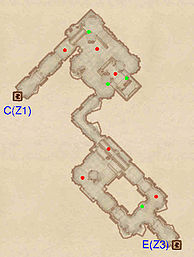
You can enter this zone from either Fort Istirus (through door C ) or Fort Istirus Barracks (through door E). While fairly linear, this zone can be quite tricky, as you will always have to fight two if not three necromancers at the same time.
In the first room after door C is a stone altar with a Headless Zombie corpse.
Occupants:
Treasure:
Doors and Gates:
- There are two doors in/out of this zone
- 1 door (at C) leads to the zone Fort Istirus
- 1 door (at E) leads to the zone Fort Istirus Barracks
Zone 3: Fort Istirus Barracks[edit]
As with the second zone you can enter this one from either Fort Istirus (through door D) or Fort Istirus Sanctuaries (door E).
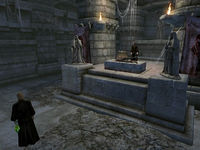
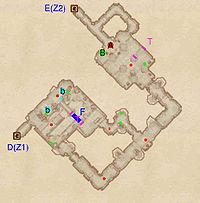
In the first room after door E are the Boss-level Necromancer boss (A), the Boss Chest (B), a Dart trap (T) and another necromancer. The boss is on a small balcony overlooking the room and you might be able to take him out without drawing the second necromancer into the fight. On the same balcony is a stone altar with a Zombie corpse.
To arrive at door D you will have to make your way through a corridor until you arrive at another balcony from which you will have to jump down into a room with two necromancers ready to greet you. This room also contains two bedrolls (b), 4 Dart traps (T) under the bridge and a drawbridge at F. This is initially raised and you'll have to lower it by activating the switch in front of it (cyan dot on the map). The bridge brings you to a previously inaccessible area which contains two chests and possibly one more necromancer.
Occupants:
- 1 boss-level Necromancer at location A on map
- 5-6 Necromancers
Treasure:
- 1 boss-level Chest (Necromancer variety) at location B on map
- 2 Chests 01 (both locked)
- 1 Chest 03
- 3 Chests 04
Traps:
- 4 Darts traps at locations T on map
Doors and Gates:
- There are two doors in/out of this zone
- 1 door (at D) leads to the zone Fort Istirus
- 1 door (at E) leads to the zone Fort Istirus Sanctuaries
- 1 Drawbridge (initially raised) at F
Other:
- 2 bedrolls at locations b on map
