Morrowind:Transport
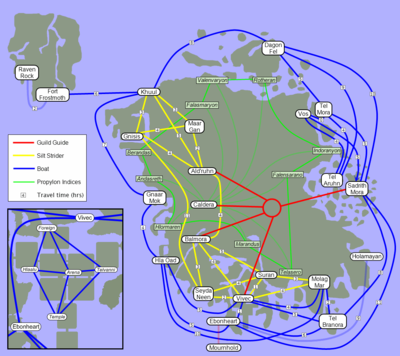
Vvardenfell is a vast landscape. There is even a quest whose sole objective is to walk from one side of the map to the other without talking to anyone, and this is likely to be an undertaking of half an hour or more, depending on how fast you can move. Luckily, most of the time you have no such issue with conversation, and are thus free to engage one of Vvardenfell's manifold quick-transport options. Note that non-magical transport takes time: although you may not realize it, a few game-hours will pass between, for example, boarding the Silt Strider in Gnisis, and getting off in Ald'ruhn. This time in transit counts as resting to restore health, magicka, and fatigue. For further information visit the Morrowind Maps page.
Followers will accompany you on commercial forms of transportation (silt striders, boats, gondolas, and guild guides). They will not accompany you if you cast Recall, Divine, or Almisivi Intervention or use a propylon chamber.
Contents
Boat[edit]
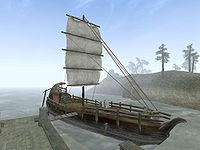
Boat transport is available to most of the coastal cities on Vvardenfell. There are various types of seagoing transports, the most common being a large single-masted three-deck ship, or the smaller open boats found in the poorer settlements.
Boat services are available from the following cities:
| Origin | Shipmaster | Ship | Destinations and Travel Times (In Hours) | |||||||
|---|---|---|---|---|---|---|---|---|---|---|
| Dagon Fel | Haema Farseer | Arrow | Khuul | 8 | Sadrith Mora | 10 | Tel Aruhn | 9 | Tel Mora | 5 |
| Ebonheart | Nevosi Hlan | Chun-Ook | Hla Oad | 5 | Sadrith Mora | 11 | Tel Branora | 6 | Vivec | 1 |
| Ebonheart | Blatta Hateria | Holamayan* | 9 | |||||||
| Gnaar Mok | Valveli Arelas | Priggage | Hla Oad | 4 | Khuul | 7 | ||||
| Hla Oad | Baleni Salavel | Harpy | Ebonheart | 5 | Gnaar Mok | 4 | Molag Mar | 10 | Vivec | 5 |
| Holamayan | Vevrana Aryon | Ebonheart* | 9 | |||||||
| Khuul | Talmeni Drethan | Omenwedur | Dagon Fel | 8 | Gnaar Mok | 7 | ||||
| Molag Mar | Rindral Dralor | Whistler | Hla Oad | 10 | Tel Branora | 2 | Vivec | 4 | ||
| Sadrith Mora | Gals Arethi | Elf-Skerring | Ebonheart | 11 | Dagon Fel | 10 | Tel Branora | 8 | Tel Mora | 5 |
| Tel Aruhn | Daynas Darys | Saucy | Dagon Fel | 9 | Tel Mora | 4 | Vos | 4 | ||
| Tel Branora | Nireli Farys | Spring | Ebonheart | 6 | Molag Mar | 2 | Sadrith Mora | 8 | Vivec | 5 |
| Tel Mora | Tonas Telvani | Pole Star | Dagon Fel | 5 | Sadrith Mora | 5 | Tel Aruhn | 4 | Vos | 0 |
| Vivec | Ano Andaram | Frost-Ghost | Ebonheart | 1 | Hla Oad | 5 | Molag Mar | 4 | Tel Branora | 5 |
| Vos | Sedyni Veran | Falvillo's Endeavor | Sadrith Mora | 5 | Tel Aruhn | 4 | Tel Mora | 0 | ||
* These ships only offer travel services about half way through main quest.
Bloodmoon adds 3 more shipmasters:
| Origin | Shipmaster | Destinations and Travel Times (In Hours) | |||
|---|---|---|---|---|---|
| Fort Frostmoth | Basks-In-The-Sun | Khuul | 6 | Raven Rock | 2 |
| Khuul | S'virr | Fort Frostmoth | 6 | ||
| Raven Rock | Veresa Alver* | Fort Frostmoth | 2 | ||
* Becomes available during the Bloodmoon East Empire Company quest.
Silt Strider[edit]
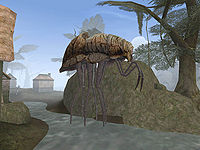
Giant arthropods towering around 60 feet in height, domesticated Silt Striders are used primarily as a means of civilian transport in an elaborate network stretching between various cities on the island of Vvardenfell in Morrowind. Having no natural cavities in which passengers may safely repose, a compartment is hollowed from the creature's chitinous shell, wherein both passengers and their luggage are loaded. The Silt Strider itself is then moved by direct manipulation of exposed organs and tissues by its driver, commonly known as a caravaner.
Apart from the transportation of passengers, Silt Striders are also employed in the shipment of trade goods. To that end, certain cities—most notably Gnisis and Molag Mar—have constructed Silt Strider docks to aid in the loading and unloading of cargo.
Desiccated remains of Silt Striders can be found in various parts of the Ashlands.
Civilian Transportation[edit]
Most commonly employed in the southern and western parts of Vvardenfell, Silt Striders travel inland in the Ascadian Isles, West Gash, and Ashlands regions. Dependent upon the desired destination, passage to the following cities may be obtained for a set price from the point of origin. Each Silt Strider has a driver, or caravaner, that navigates the Silt Strider to its destination. All caravaners in Morrowind are Dark Elves.
| Origin | Caravaner | Destinations and Travel Times (In Hours) | |||||||
|---|---|---|---|---|---|---|---|---|---|
| Ald'ruhn | Navam Veran | Balmora | 4 | Gnisis | 4 | Khuul | 5 | Maar Gan | 2 |
| Balmora | Selvil Sareloth | Ald'ruhn | 4 | Seyda Neen | 3 | Suran | 5 | Vivec | 4 |
| Gnisis | Punibi Yahaz | Ald'ruhn | 4 | Khuul | 3 | Maar Gan | 4 | Seyda Neen | 11 |
| Khuul | Seldus Nerendus | Ald'ruhn | 5 | Gnisis | 3 | Maar Gan | 3 | ||
| Maar Gan | Daras Aryon | Ald'ruhn | 2 | Gnisis | 4 | Khuul | 3 | ||
| Molag Mar | Dilami Androm | Suran | 3 | Vivec | 4 | ||||
| Seyda Neen | Darvame Hleran | Balmora | 3 | Gnisis | 11 | Suran | 4 | Vivec | 2 |
| Suran | Folsi Thendas | Balmora | 4 | Molag Mar | 3 | Seyda Neen | 4 | Vivec | 1 |
| Vivec | Adondasi Sadalvel | Balmora | 4 | Molag Mar | 4 | Seyda Neen | 2 | Suran | 1 |
Caravaners are often good first resources of information about their cities as well. Be sure you explore all topics of conversation with them. Additionally, increasing their disposition towards you will reduce travel costs from their station to others. You can bribe them for a guaranteed disposition increase, but this partially offsets the gains of lower fares.
Gondola[edit]
The gondoliers in the holy city of Vivec transport customers from one canton to the next for nominal fees. Additionally, they carry one of the most unique hats in Vvardenfell. It can only be gained by killing the person wearing it, so don't try if you feel you need them to navigate the city.
The gondolas are available from the following cantons:
| Origin | Gondolier | Destinations | |||
|---|---|---|---|---|---|
| Arena Canton | Dalse Adren | Hlaalu Canton | Foreign Quarter | Telvanni Canton | Temple Canton |
| Foreign Quarter | Devas Irano | Arena Canton | Hlaalu Canton | Telvanni Canton | |
| Hlaalu Canton | Aren Maren | Arena Canton | Foreign Quarter | Temple Canton | |
| Telvanni Canton | Fendryn Delvi | Arena Canton | Foreign Quarter | Temple Canton | |
| Temple Canton | Talsi Uvayn | Arena Canton | Hlaalu Canton | Telvanni Canton | |
Guild Guide[edit]
This article is about the NPCs. For the Guild Guide class, see Guild Guide (class).
Guild Guides are experts in Mysticism who maintain magical contact with their counterparts in other branches of the Mages Guild. For a fee, they can teleport players, as well as any followers, to the other guild halls. Guild guides are usually found standing beside an empty platform; they will offer their services when asked about Travel.
Their prices vary mostly according to their disposition and very little, if at all, by the distance to your destination. They offer one of the cheapest, as well as fastest, modes of transportation. You are instantly transported unlike traveling by boat or by silt strider, which takes some time. Naturally, you do not get any "rest" while teleporting; you will not regain any health, magicka or fatigue when you get to your destination.
There is a guild guide in every branch of the Mages Guild; each one can transport you to any of the other four guild halls.
| Guild Branch | Guild Guide |
|---|---|
| Ald'ruhn | Erranil |
| Balmora | Masalinie Merian |
| Caldera | Emelia Duronia |
| Sadrith Mora | Iniel |
| Vivec | Flacassia Fauseius |
Bugs[edit]
- The fee you actually pay is different from what is shown in the travel dialogue.
The Morrowind Code Patch, version 2.4+, addresses this issue. Turn on the "Travel price fix" patch in the bugfixes section.
Be aware that due to the Mages Guild's hatred of House Telvanni, if you join the Telvanni and rise high enough in their ranks you may reach a point at which the guild guide's dispositions towards you are so low that they refuse to offer their travel service. Raising their disposition from this low level may be difficult if your character does not have a high Speechcraft skill.
Intervention Spells[edit]
If you ever find yourself in serious trouble, you should have listened to the advice of seasoned adventurers: always carry some Divine Intervention or Almsivi Intervention scrolls with you. These effects transport you away from your impending moment of doom to the safety of an Imperial Cult shrine or the nearest Tribunal Temple, respectively. For further information visit the Almsivi Intervention Map and Divine Intervention Map. If you find that you use these effects frequently and/or don't want to invest money in buying lots of scrolls, you can get them as normal spells or enchanted items.
This can also be used as free, instantaneous transportation for frugal people and to carry bulk amounts of loot to a safe, nearby city. The transportation ignores overencumbrance, but once transported, you'd be stuck there until you drop items or otherwise make your encumbrance manageable.
| Almsivi Temples | Imperial Shrines |
|---|---|
| Ald'ruhn Balmora Gnisis Molag Mar Vivec |
Buckmoth Legion Fort (Ald'ruhn) Moonmoth Legion Fort (Balmora) Fort Hawkmoth (Ebonheart) Fort Darius (Gnisis) Fort Pelagiad (Pelagiad) Wolverine Hall (Sadrith Mora) |
The expansions add three more locations. Fort Frostmoth, an Imperial Shrine in Solstheim, is added by Bloodmoon. The Imperial Cult Services area of the Royal Palace, which contains an Imperial Shrine, and Mournhold Temple, an Almsivi Temple, are added by Tribunal. You will only be transported to Mournhold Temple or the Royal Palace from other locations in or below Mournhold. (Thus any location added by the Tribunal Expansion.) Fort Frostmoth can actually be reached by Divine Intervention from the northwestern-most corner of Vvardenfell, thus saving the boat trip. However, most places on land in that region will end up taking you to Gnisis instead.
Note that there are a few locations where Intervention spells are disabled. In Morrowind, the only two are Magas Volar, the Daedric temple where you receive the Daedric Crescent (only on the GOTY edition), and Akulakhan's Chamber. In Tribunal, Intervention is not allowed from The Clockwork City. In Bloodmoon, you cannot cast the spells from underneath the Mortrag Glacier.
Mark/Recall[edit]
The school of Mysticism also contains the effects of Mark and Recall. These allow you to be your own instant transportation as Almsivi/Divine Intervention do, but this takes you to a point of your own design. Mark sets the point, and Recall takes you to the mark you made. This can be used for marking a place you'd want to return to easily and repeatedly, or for setting a "home" where you want to store the valuables you've gained in your travels. It is also very useful to return to a quest giver after completing a quest. The downside is that (without mods) you can only have one location Marked at any one time. Casting Mark again overwrites your previous Mark. By combining Mark/Recall and Almsivi/Divine Intervention one can reach most Temples and Shrines whitin minutes, visit the map page to find a suitable location to mark.
Propylon Chambers[edit]
The propylon chamber system was devised to allow instantaneous travel among ten ancient Dunmer strongholds, which are scattered across Vvardenfell and quite isolated. Each chamber links to two others, forming the propylon circle.
|
|||||||||||||||||||||||||||||||||||||||||||||||||||||||||||||||||||||||||||||||||||||||||||||||||||||||||||||||||||||||||||||||||||||||||||||||||||||||||||
To transport to a specific stronghold, you must be carrying the correct propylon index. The indices are scattered across Vvardenfell, and often go unnoticed because they are so small. Chances are not very good that you will stumble across all ten on your own, but fortunately there is a list of index locations.
The need to carry all ten indices and to follow the propylon circle in order is eliminated by the Master Propylon Index. The master index is a direct link between Caldera and every propylon chamber. It was not part of the game originally, but Bethesda added it with an official plugin which can be downloaded here. The plugin has Folms Mirel send you on a quest to retrieve every index, being given the master index as a reward.
Propylon Chambers are found in these Dunmer strongholds:
- Andasreth
- Berandas
- Falasmaryon
- Falensarano
- Hlormaren
- Indoranyon
- Marandus
- Rotheran
- Telasero
- Valenvaryon
There is also an eleventh Propylon Chamber located in Kogoruhn, though it is now no longer functional.
Teleporting Items[edit]
There are additionally, a small number of items that will transport you to various locations when you put them on. They are as follows:
| Item | Found | Teleports to |
|---|---|---|
| Aundae Amulet | By completing the Aundae Vampire quests | Ashmelech (ceases to work once cured of vampirism) |
| Barilzar's Mazed BandTR | By completing the Tribunal Main Quest | Vivec, Mournhold Temple, or The Clockwork City |
| Berne Amulet | By completing the Berne Vampire quests | Galom Daeus (ceases to work once cured of vampirism) |
| Daedric Sanctuary Amulet | In a chest near Divayth Fyr in Tel Fyr | Magas Volar (can only be used once) |
| Quarra Amulet | By completing the Quarra Vampire quests | Druscashti (ceases to work once cured of vampirism) |
| Tel Fyr Amulet | On the corpse of Lord Dregas Volar in Magas Volar | Tel Fyr (cannot be used because of a bug) † |
† This bug is fixed by the Morrowind Patch Project.
Mournhold Teleport[edit]
Two other people who offer teleportation services are added by the Tribunal expansion. You must first have been attacked by assassins and spoken to Apelles Matius in Ebonheart in order to receive these services. After that, Asciene Rane will offer you free, instant transport to Mournhold when you ask her about Transport To Mournhold. Effe-Tei in the Royal Palace can transport you back.
Hiking[edit]
Even with the variety of fast transportation methods, one often has need to move by foot for part of their journey. There are many ways to help the pedestrian in Morrowind:
- Running diagonally is sqrt(2) times faster than running forward or strafing.
- Jumping is faster than running if your Acrobatics is equal to or greater than your Athletics, and with a Jump spell and its variations you can go even faster. However, this will drain your fatigue quickly and if you are unexpectedly attacked on your journey your ability to defend yourself will be limited. The solution to this is any enchanted item with its constant fatigue replenishment effect.
- Speed, Agility, Strength (which lowers your encumbrance), Acrobatics and Athletics all affect your speed.
- Spell Effects like Restore Fatigue, Fortify Fatigue, Feather (which lowers your encumbrance), as well as Fortify Attribute and Skill (for the previously mentioned stats) will magically enhance your speed.
- Spell Effects such as Levitate and Water Walking will help you cross difficult terrain.
- The Boots of Blinding Speed can be obtained through a simple quest and provide an incredible speed boost at the expense of a loss of vision.
- You can gain a hundred-point Levitate effect lasting an entire day by visiting the Shrine of Daring in Vivec and offering a potion of rising force; it is easily reached with Almsivi Intervention from anywhere near Vivec, while the potion can be purchased cheaply from the temple nearby. While this effect is active, you can cross the countryside far faster than with normal walking. Note that it will likely expire if you use silt striders or boats for transport, so the best way to take advantage of it is to Mark your current location, travel to Vivec through Intervention spells and the Mages Guild network, then Recall back to the location you want to fly out of. This combines particularly well with the Boots of Blinding Speed, since the high-speed, high-altitude flight lets you navigate using your map and makes it unnecessary to see normally.


